Introduction
This article will show you how to leverage the Silverlight Toolkit's ChildWindow class to implement snazzy looking Message and Confirm dialog boxes.
Although Silverlight already exposes a MessageBox (in the System.Windows namespace), it looks more Windows-like in appearance, and none of the flashy Silverlight 'shine' is present. Also, no Confirm dialog seems to natively exist. What this article will show you is how to implement these dialogs using the Silverlight Toolkit.
Background
When I first started using Silverlight (version 2.0), I was using the built-in MessageBox class to display various bits of information (such as operation success or failure) to the user. This was easy to use, and no extra work was required. However, the look-and-feel did not fit in with the rest of the Silverlight applications I was writing, and the MessageBox really looked more like, well, a Windows message box.
So I replaced this with a user control I wrote, which has a more Silverlight tone to it. Sure, it was a simple implementation, but it had more of a Silverlight ambience to it, and the world seemed a happier, brighter place.
Then, Microsoft released Silverlight 3.0, and a short while after that, I discovered the Silverlight 3.0 Toolkit (the July release, to be exact!). While browsing through what was available in the toolkit, I stumbled across the ChildWindow class. Very nice, I thought, and immediately it screamed "I would work well with a custom MessageBox / Confirm Dialog implementation"!
Using the Code
The attached solution comprises three projects - the Silverlight application demoing the Message Box (FortySixApplesMessageBox), a web application project that hosts the Silverlight application (FortySixApplesMessageBox.Web), and a Silverlight class library containing the Message Box / Confirm Dialog implementation code (FortySixApplesMessageBox.Common).
To run the demo, extract the archive to your local disk, make FortySixApplesMessageBox.Web the startup project, and FortySixApplesMessageBoxTestPage.aspx the startup page. Run the application, and click the "Show Confirm dialog" button to show an example of the dialog.
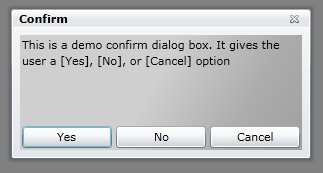
Below is an example of how to show a confirm dialog:
CreateButton.Click += (sender, args) =>
{
var messageBox = new MessageBoxPopUp();
messageBox.Show(
"Confirm",
"This is a demo confirm dialog box. " +
"It gives the user a [Yes], [No], or [Cancel] option",
Buttons.YesNoCancel);
};
which produces the following:
The MessageBox / Confirm Dialog Class
The dialogs have been defined in the FortySixApplesMessageBox.Common class library as the MessageBoxPopUp class.
The first thing to notice is that MessageBoxPopUp inherits from ChildWindow. As mentioned previously, this class is defined in the Silverlight Toolkit, and System.Windows.Controls should be referenced to obtain access to it. What the ChildWindow class provides is the pop up functionality and animation (using the Visual State Manager), as well as ensuring that the rest of the UI is disabled while the window / pop up is active.
OK, so now, we have the basic pop up functionality provided by the ChildWindow class. The next piece in the puzzle is to add Message Box-specific functionality. This includes a way of specifying what buttons the message box is to provide, and a means for the developer to pass in a title for the message box, as well as what message is to be displayed to the user.
The former is exposed as an enum called, wait for it, wait for it, yup, you guessed it - Buttons!
public enum Buttons
{
    Ok,
    YesNo,
    OkCancel,
    YesNoCancel
}
I've made provision for the developer to set certain visual characteristics in two places. Firstly, in the overloaded constructors, and secondly, in the overloaded Show() methods. The developer can specify a width, height, and opacity for the message box pop up. One thing to note here is if a height, width, and opacity is set in one of the message box constructors, and then different values in one of the overloaded Show() methods; the latter will override those set in the constructor.
An example of a constructor that initializes the message box pop up to a specified width and height, looks like this:
public MessageBoxPopUp(double width, double height, double opacity)
{
    InitializeComponent();
    Width = width;
    Height = height;
    Opacity = opacity;
}
To display the message box pop up to the user, the developer can call one of the overloaded Show() methods, as follows:
public void Show(string title, string message, Buttons buttons)
{
    generateButtons(buttons);
    Title = title;
    Message = message;
    Show();
}
What you may have noticed in the Show() method is I'm calling a method called generateButtons(). As the name implies, this method is used for creating the required buttons and laying them out appropriately as required by the specified Buttons enum parameter.
private void generateButtons(Buttons buttons)
{
    switch (buttons)
    {
        case Buttons.Ok:
        {
            createOkButton();
            createOkButtonGrid();
            break;
        }
        case Buttons.YesNo:
        {
            createYesAndNoButtons();
            createYesNoGrid();
            break;
        }
        case Buttons.OkCancel:
        {
            createOkAndCancelButtons();
            createOkCancelGrid();
            break;
        }
        case Buttons.YesNoCancel:
        {
            createYesAndNoAndCancelButtons();
            createYesNoCancelGrid();
            break;
        }
        default:
            throw new ArgumentOutOfRangeException("buttons");
    }
}
Each case statement initializes the required buttons, and creates ColumnDefinitions in a Grid for the button's layout. Below are some of the methods that are called during this process:
private void createYesAndNoButtons()
{
createYesButton();
createNoButton();
}
private void createYesButton()
{
if (_yesButton != null) return;
_yesButton = new Button
{
Content = "Yes",
Margin = new Thickness(2)
};
_yesButton.Click += (sender, args) => DialogResult = true;
}
private void createYesNoGrid()
{
resetAndClearGrid(ButtonsGrid);
addColumnDifinitionsToGrid(ButtonsGrid, 2);
addButtonToGrid(ButtonsGrid, _yesButton, 0);
addButtonToGrid(ButtonsGrid, _noButton, 1);
}
private static void addButtonToGrid(Panel grid, UIElement button, int columnIndex)
{
grid.Children.Add(button);
button.SetValue(Grid.ColumnProperty, columnIndex);
}
And there you have it - Message Box ala ChildWindow, compliments of the Silverlight Toolkit!
One last thing to mention, the message box result (whether [Yes], [No], [OK], or [Cancel] was clicked by the user) is stored in the ChildWindow class' DialogResult property, which is a nullable bool. This can be interpreted as follows:
messageBox.Closed += (s, e) => { var result = messageBox.DialogResult; };
History
This member has not yet provided a Biography. Assume it's interesting and varied, and probably something to do with programming.


 General
  News
News  Suggestion
  Question
  Bug
Bug  Answer
  Joke
Joke  Praise
  Rant
Rant  Admin
Admin 


