Introduction
There are many scenarios when we want to display the DataList items in different colors based on some predefined conditions. Also, there are many situations when we have a checkbox in every datalist item and we need to identify and act upon the check change event for any particular item. This article discuss the way this functionality can be implemented.
Background
Each item in a datalist is shown in a default style. The datalist control has the mechanism to display the items and alternate items with some style. There are scenarios when we need to specify some style for an item based on the contained data rather then simply item and alternate item style. This can easily be done by handling the ItemDataBound event. The other approach to do this is to parse all the items and the data and change the color of the item based on the data inside.
Another frequent problem is, handling the Item specific events for a datalist control. Example could be, if we have a checkbox in each item of datalist then how can we handle the check change event for every item independently. This can be done by handling the check change event in a single location i.e. a single event handler for all datalist items checkboxes and then acting upon this event by identifying the actual checkbox that id checked.
Using the code
Let us implement a small application that will display the items in separate colors based on some condition. Then we will find out what all items are checked by handling the checked change event for each item and then process the items that are checked.(For sake of simplicity we will simply push these items in a database table, in real world there could be some other action that needs to be taken with these items)
Let us start by creating the database table schema for this small demo application.
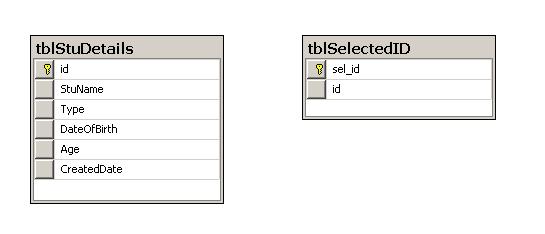
In the above picture there are two tables. TblStuDetails is the table whose data will be shown in the datalist. The deciding factor for the colors will be the TYPE filed of this table. The rules for showing the colors based on type are as follows:
| "F": | Blue |
| "A": | Green |
| "H": | Red |
| "G": | Yellow |
| "B": | Violet |
The second table tblSelectedID is the table in which we will insert the selected items ID. This table is more for the demo purpose to show how the checkbox events can work in unison with the post-backs.
Let us now see how we are binding the Datalist Items with the data that is pulled from the database.
private void fillDatalist()
{
    using (SqlConnection sqlConn = new SqlConnection(connString))
    {
        string strSQL = "SELECT [id],[StuName],[Type],convert(varchar,[DateOfBirth],103) as [DateOfBirth],[Age] FROM [tblStuDetails]";
        using (da = new SqlDataAdapter(strSQL, sqlConn))
        {
            if (sqlConn.State != ConnectionState.Open)
            {
                sqlConn.Open();
            }

            using (table = new DataTable())
            {
                da.Fill(table);

                if (table.Rows.Count > 0)
                {
                    DataList1.DataSource = table;
                    DataList1.DataBind();
                }
            }
        }
    }
}
Now the second task would be to identify the TYPE of item and the changing the color of this Datalist item.
private void UpdateColors()
{
    foreach (DataListItem item in DataList1.Items)
    {
        Label lbl = (Label)item.FindControl("Label1");
        switch (lbl.Text)
        {
            case "F":
                item.BackColor = System.Drawing.Color.Blue;
                break;
            case "A":
                item.BackColor = System.Drawing.Color.Green;
                break;
            case "H":
                item.BackColor = System.Drawing.Color.Red;
                break;
            case "G":
                item.BackColor = System.Drawing.Color.Yellow;
                break;
            case "B":
                item.BackColor = System.Drawing.Color.Violet;
                break;
        }
    }
}
Now we need to bind the datalist with the item on the first run but we need to keep the colors even after postback. to achieve this we need to call the UpdateColors functions on every postback whereas the Databind on the first load only.
protected void Page_Load(object sender, EventArgs e)
{
    if (!IsPostBack)
    {
        fillDatalist();
    }

    UpdateColors();
}
Now when we run the application, we can see the datalist items in separate colors i.e. the desired results.

Now the second objective of the article is to identify the independent checkbox check changes. This can be done by having a single function getting called on every checkbox's check_Changed event. In this event we will identify the item and take some action.
protected void CheckBox1_CheckedChanged(object sender, EventArgs e)
{
    StringBuilder sel = new StringBuilder();
    foreach (DataListItem li in DataList1.Items)
    {
        if (li.ItemType == ListItemType.Item || li.ItemType == ListItemType.AlternatingItem)
        {
            CheckBox cb = li.FindControl("CheckBox1") as CheckBox;
            if (cb != null)
            {
                if (cb.Checked)
                {
                    sel.Append(cb.Text + ",");
                }
            }
        }
    }

    lblSelected.Text = sel.ToString();
}
Note: The idea here is to keep all the selected items in a "," separated list and then when user chooses to submit we will push these in the DB. So let us see the code where we are pushing the selected data in the DB.
protected void Button1_Click(object sender, EventArgs e)
{
    string[] strSelected;
    string finalvalue = string.Empty;
    int recordsUpdated = 0;

    finalvalue = lblSelected.Text.Substring(0, lblSelected.Text.Length - 1);
    strSelected = finalvalue.Split(',');

    if (strSelected.Length > 0)
    {
        for (int i = 0; i < strSelected.Length; i++)
        {
            using (SqlConnection sqlConn = new SqlConnection(connString))
            {
                string strSQLInsert = "insert into tblSelectedID(id) values(@strSelected)";
                using (SqlCommand cmd =sqlConn.CreateCommand())
                {
                    cmd.CommandText = strSQLInsert;
                    cmd.CommandType = CommandType.Text;
                    cmd.Parameters.AddWithValue("@strSelected", strSelected[i].ToString());

                    if (sqlConn.State != ConnectionState.Open)
                    {
                        sqlConn.Open();
                    }
                    recordsUpdated += cmd.ExecuteNonQuery();
                }
            }
        }

        if (recordsUpdated > 0)
        {
            lblResult.Text = string.Format("{0} Records Saved Successfully", recordsUpdated);
        }
    }
}
and now when we run the application, select the checkboxes and hit Save button.
And so we now have a datalist that shows the custom style based on the data present in the Item and is capable of handling the checkbox change event for each item independently.
Point of Interest
The main reason for me to write this small article is the number of queries coming in the quick Answers section on CodeProject. Many developers are struggling to get this functionality working. I thought, I should provide a baseline article to explain how this can be done so that others can benefit from it.
History
13 August 2012: First version posted.
I am a Software Engineer from Bhopal. I started my Career from Programming in ASP and now working as a Web Developer in ASP.Net (C#). I Love coding and always ready to gain new thing and always been towards Microsoft Technologies. Apart from coding my other hobbies are traveling, Internet Surfing, spending time with family and hang out with friends.
http://www.webtekspace.blogspot.in/


 General
  News
News  Suggestion
  Question
  Bug
Bug  Answer
  Joke
Joke  Praise
  Rant
Rant  Admin
Admin 


