Introduction
Microsoft SharePoint is often used on company intranets with the goal of keeping information centralized and easily accessible to all relevant
parties. However, not only information needs to be centralized. Companies spend a huge amount of resources on IT to ensure that all computers are updated with
the latest versions of tools and software. Having a SharePoint server that provides software tools can alleviate the need for synchronizing all that software across systems.
Dynamic Web TWAIN is a web document processing SDK that can combine with SharePoint’s management
features to create the ultimate document management solution for your company.
Dynamsoft provides an ActiveX control for Dynamic Web TWAIN,
which can be accessed through the Internet Explorer browser naturally. Although
Microsoft SharePoint is most commonly accessed through Internet Explorer, when
other browsers are used Dynamic Web TWAIN can also be integrated through a
browser plug-in. The following article explains how Dynamic Web TWAIN can be
integrated into SharePoint as an object supporting both ActiveX and browser
plug-in methods.
Key Features
- Natural integration into SharePoint as a Web Part.
- Upload files directly to SharePoint Libraries after scanning and editing the images.
- ActiveX plug-in for Internet Explorer users.
- Browser plug-in which supports other browsers: Firefox, Chrome, Opera, Safari.
Procedure
There are two common methods used to insert custom code into SharePoint: by using “Edit HTML source” on a Page or Content Editor, or by
using custom Web Parts. While the first option is simple, it isn’t very modular and makes copying code messy and error prone. In this tutorial, we’re going to
focus on the second method: using a custom Web Part.
A Web Part is a modular “object” that can be inserted into any SharePoint page easily. It is created using an .ascx source file that
contains HTML, JavaScript, and/or .NET code. In our case, we have no need for any server side scripting, so we will just have HTML and JavaScript. We will
use Visual Studio 2010 with SharePoint development tools installed to create the Web Part.
Step 1. Deployment
For the purpose of this tutorial, we’re assuming that you already have an installation of Dynamic Web TWAIN on your computer, or have
downloaded a trial version. Go to your Dynamic Web TWAIN installation folder, and take a
look at the files prefixed with Dynamic inside. In our case, we’re using the trial version, and we have:
- DynamicWebTWAIN.cab: for 32-bit IE on Windows
- DynamicWebTWAINx64.cab: for 64-bit IE on Windows
- DynamicWebTwain.xpi: for Firefox on Windows
- DynamicWebTWAINMacEditionTrial.pkg: for Mac OS
- DynamicWebTWAINPlugIn.msi: for Chrome, Safari and Opera on Windows
These are the files required on the server side for Dynamic Web TWAIN. We’ll upload them to the SharePoint layouts folder so that they can
be accessed through the SharePoint server. Find your SharePoint LAYOUTS folder. Typically, this is located at: C:\Program Files\Common Files\Microsoft
Shared\Web Server Extensions\14\TEMPLATE\LAYOUTS.
Inside that folder, create a new folder called DynamicWebTWAIN or whatever you wish. Copy all the previously mentioned files
into this new folder. You are now ready to move on and create a Web Part to use these files.
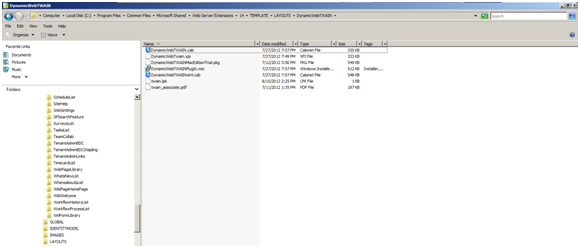
Note: In our example, we also include a .lpk license file, which you can generate if you have a license, and a
twain_associate.pdf file. The
twain_associate.pdf file is just a sample image to be loaded into TWAIN by our sample code.
Step 2. Load and upload images to your SharePoint Library
In Visual Studio create a new Web Part to contain Dynamic Web TWAIN. To do this, go to File -> New Project -> SharePoint -> 2010 -> Visual Web Part.

Visual Studio will ask some questions about your server setup, and then create a new .ascx file for you with a few headers. Below those headers, you will insert your HTML
and JavaScript code for integrating Dynamic Web TWAIN. Here, you may insert any code which you use for other web pages outside of SharePoint, and it should
work fine. For this tutorial I will demonstrate a simple implementation of Dynamic Web TWAIN, which will load an image and upload it into a SharePoint library.
WebTWAIN.HTTPDownload("dynamsharepoint", "/_layouts/DynamicWebTWAIN/twain_associate.pdf");
WebTWAIN.HTTPUploadThroughPut("dynamsharepoint", 0, "/TWAIN%20Uploads/twain_associate.pdf");
The DynamicWebTWAIN folder should be absolute paths, starting with the hostname of your SharePoint server.
In our case, that hostname is dynamsharepoint. The layouts folder is accessed using the _layouts virtual path.
if (ExplorerType() == "IE" && (navigator.userAgent.indexOf("Win64") == -1 || navigator.userAgent.indexOf("x64") == -1)) {
strObjectActiveX = "<object id='mainDynamicWebTwainIE' style='width: 300px; height: 300px;' " +
"codebase='http://dynamsharepoint/_layouts/DynamicWebTWAIN/DynamicWebTWAIN.cab#version=7,0' " +
"class='divcontrol'" + "classid='clsid:FFC6F181-A5CF-4ec4-A441-093D7134FBF2' viewastext> " +
strObjectActiveX;
var objDivx86 = document.getElementById("maindivIEx86");
objDivx86.style.display = "inline";
objDivx86.innerHTML = strObjectActiveX;
var obj = document.getElementById("maindivPlugin");
obj.style.display = "none";
WebTWAIN = document.getElementById("mainDynamicWebTwainIE");
}
Step 3. Test
Now that your Web Part has been created in Visual Studio, it’s time to test it through SharePoint. In the Visual Studio Debug menu, click
Start Debugging (or press F5 on your keyboard). This will begin to debugging process, and start your default browser. Once you are logged into SharePoint,
edit any Page. While editing the page, switch to the Insert tab under Editing Tools, and then click Web Part. (The Web Part button may take a few moments to
become available).
Once the Web Part dialog comes up, select Custom and select the Web Part you just created in Visual Studio. Lastly, click the add button on the right to add it to the page.
After adding the Web Part, save and view your Page. You should now have a functioning
WebTWAIN object on your page. If you do not see
it, be sure to check your JavaScript console to identify any errors in your code. If Dynamic Web TWAIN loaded successfully, there should be a
WebTWAIN object in the JavaScript console.
You may see in the above image that there is a “TWAIN Uploads” library. In our sample code, we uploaded the image to TWAIN uploads
through PUT. If you’re using the sample code, be sure to create a new library called TWAIN Uploads to allow for the upload. Once the folder has been
created, visit the WebTWAIN object page again, and the image should be uploaded into the folder as seen below.
Uploading scanned images directly to SharePoint allows for them to be tracked by SharePoint’s internal version control features. This kind
of integration is very powerful for document management.
Just like that, you’ve unlocked the features of Dynamic Web TWAIN within SharePoint. Now that everything is tested and working, you can think
about placing the Web Part onto your production Sharepoint server permanently. If you do not know how to proceed with this, you can view
Microsoft’s documentation on deploying Web Parts.
Conclusion
For companies that use Microsoft SharePoint for their intranets or websites, WebTWAIN is the perfect option to implement a
centralized document management tool. Using a web tool takes away from the need for installation and updating software across systems, which fits perfectly with Microsoft SharePoint.
Combining the powerful management features of Microsoft SharePoint with a document processing solution like Dynamic WebTWAIN results in a complete
document management solution that will keep your company organized. Scanned documents can be tracked through version control, protected through access
control, and viewed on your intranet. For more information about Dynamic WebTWAIN, visit the Dynamsoft website.
Download the Sample
To try out the integration with SharePoint, you can download the free trial of Dynamic Web TWAIN
here: Dynamic Web TWAIN 30-day Free Trial.


 General
  News
News  Suggestion
  Question
  Bug
Bug  Answer
  Joke
Joke  Praise
  Rant
Rant  Admin
Admin 


