Introduction
This article shows how to create a car game; the concept of this game is very popular and used in many games. To create a game with a realistic physical behavior we used box2d physical engine. The final code in this article can be implemented in your own complete game. This code was written in object oriented JavaScript used for cross-platform development called Moscrif, but box2d is ported to many other programming languages and its usage is very similar. Video with this project is available also on youtube.
Box2d engine
The box2d physical engine offers realistic physical simulation. It shows performance in many devices like Nintendo Wii, DS and several mobile phones (including Android and iPhone) as well as most major operating systems.
Box2d joints
All physical elements are created as box2d bodies, which interact in the box2d world and are connected together with joints. Many types of joints are supported: distance, friction, gear, mouse, prismatic, revolute, weld etc...
Every joint connects two bodies together and allows some type of movement. In this sample we use prismatic, revolute and mouse joints.
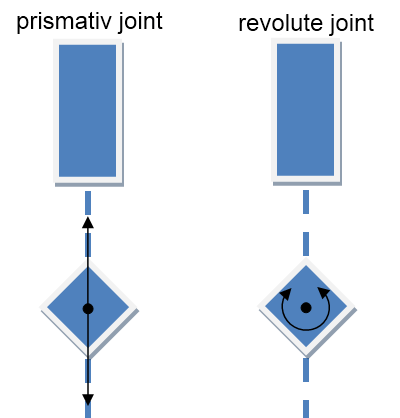
- The prismatic joint allows for relative translation of two bodies along a specified axis. Prismatic joint prevents relative rotation between the bodies.
- The revolute joint allows relative rotation of two bodies around an anchor point.
- Mouse joint is used only to connect the wheels and chassis to deny the contacts between these bodies.
Image: prismatic and revolute joint
Sometimes, it is unwanted to allow joint’s movement on the whole range. To restrict the joint movement we can use joint’s limit. Also, motor can be applied onto joints to drive the motion of the connected bodies according to the joint's degrees of freedom.
Car
Car consists of five bodies, the chassis, wheels, and dampers (suspensions). All bodies are partially dynamic which means that they interact with other static or dynamic bodies and are fully simulated – moves under forces and velocity. Dampers are only small bodies, which are not visible. They only provide connection between prismatic and revolute joint. The dampers move top-down by prismatic joint and wheels are connected onto dampers by revolute joint, which allows them to rotate around they center. The wheels are the part of the car which is in contact with the ground. Their friction (together with friction of the ground) affects the car adhesion.
In our sample all cars’ features are provided by Car class. The create function creates the new car.
Example: create all car’s bodies
function create(scene, x, y)
{
var damperHeight = 8*this._images.wheel.width * this._scale/10;
var wheelDistance = 7 * this._images.body.width*this._scale / 10;
this._body = scene.addPolygonBody(this._images.body, #dynamic, 0.1, 0.0, 0.0, this._images.body.width*this._scale, this._images.body.height*this._scale);
this._body.z = 2;
this._body.scale = this._scale;
this._body.setPosition(x, y);
this._frontDamper = scene.addPolygonBody(null, #dynamic, 10.0, 0.0, 0.0, 2, this._images.wheel.width / 2 * this._scale);
this._frontDamper.setPosition(x + wheelDistance / 2, y + damperHeight - this._images.wheel.width / 4 * this._scale);
this._frontWheel = scene.addCircleBody(this._images.wheel, #dynamic, 0.1, 0.4, 0.0, this._images.wheel.width / 2 * this._scale);
this._frontWheel.scale = this._scale;
this._frontWheel.setPosition(x + wheelDistance / 2, y + damperHeight);
this._backDamper = scene.addPolygonBody(null, #dynamic, 10.0, 0.0, 0.0, 2, this._images.wheel.width / 2 * this._scale);
this._backDamper.setPosition(x - wheelDistance / 2, y + damperHeight - this._images.wheel.width / 4 * this._scale);
this._backWheel = scene.addCircleBody(this._images.wheel, #dynamic, 0.1, 0.4, 0.0, this._images.wheel.width / 2 * this._scale);
this._backWheel.scale = this._scale;;
this._backWheel.setPosition(x - wheelDistance / 2, y + damperHeight);
... JOINTS ....
All bodies are connected together with joints. The dampers are connected with chassis by prismatic joint. Limit and motor are applied onto prismatic joint. The limits restrict the upper and lower joint transition. The upper transition is the lowest position of wheel with fully extended suspensions and lower transition represents opposite position.
Prismatic joint also uses motor to drive the vertical motion of suspensions. The motor’s maximum force is lower than force, which affects the wheel when they hit a barrier, but larger then gravity force onto one wheel, which causes that the wheel nicely passes all barriers.
The revolute joint is used to turn the wheels around the centre. There is motor applied onto revolute joint with sufficient force to move the car. The motor speed is later changed according to the user events.
Image: joints

Example: create joints
var jointDef = {
lowerTranslation : -3 * (damperHeight / scene.scale) / 10, upperTranslation : 0.0,
enableLimit : true,
enableMotor : true,
motorSpeed : 2.5,
maxMotorForce : this._body.getMass() * 8.5,
}
this._joints.push(scene.createPrismaticJoint(this._frontDamper, this._body, x + wheelDistance / 2, y, 0.0, 1.0, 0.0, jointDef, false));
this._joints.push(scene.createPrismaticJoint(this._backDamper, this._body, x - wheelDistance / 2, y, 0.0, 1.0, 0.0, jointDef, false));
jointDef = {
enableMotor : true, maxMotorTorque : 1500000, motorSpeed : 0.0, }
this._motorJoint = scene.createRevoluteJoint(this._frontDamper, this._frontWheel, x + wheelDistance / 2, y + damperHeight, jointDef, false);
this._motorJointB = scene.createRevoluteJoint(this._backDamper, this._backWheel, x - wheelDistance / 2, y + damperHeight, jointDef, false);
this._joints.push(this._motorJoint);
this._joints.push(this._motorJointB);
this._joints.push(scene.createMouseJoint(this._body, this._frontWheel, null, false));
this._joints.push(scene.createMouseJoint(this._body, this._backWheel, null, false));
}
The car can speed up or down by changing the speed of motor on revolute joint.
Example: speed up
function speedUp()
{
if (this._motorJoint.motorSpeed > -12*Math.PI) {
this._motorJoint.motorSpeed -= this._speedStep;
this._motorJointB.motorSpeed -= this._speedStep;
}
}
Scene
The car scene contains many small hurdles to show how suspensions work. The hurdles are small rectangles, which are randomly distributed on the whole scene. There are also three jumps in the scene. The scene, wherein car moves, is usually larger then device’s screen. It means that we need to scroll the scene horizontally or vertically. To scroll the scene we can scroll canvas onto which it is drawn. The canvas is scrolled in draw method.
Example: draw scene onto scrolled canvas
function draw(canvas)
{
canvas.drawRect(0, 0, System.width, System.height, this._bg);
canvas.save();
canvas.translate(this._translateX, this._translateY);
this._x += this._translateX;
this._translateX = 0;
super.draw(canvas);
canvas.restore();
}
The variable ._translateX and ._translateY are updated in process function which is called every about 25ms. This function checks current position of the car and updates the translate variables.
Example: update translate variabes
function process()
{
var (x, y) = this._car.getPosition();
if (true) {
this._translateX = -1*((x) - (4*System.width / 10));
this.menu.translateX = this._translateX;
}
if (y < 2*System.height / 10) {
this._translateY = -1*(y - 2*System.height / 10);
this.menu.translateY = this._translateY;
}
if (y > 8*System.height / 10) {
this._translateY = 1*(y - 8*System.height / 10);
this.menu.translateY = this._translateY;
}
this.step(1.0/40.0);
}
Improvements
This article is the first part, which shows how to make basic box2d car. The appearance can be better by using vector graphics instead of bitmaps. The vector graphics ensures smooth graphics onto all resolutions, because it preserves details also after resizing.
Summary
This article shows how to create a car truck game based on physical engine box2d. The result is a free game draft, which you can download for free and use in your projects. The box2d is ported to many programming languages like: C++, Java, Adobe Flash, C#, JavaScript etc. With these languages you can create this game but probably the best way how to create this game for three platforms with only one code is using Moscrif.
Author develops in various programming languages included: C++, Javascript, and PHP. Last year he creates mobile cross platform applications in Moscrif SDK.


