Let's say that you're one of the lead developers for your organization's Salesforce instance, and you're looking for ways to make your org better. Your org's users are quite tech-savvy, and you increasingly notice they bring iPads to meetings and use Android phones outside of work. You, yourself, have recently purchased an Android phone, so you log in to your Salesforce org from your mobile device to see what the experience is like. From an Android browser, you find it looks the same as a desktop browser. Being forced to zoom in to navigate and use your Visualforce apps is a bit inconvenient, but it works in a pinch. With more of your users carrying mobile devices, you have a good reason to gain new tech skills.
If you’re pretty well versed in web development, which is likely the case for many Visualforce developers, you’re already half-way down the path to mobile-optimized applications. The HTML5 movement is in full swing, and there are a number of mobile-optimized web frameworks that make it easy to leverage its features. One such mobile framework is jQuery Mobile, a framework for the long-term as it is backed by the jQuery Foundation and a community of contributing developers and plugin authors.
This article is about building Visualforce components that leverage mobile frameworks such as jQuery Mobile and make it easy to generate mobile apps that use Salesforce data. To get started, let’s do a quick run-through of jQuery Mobile to familiarize ourselves with it, as we’ll be using its terminology in this article.
Introducing jQuery Mobile Pages
Let’s take a look at a jQuery Mobile page from a high level. The framework heavily relies on tagging elements with the data-role attribute for block-level page layouts, specifying one of a variety of values. On page load, the jQuery Mobile framework searches the document for these elements and takes control of them, adding behavior and styles that brands it as a mobile app. For example, an element with a data-role value of page defines it as the most basic building block of a jQuery Mobile application -- a single mobile-optimized page. When the page is parsed, jQuery Mobile fills the screen with its contents, treating it as a single page in the mobile app.
<!-- Ex. jQuery Mobile Page -->
<div data-role="page">

  <h1>My Page</h1>
</div><!-- /page -->
There are other data-role attributes, which are designed to be used together to create a mobile app. A page section looks best when it has header section on top, a content section in the middle, and a footer section on the bottom. When elements with these data-role values are nested inside a page, the framework ensures that it looks as it should and that it looks consistent across devices. Besides nesting elements, you can combine app sections horizontally as well. If a page section has sibling page sections, jQuery Mobile displays only the first page section when loading the app, and removes the others from the DOM to keep it lean and responsive. Don’t worry, those pages are cached, and can be displayed by hash-linking to them by page id, complete with page load and transition animations.
<!-- Ex. jQuery Mobile Page 2 -->
<div data-role="page2">
  <div data-role="header">
    <h1>My Title</h1>
  </div><!-- /header -->

  <div data-role="content">
    <p>Hello world</p>
  </div><!-- /content -->
</div><!-- /page -->
Understanding Visualforce Mobile Components
jQuery Mobile has list views, navigation, and a variety of form inputs, which is perfect for displaying and entering data on a mobile device. Combine this with a data source, such as your Salesforce org, and you can quickly create mobile apps filled with meaningful and useful data. With this in mind, let’s take a look at the Mobile Components for Visualforce library. Mobile Components for Visualforce is an open source library that lets Visualforce developers easily use a mobile app framework, like jQuery Mobile, by providing easy-to-use components. At the time of this writing, the library is relatively new and doesn’t support every type of mobile view and widget, but it has a strong core that makes creating new components to fill these gaps pretty easy.
The following figure illustrates the Mobile Components for Visualforce architecture.
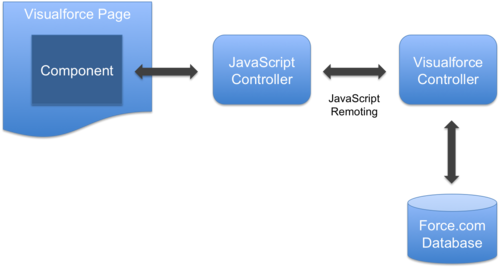
A Visualforce page contains a variety of components, including mobile components provided by Mobile Components for Visualforce. A mobile component relies on a JavaScript controller, a JavaScript Remoting bridge, and an Visualforce controller to interact with the Force.com database.
Building Custom Mobile Components for Visualforce
Now that you understand the architecture of Mobile Components for Visualforce, let’s make a new component so that you can see exactly how it’s done. When it was first open-sourced, the Mobile Components for Visualforce project consisted of only a handful of components, including a List, a Navigation, and a Detail component. However, the jQuery Mobile framework supports many other components, which means there is much room for growth in this project.
The following figure on the left shows an example of the List component that is already part of Mobile Components for Visualforce. But wouldn’t it be cool to show a list of your org’s users, complete with their profile pictures, such as in the following figure on the right?

jQuery Mobile has this type of list, called a Thumbnails List, which gives us a good head-start. In this article, we're going to walk through the code that builds such a component, both high-level in justifying the responsibility of each code snippet and low-level by showing and explaining implementation details. With such an approach, this guide is intended to be useful as an introduction and reference for readers who may wish to create other types of components.
Following Along
If you would like to have a working example to follow along:
- Create a new, free Developer Edition (DE) org.
- Install the example managed package to build everything related to a new ThumbnailsList component.
The package includes:
- a custom fork of the Mobile Components for Visualforce framework that includes some modified versions of provided components, such as Page
- the ThumbnailList component with a demo page named ThumbnailList
Reviewing the Custom Visualforce Mobile Component
The following code is the custom ThumbnailList component. If you installed the sample package in a DE org, you can find this code by clicking Setup > Develop > Components > ThumbnailList.
<apex:component controller="ThumbnailListController">

  <!-- Content -->
  <apex:attribute name="sObjectType" type="String" required="true" assignTo="{!config.sObjectType}" description=""/>

  <apex:attribute name="filter" type="String" required="false" assignTo="{!config.filter}" description="owner|recent|follower"/>

  <apex:attribute name="filterClause" type="String" required="false" assignTo="{!config.filterClause}"
description="SOQL WHERE clause to use to filter list records."/>

  <!-- UI -->
  <apex:attribute name="imageUrlField" type="String" required="true" assignTo="{!config.imageUrlField}" description=""/>

  <apex:attribute name="labelField" type="String" required="true" assignTo="{!config.labelField}" description=""/>
  <apex:attribute name="subLabelField" type="String" required="true" assignTo="{!config.subLabelField}" description=""/>

  <apex:attribute name="listItemStyleClass" type="String" assignTo="{!config.listItemStyleClass}" description=""/>
  <apex:attribute name="sortByField" type="String" required="true" assignTo="{!config.sortByField}" description=""/>

  <apex:attribute name="listDividerStyleClass" type="String" assignTo="{!config.listDividerStyleClass}" description=""/>
  <apex:attribute name="listDividerStyleClass" type="String" assignTo="{!config.listDividerStyleClass}" description=""/>

  <apex:attribute name="listFilter" type="Boolean" default="false" description=""/>
  <!-- Behaviour -->
  <apex:attribute name="nextPage" type="String" assignTo="{!config.nextPage}" description=""/>

  <apex:attribute name="jsCtlrName" type="String" assignTo="{!config.jsCtlrName}" default="$V.ThumbnailListController"
description="Custom JavaScript handler to manage client-side lifecycle and behavior."/>

  <apex:attribute name="debug" type="Boolean" assignTo="{!config.debug}" default="false" description=""/>

  <!-- VF/HTML -->

  <apex:includeScript value="{!URLFOR($Resource[ThumbnailListJS])}"/>
  <apex:includeScript value="{!URLFOR($Resource.ICanHaz)}"/>

  <apex:outputPanel layout="inline" id="list">

     <ul data-role="listview" data-filter="{!listFilter}"></ul>
  </apex:outputPanel>

  <script>$V.App.registerComponent('{!$Component.list}', {!configAsJson});</script>
</apex:component>
- Line 1: Notice that the component uses a custom Visualforce controller ThumbnailListController. We'll examine this controller soon.
- Lines 3-20: These are run-time parameters that the component accepts. When a Visualforce page utilizes this component, the component passes the associated attribute values to its Visualforce controller, which in turn passes them on to its JavaScript controller to reference. Note that the
assignTo parameters of each attribute reference the config object, which is defined on the Visualforce controller. We'll review both of these controllers in subsequent sections.
- Line 23: This line includes the custom JavaScript controller, which is stored in the database as a static resource. We'll review this controller soon.
- Line 24: The example Visualforce page in the next section includes a list item template that uses Mustache tags, which is a well-known logic-less template tool. Therefore, we'll need a JavaScript library that can parse the tags and fill the template with data. The Mustache-supporting template tool that we are using for this component is called ICanHaz, which is freely available as open source code. This line includes ICanHaz, which is also stored in our database as a static resource.
- Lines 26-28: A standard outputPanel to which the list items we generate will be appended.
- Line 30: All components must register with the framework before they can render on page requests, which is what this line is doing. For future discussions, note that this is where the JavaScript controller receives the
config object that is stored in the Visualforce controller. This config object is used by both Visualforce and JavaScript controllers, as it communicates essential information between them, such as the Visualforce controller's name, the root element of the list, and whether the mobile app is in debug mode and permits debug messages. This function parameter is expecting a JSON string, so there's a method in the Visualforce controller, getConfigAsJson, that serializes the config object into JSON.
Reviewing an Example Visualforce Page
Now let's review the sample Visualforce page that uses the new ThumbnailList component. If you installed the sample package in a DE org, you can find this code by clicking Setup > Develop > Pages > ThumbnailList.
<!-- ThumbnailList.page -->
<apex:page showHeader="false"  standardStylesheets="false" cache="false" doctype="html-5.0">

    <!-- Templates -->
    <script id="rowItemTempl" type="text/html">
      {{#records}}
      <li data-corners="false"
          data-shadow="false"

          data-iconshadow="true"
          data-wrapperels="div"
          data-icon="arrow-r"
          data-iconpos="right"
          data-theme="c"

          data-item-context="{{Id}}"
          class="ui-btn ui-btn-icon-right ui-li-has-arrow ui-li ui-li-has-thumb ui-btn-up-c">

        <div class="ui-btn-inner ui-li">
          <div class="ui-btn-text">

            <a href="http://www.codeproject.com/ThumbnailList#userDetail" class="ui-link-inherit">
              <img src="{{FullPhotoUrl}}" class="ui-li-thumb">
              <h3 class="ui-li-heading">{{Name}}</h3>

              <p class="ui-li-desc">{{Phone}}</p>
            </a>
          </div>
          <span class="ui-icon ui-icon-arrow-r ui-icon-shadow"> </span>

        </div>
      </li>
      {{/records}}
    </script>
<!-- Declare a new app, with one page. -->
<c:App debug="true">

    <c:Page name="list"
            theme="touch"
            debug="true">
        <c:Header >
            <h1 style="font-size: 20px; margin: 0px;">All Users</h1>

        </c:Header>
        <c:Content >
            <c:ThumbnailList sObjectType="User"
                    imageUrlField="FullPhotoUrl"
                    labelField="Name"

                    subLabelField="Phone"
                    sortByField="Name"
                    listFilter="true"
                    filter="recent"
                    debug="true"/>

        </c:Content>
    </c:Page>
</c:App>
<style>
    [data-role="panel"][data-id="main"] [data-role="page"].ui-page .ui-content {
        background: white;
    }
    .ui-body-touch, .ui-overlay-touch {
        font-family: Helvetica, Arial, sans-serif
    }
</style>

</apex:page>
First let's discuss the HTML template defined by the <script id="rowItemTempl"> tag, Lines 3-28. This template is an extension of the HTML for the example Thumbnail List on the jQuery Mobile site. At the beginning of this article, we described how jQuery Mobile reads elements that have specific properties. We need to use this array of properties on the li tags to ensure they are styled properly by jQuery Mobile when they are added to the page's DOM.
Also, notice that the rowItemTempl template uses Mustache tags - ({{records}}, {{Id}}, {{FullPhotoURL}}, and {{Phone}}) - as placeholders for field values to simplify the process of transforming JSON data into HTML elements. After parsing this template with ICanHaz (discussed previously), we can push JSON data into it, which we receive from our JavaScript Remoting requests to the Visualforce controller. This quickly and easily creates a list of li tags, each with data specific to each record retrieved, and each with particular attributes that jQuery Mobile can parse and handle. With this complete, we now have a complete way of getting Salesforce data and rendering it to the page such that it looks like native mobile app.
In the body of the page, review Lines 38-45. All that's necessary is a reference to the custom ThumbnailList component (discussed previously), providing values for each of the component's attributes.
Reviewing the JavaScript Controller
Next, let's review the JavaScript controller. Remember, one of the main functions of the JavaScript controller is to serve as a data bridge to the component's Visualforce controller, which we'll discuss in the next section. If you installed the sample package in a DE org, you can find this code by clicking Setup > Develop > Static Resources > ThumbnailListJS > view file.
(function($) {
$V.ThumbnailListController = $V.Component.extend({
init: function(config) {
this._super(config);
},
prepare: function() {
this._super();
},
render: function() {
this._super();
$.mobile.showPageLoadingMsg();
var serverRecords = this.requestRecords(this.requestRecordsHandler);
$.mobile.hidePageLoadingMsg();
},
requestRecords: function(responseHandler) {
var configProxy = {
sObjectType: this.config.sObjectType,
imageUrlField: this.config.imageUrlField,
labelField: this.config.labelField,
subLabelField: this.config.subLabelField,
sortByField: this.config.sortByField
};
$V.App.getFn(this.config.serverCtlrName).getRecordsForConfig(
this.config,
(function(that, fn) {
return function(result, event) {
fn.apply(that, arguments);
};
})(this, responseHandler)
);
},
requestRecordsHandler: function(result, event) {
$V.App.log.debug(this.config.serverCtlrName + '.getRecords response: ', result);
var model = {};
model.records = [];
for (var i = 0; i < result.length; i++) {
var record = result[i];
model.records.push(record);
}
$V.App.log.debug('Finished model: ', model);
var listItemsMarkup = ich.rowItemTempl(model, true);
$V.App.log.debug('Template result: ', listItemsMarkup);
$ul = this.$me.find('ul');
$ul.html(listItemsMarkup);
}
});
})(jQuery);
To fully understand this code, I suggest that you read the Mobile Components for Visualforce framework documentation. In it, we learn that if we want our component to be renderable by the framework, we need to create a new class that inherits from the framework’s $V.Component class. This is exactly what we're doing in the JavaScript controller.
Line 2 demonstrates the syntax to use when inheriting the framework's $V.Component class. How to implement this JavaScript controller, even though it is noted in the documentation, needs more clarification. When extending this framework class, we need to fulfill the implied contract, which is to implement the init, prepare, and render methods, and call the this._super() method before any of their implementation logic. You can see this in Lines 3-25.
Let's look deeper at the significance of these methods. Why are they necessary, and how should they be implemented? These methods are called from the framework, and the framework expects them to perform specific actions. The framework will call a component's init method when the object is first created, the prepare method right before rendering the component, and the render method when the user requests the component to be rendered. With a simple implementation like ours, we don’t need to do anything to setup this object, so we can leave the init method empty. For the same reason, we can also leave the prepare method empty. Our efforts are focused on the render method, in which we generate the list items by using the HTML template in our page (see previous section). This render method:
- Fetches records from the server by calling the JavaScript Remoting method in our Visualforce controller,
getRecordsForConfig. We'll take a look at this method in the next section.
- Handles the server response with the
requestRecordsHandler method, which translates the record data into HTML strings, using the rowItemTempl template, and appends it to the ul element in the DOM.
Reviewing the Visualforce Controller
Finally, let's explore what's happening in the Visualforce controller that supports the new ThumbnailList component. If you installed the sample package in a DE org, you can find this code by clicking Setup > Develop > Apex Classes > ThumbnailList.
public class ThumbnailListController {
public ThumbnailListConfig config {get; set;}
public virtual class ThumbnailListConfig {
public Boolean debug { get; set; }
public String elemId {get; set;}
public String sObjectType {get; set;}
public String imageUrlField {get; set;}
public String labelField {get; set;}
public String subLabelField {get; set;}
public String sortByField {get; set;}
public String filter { get; set; }
public String filterClause {get; set;}
public String listItemStyleClass { get; set; }
public String listDividerStyleClass { get; set; }
public String nextPage { get; set; }
public String serverCtlrName = 'ThumbnailListController';
public String jsCtlrName {get; set;}
}
public ThumbnailListController() {
this.config = new ThumbnailListConfig();
}
private final static String THUMBNAIL_LIST_JS = 'ThumbnailListJS';
public String getThumbnailListJS() {
return config.debug ? THUMBNAIL_LIST_JS : (THUMBNAIL_LIST_JS + 'Min');
}
@RemoteAction
public static List<Sobject> getRecordsForConfig(ThumbnailListConfig config) {
System.debug('--- config: ' + config);
Set<String> fieldsToQuerySet = new Set<String>();
fieldsToQuerySet.add(config.imageUrlField);
fieldsToQuerySet.add(config.labelField);
fieldsToQuerySet.add(config.subLabelField);
fieldsToQuerySet.add(config.sortByField);
List<Sobject> recordList = ThumbnailListController.getRecords(
config.sObjectType,
fieldsToQuerySet,
UserInfo.getUserId()
);
return recordList;
}
public static List<Sobject> getRecords(
String sObjectType,
Set<String> fieldsToQuerySet,
Id userId) {
List<Sobject> recordList = new List<Sobject>();
String queryString = ' ';
queryString += 'SELECT ';
for (String field : fieldsToQuerySet)
queryString += (field + ',');
queryString = queryString.subString(0, queryString.length()-1);
queryString += ' FROM ' + sObjectType;
queryString += ' WHERE ';
queryString += ' LastModifiedById = \'' + userId + '\'';
recordList = Database.query(queryString);
return recordList;
}
public virtual String getConfigAsJson() {
String configStr = JSON.serialize(this.config);
System.debug(configStr);
return configStr;
}
}
- Lines 3-27: These methods set up the
config object. Remember, both the JavaScript controller and Visualforce controller, discussed earlier, rely on the config object to communicate essential information back and forth.
- Lines 76-80: A method to serialize the
config object as JSON, meant to be passed to the $V.App.registerComponent method, in Line 30 of the component.
- Lines 29-32: A script include tag in the
ThumbnailList component itself (Line 23) relies on this getThumbnailListJS method to get the name of the JavaScript controller's file name. By allowing a method to supply the name of this file, we can inject logic that returns either the full source code version or a minified version. A minified version would be more suitable when deploying this code to production, since it is smaller filesize and a user can load the script faster.
- Lines 34-50: The
getRecordsForConfig method is the JavaScript Remoting method that links together the JavaScript and Visualforce controllers. When called by the JavaScript controller's requestRecords function, getRecordsForConfig does some setup and calls the getRecords method in the Visualforce controller to fetch and return the requested records.
- Lines 51-74: The
getRecords method in the Visualforce controller fetches and returns the requested records.
Wrapping Up
Let's see the fruits of our labor and open the example page that uses the component we just looked at. In your DE org, navigate to <pod>.salesforce.com/apex/ThumbnailList to see the demo page that uses the new component.
The complete implementation for this article is in my GitHub repository if you want to look, contribute, or fix my implementation.
What's next? A good idea for a complementing component is a Chatter view, which might present relevant Chatter fields for a specified user Id. This view might be seen when tapping an item in the thumbnail list we built in this article. I look forward to seeing what other components the community creates to help fill the gaps in the library. These components will help bring mobile app development to a wider audience, enabling the thousands of Visualforce developers out there to easily create mobile apps.
Related Resources
This member has not yet provided a Biography. Assume it's interesting and varied, and probably something to do with programming.


