Introduction
This is the second half of a tutorial on making Windows 8 apps. The goal is to learn how to use Visual Studio 2012, the Windows 8 APIs and the basic tools that they provides. The approach will be to make two simple apps from scratch. In the first part, we saw how to make a simple calculator and in the second part, we will make a note-taking app.
The goal
The tutorial will show you how to make the following :
The features are extremely basic - the reader will be free to extend the functionality of the app if he wishes.
Taking notes : Creating the interface
1) Again, create a new, blank project in File > New > Project ... > Templates > Visual C# > Windows Store > Blank App (XAML). Let's name it "LittleNotes".
2) First of all, the user will be taking more than one note. Rather than having only one note, we will want to have a container with many notes. An excellent control for this is the GridView. It can contain any kind of control and will automatically arrange all its content in addition to providing some fading animation when you add new controls in the container. Let's drag a Gridview into the interface editor of MainPage.xaml. Resize it so that it takes the entire screen. Name it NotesGrid.
3) To create new notes, let's drag a button from to Toolbox to the Gridview. Once you've released it inside the Gridview, it will automatically snap to the top-left of the container. Make sure that the button is indeed inside the Gridview - you can check that by looking at the XAML editor. Resize it to 250x125 and make the font bigger. Name it NewNoteBtn.

4) Double-click on NewNoteBtn to create the function that is called when NewNoteBtn is clicked.
private void NewNoteBtn_Click(object sender, RoutedEventArgs e)
{

}
5) Go back to your interface editor. We need a field where we can input text. As seen in Part I, the control for that is Textbox. Drag it to the editor but make sure this time that is is outside the GridView. In other words, the indentation level should be the same as the Gridview. If it's not, just copy-paste the tag <> of the Textbox in the XAML editor outside of the GridView.
6) Resize the Textbox so that it takes most of the screen. Make sure that the AcceptsReturn property is set to true, so that your notes can have more than one line. Name the Textbox Notepad.
7) It can be a little inconvenient to have different controls overlapping each other. Furthermore, the text editor should not be open by default. So you can hide Notepad by changing it's Visibility property to Collapsed either by typing it in the XAML editor or via the Properties pane on the right.
8) Now, what should happen when the user clicks on New Note? We should show the text editor (Notepad) and hide the menu (NotesGrid).
private void NewNoteBtn_Click(object sender, RoutedEventArgs e)
{
NotesGrid.Visibility = Visibility.Collapsed;
Notepad.Text = "";
Notepad.Visibility = Visibility.Visible;
} 9) You can run your app to test what we have so far.
10) Next we want to close the text editor (Notepad). There are many ways to do that. For instance, we could add a "Close" button that shows up at the same time as Notepad. What we're going to do instead is use a feature of Windows 8 called the App Bar. The App Bar is usually present in most apps and is accessed by right-clicking anywhere on an app or by swiping from the bottom edge of the screen on touch devices.
11) Add an App Bar to your interface via the XAML editor. You can copy it from the following code :
<Page
x:Class="LittleNotes.MainPage"
xmlns="http://schemas.microsoft.com/winfx/2006/xaml/presentation"
xmlns:x="http://schemas.microsoft.com/winfx/2006/xaml"
xmlns:local="using:LittleNotes"
xmlns:d="http://schemas.microsoft.com/expression/blend/2008"
xmlns:mc="http://schemas.openxmlformats.org/markup-compatibility/2006"
mc:Ignorable="d">
<Page.BottomAppBar>
<AppBar>
</AppBar>
</Page.BottomAppBar>
<Grid Background="{StaticResource ApplicationPageBackgroundThemeBrush}">
<GridView x:Name="NotesGrid" HorizontalAlignment="Left" Height="768" VerticalAlignment="Top" Width="1366">
<Button x:Name="NewNoteBtn" Content="New Note" Width="250" Height="125" FontSize="30" Click="NewNoteBtn_Click"/>
</GridView>
<TextBox x:Name="Notepad" Visibility="Collapsed" HorizontalAlignment="Left" Margin="32,32,0,0" TextWrapping="Wrap" Text="TextBox" VerticalAlignment="Top" Height="704" Width="1304" AcceptsReturn="True" />
</Grid>
</Page> 12) Now, when you place your cursor inside <AppBar> </AppBar> in the XAML editor, it will appear in the interface editor.
13) The AppBar itself is not useful, of course. It needs to have menu buttons inside it. Here, we will use an existing template for AppBar buttons. Add the following inside your AppBar :
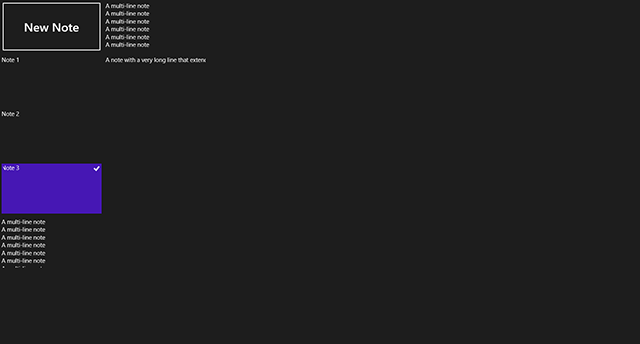
<Button Name="SaveClose" Style="{StaticResource AppBarButtonStyle}" Content="✔" AutomationProperties.Name="Save and Close" /> 14) You will get something that looks like the image below.
How does it work?
Style="{StaticResource AppBarButtonStyle}" sets the template that the button uses. If you wish to see what that template looks like, it can be found in Common/StandardStyles.xaml in the Solution Explorer.
Content="✔" sets the icon that goes inside the circle. By default, AppBarButtonStyle sets the font of the button to Segoe UI Symbol, which is one of those weird fonts with random symbols in it. x2714 is the hexadecimal code for that particular character. Windows come with the software "Character Map" (which you can search for by typing its name in the Start Menu) which allows you to get the hexadecimal code for various characters.
AutomationProperties.Name="Save and Close" simply determines what text goes under the button.
Taking notes : Using the notes
Now that we have the base of our interface setup, it is time to do some real coding.
15) Double-click on that button to create the Click function for that button. When that button is clicked, we want to go back to the menu, but not if we are in the menu already.
private void SaveClose_Click(object sender, RoutedEventArgs e)
{
if (Notepad.Visibility == Visibility.Visible)
{
Notepad.Visibility = Visibility.Collapsed;
NotesGrid.Visibility = Visibility.Visible;
}
}
16) That will only close the Notepad, not save the note. When we create a new note, we want it to appear in the NotesGrid. So we will create a Textblock directly inside the memory and add it to the NotesGrid, rather than via the interface editor as we have done previously.
private void SaveClose_Click(object sender, RoutedEventArgs e)
{
if (Notepad.Visibility == Visibility.Visible)
{
TextBlock block = new TextBlock();
block.Width = 250;
block.Height = 125;
block.Text = Notepad.Text;
NotesGrid.Items.Add(block);
Notepad.Visibility = Visibility.Collapsed;
NotesGrid.Visibility = Visibility.Visible;
}
} 17) Now, when you create new notes, a Textblock will appear under the button. If you create many of them, they will automatically arrange themselves in a new column eventually. Note that the text is automatically cut off. If you want to enabled text wrapping, simply write block.TextWrapping = true;
18) We've managed to save notes, but the user might want to edit them again. Every Textblock will need its own Click function, in that case. So we will write that function and assign to every newly created Textblock.
private void SaveClose_Click(object sender, RoutedEventArgs e)
{
if (Notepad.Visibility == Visibility.Visible)
{
TextBlock block = new TextBlock();
block.Width = 250;
block.Height = 125;
block.Text = Notepad.Text;
block.Tapped += block_Tapped;
NotesGrid.Items.Add(block);
Notepad.Visibility = Visibility.Collapsed;
NotesGrid.Visibility = Visibility.Visible;
}
}
private void block_Tapped(object sender, TappedRoutedEventArgs e)
{
TextBlock block = sender as TextBlock;
Notepad.Text = block.Text;
NotesGrid.Visibility = Visibility.Collapsed;
Notepad.Visibility = Visibility.Visible;
NotesGrid.Items.Remove(block);
} 19) The user might also want to delete some notes. We will add a button in the AppBar for that. However, the AppBar can only contain one control! So how do we add two or more buttons? We place them inside a container. StackPanel is very convenient for that purpose. Here, it will be easier to write it directly in the XAML editor.
<Page.BottomAppBar>
<AppBar>
<StackPanel Orientation="Horizontal">
<Button Name="SaveClose" Style="{StaticResource AppBarButtonStyle}" Content="✔" AutomationProperties.Name="Save and Close" Click="SaveClose_Click" />
<Button Name="Delete" Style="{StaticResource AppBarButtonStyle}" Content="" AutomationProperties.Name="Delete Selected" />
</StackPanel>
</AppBar>
</Page.BottomAppBar>
20) Double-click on the "Delete Selected" button to write the code for it. Here we simply go through every non-button selected element and remove it from the GridView.
private void Delete_Click(object sender, RoutedEventArgs e)
{
foreach (UIElement element in NotesGrid.SelectedItems)
{
if (element.GetType() != typeof(Button))
NotesGrid.Items.Remove(element);
}
} Taking notes : Sharing notes
I'm sure you've noticed by now : Windows 8 has this thing called the Charms bar, which you access by putting your cursor on the top-right corner of the screen. It's not just for show. Every app can make use of the Charms bar. The last thing we are going to do in this tutorial is use a feature called the Share Contract. Basically, it allows you to share content from your application (text in this case) to any other application that supports it.
21) To use the Share Contract, you need to call a library for that. At the top of MainPage.xaml.cs, add :
using Windows.ApplicationModel.DataTransfer;
22) We need to "tell" Windows 8 that our app supports sharing. So we will create a new function that is called when the user presses on Share in the Charms bar and we will attach it to Windows 8 when our app is first started.
public MainPage()
{
this.InitializeComponent();
DataTransferManager.GetForCurrentView().DataRequested += MainPage_DataRequested;
} 23) And we write the function that does the actual sharing.
void MainPage_DataRequested(DataTransferManager sender, DataRequestedEventArgs args)
{
if (Notepad.Visibility == Visibility.Visible)
{
DataPackage requestData = args.Request.Data;
requestData.Properties.Title = "My little note";
requestData.SetText(Notepad.Text);
}
} There's nothing much to explain there. It's only a matter of going through the documentation on the MSDN website and copying whatever their sample code. The same thing applies for most APIs, really.
24) Now you can share your text to other apps!
Going further...
In its current form, the interface for Little Notes is horrible. No one would download it. Can you make it look better?
Textblocks have an invisible background; they do not have an BackgroundColor property that you can change. Containers, however, do. Whenever you create a Textblock, can you put it inside a container, then put it inside Gridview?
How can you save your notes to your computer so that it also syncs across different devices?
What features can you add? Each note could display the time and date it was last modified.
If your screen resolution is larger than 1366x768, you might have noticed that NotesGrid does not automatically resize to your screen when you launch it. Can you fix that? The current size of your screen can be obtained with :
Window.Current.Bounds.Width
Window.Current.Bounds.Height
However, what happens if the user is running Little Notes on a tablet and rotates into portrait mode? You will need to adjust your interface accordingly.
Windows 8 an operating system for many different form factors. A good Window Store app will support mouse, keyboard, touch and stylus. It will support Snap View, landscape mode, portrait mode. It will support 13" laptops, 27" desktop monitors and 10" tablets with extremely high resolution. It's a lot of work to make a Windows 8 app! I spent countless hours on the internet looking at documentation and the design guidelines for all these things. But effort is worth it : you will be reaching millions of users.
Source code
Download LittleNotes.zip


 General
  News
News  Suggestion
  Question
  Bug
Bug  Answer
  Joke
Joke  Praise
  Rant
Rant  Admin
Admin 


