Table of Contents
In this article, we will look into 5 basic steps which will help us to run our first Azure program. In this article, we will understand how to create a simple web role application and while doing the same, we will understand some development concepts of Azure.
If you are looking to skyrocket your career in Azure then here are the wonderful videos by me dedicated for fresher and experienced
o let’s start with the 5 basic steps. By the way, when I wrote this article, it was 31st December, 10:30 evening, so Happy New Year and have a blast. Do not drink and drive, just drink, drink and sleep.
- Azure FAQ Part 1
- Simple 5 steps to run your first Azure program
- 7 simple steps to run your first Azure Queue program
- 9 simple steps to run your first Azure Table Program
- Simple 6 Steps to Run your First Azure Worker Role Program
Windows Azure works only on Windows 7, Windows Server 2008 and Windows Vista. It does not work on XP currently. So ensure you have one of the above mentioned operating systems. Developers who are on XP, please do not attempt it. I have tried heavily but there is no way currently to execute Azure on XP. There are a lot of hacks which are given online, believe me, none of them work.
From Visual Studio aspect, ensure you have VS 2008 or VS 2010.
Windows Azure SDK simulates Azure hosting environment in your PC, so that you can develop your applications locally and then upload them online. So the first step is to download the SDK.
Once you install Windows Azure, you should see two menus - one of the development fabric and the other of the development storage.
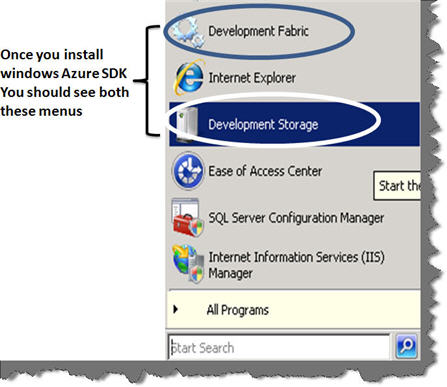
You can also see the fabric and storage running on your task bar.

If you click on the same, you should be able to see the fabric and storage as seen in the below figure:
We will need the cloud service Visual Studio template to speed up development in visual. So click on this link to download Windows Azure tools which will install the template in Visual Studio.
If Windows Azure tool is successfully installed, you should get the cloud service template as shown in the below figure:
Once you have the cloud service template in your Visual Studio environment, click on it and select the ‘Web role’ as shown in the below figure. There are two kinds of basic applications you can create on Azure - ‘Web role’ and ‘Worker role’. Web role is nothing but a web application while worker roles are background processing applications like Windows processes.
To keep it simple, we have currently selected ‘WebRole’.
Once you are done, you should get two projects as shown below. One project is the cloud service project and the other is your web application. Cloud service project has associations to web and worker role projects.
The cloud service has two files, ‘ServiceConfiguration.cscfg’ and ‘ServiceDefinition.csdef’.
The ‘ServiceDefinition.csdef’ file contains the metadata needed by the Windows Azure fabric as per your application needs. It will also contain configuration settings that apply to all instances.
The ‘ServiceConfiguration.cscfg’ file lets you set the values for the configuration settings and the number of instances to run for each role. So you can define some parameter called as ‘ConnectionString’ in your definition file and set the value in the configuration file.
In order to keep this simple, just run the project as it is. Your application will run as shown in the below browser and at the background fabric will create virtual instance in which your application runs. The below figure shows the virtual instance created by fabric to run your application.
In order to understand the power of Azure configuration, go to the service configuration file and change the instance to 2, you should see two instances of your web role running as shown below:
For further reading do watch the below interview preparation and step by step video series.


 General
  News
News  Suggestion
  Question
  Bug
Bug  Answer
  Joke
Joke  Praise
  Rant
Rant  Admin
Admin 


