Introduction
I'm interesting in incorporating the Android UI pattern called "Quick Action". Basically, it's a context menu that doesn't cover up the data that is being acted on. Implementiong this pattern might probably make your application more interactive and interesting. The QuickActions dialog is not included in standard Android SDK, so we have to create it manually.
Quick Action pattern in Android
Quick Action, who is he ?
Firstly, for you can picture this pattern easily, take a look how it works ? See at below picture:
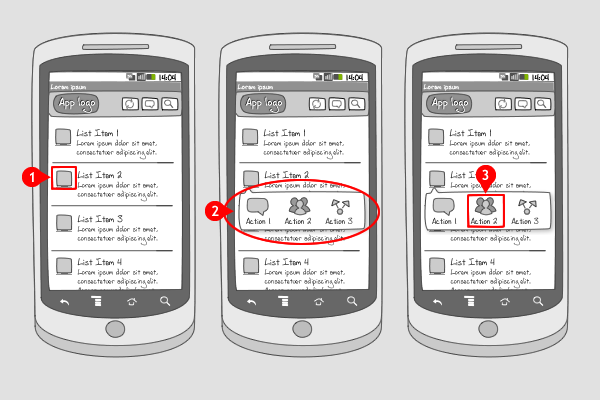
1 - The user taps a distinct visual target and…
2 - … a quick actions pop up is layered over the current screen containing the most important and obvious actions that can be performed.
3 - The user selects an action that will be executed directly, or after a confirming in a dialog.
The above 3 steps showing how Quick Action in Adroid looks like. In default Message application in Android, you can see the Quick Action is implemented. Tapping on icon in Message, you will see 3 option appear: Call, View contact and SMS.
Use when
A quick actions pop over can be used when you want to provide actions for items that have competing internal targets. It has to be triggered from a distinct visual target, so the user knows that there's something he can do with it. Make sure the pop over is not blocking the screen like a traditional dialog, but popping above or below the item. Only use the most important and obvious actions in the quick actions pop over. For other contextual actions you can choose to add a context menu.
Don't use quick actions when multiple selection is supported, like in Gmail. Use a button bar in that situation instead.
Some application that using Quick Action pattern.
Twitter
Official Twitter application for Android has introduced new Android UI features and behavior patterns such as Dashboard, Search Bar, QuickAction and Action Bar. One of the interesting pattern is QuickActions that displays contextual actions in a list view. This pattern actually already exists in QuickContact dialog/bar in default Contact application (since Android 2.0).

Samsung Galaxy S Contacts
Simple demo.
Now we will build a simple demo for Quick Action. Main activity contain an ImageView, and a Button. When user tap on these components, a popup will appear. It contains 3 options for user select.
The main activity
A pop-up appear when user tap on ImageView.
A pop-up appear when user tap on Button.
Now, let's explore some main points in code
Quick Action Item
We firstly must create an entity which will represent a particular item of out quick action. It will mainly contain an icon and a title (what is visible for the user). Besides this, the item will have an id (in order to recognize it when we want to listen on click events on it), and two states – sticky or not (i.e. after taping on the item the quick action will disappear or not).
It’s basically an object that holds the information for a particular item from the quick action.
Create a new class and name it QuickAction. The class has some routines should look like this:
public QuickAction(Context context) {
super(context);
inflater = (LayoutInflater) context
.getSystemService(Context.LAYOUT_INFLATER_SERVICE);
mTrackAnim = AnimationUtils.loadAnimation(context, R.anim.rail);
mTrackAnim.setInterpolator(new Interpolator() {
public float getInterpolation(float t) {
final float inner = (t * 1.55f) - 1.1f;
return 1.2f - inner * inner;
}
});
setRootViewId(R.layout.quickaction);
animStyle = ANIM_AUTO;
animateTrack = true;
mChildPos = 0;
}
public void show(View anchor) {
preShow();
int[] location = new int[2];
anchor.getLocationOnScreen(location);
Rect anchorRect = new Rect(location[0], location[1], location[0]
+ anchor.getWidth(), location[1] + anchor.getHeight());
mRootView.setLayoutParams(new LayoutParams(LayoutParams.WRAP_CONTENT,
LayoutParams.WRAP_CONTENT));
mRootView.measure(LayoutParams.WRAP_CONTENT, LayoutParams.WRAP_CONTENT);
int rootWidth = mRootView.getMeasuredWidth();
int rootHeight = mRootView.getMeasuredHeight();
int screenWidth = mWindowManager.getDefaultDisplay().getWidth();
int xPos = (screenWidth - rootWidth) / 2;
int yPos = anchorRect.top - rootHeight;
boolean onTop = true;
if (rootHeight > anchor.getTop()) {
yPos = anchorRect.bottom;
onTop = false;
}
showArrow(((onTop) ? R.id.arrow_down : R.id.arrow_up),
anchorRect.centerX());
setAnimationStyle(screenWidth, anchorRect.centerX(), onTop);
mWindow.showAtLocation(anchor, Gravity.NO_GRAVITY, xPos, yPos);
if (animateTrack)
mTrack.startAnimation(mTrackAnim);
}
Popup Window
Next, we must make a base class for our quick action implementation and for other types of quick actions you would want to implement. What this class does is basically create a floating window on the screen at certain coordinates. Its main component is the PopupWindow class from the Android framework .
Create a new class and name it PopupWindows. Your class has some routines should look like this:
public PopupWindows(Context context) {
mContext = context;
mWindow = new PopupWindow(context);
mWindow.setTouchInterceptor(new OnTouchListener() {
public boolean onTouch(View v, MotionEvent event) {
if (event.getAction() == MotionEvent.ACTION_OUTSIDE) {
mWindow.dismiss();
return true;
}
return false;
}
});
mWindowManager = (WindowManager) context.getSystemService(Context.WINDOW_SERVICE);
}
protected void preShow() {if (mRootView == null)
throw new IllegalStateException("setContentView was not called with a view to display.");
onShow();
if (mBackground == null)
mWindow.setBackgroundDrawable(new BitmapDrawable());
else
mWindow.setBackgroundDrawable(mBackground);
mWindow.setWidth(WindowManager.LayoutParams.WRAP_CONTENT);
mWindow.setHeight(WindowManager.LayoutParams.WRAP_CONTENT);
mWindow.setTouchable(true);
mWindow.setFocusable(true);
mWindow.setOutsideTouchable(true);
mWindow.setContentView(mRootView);
}
Quick Action
We must define a layout for our quick action and for a particular element from it – the quick action item.
Create a new xml in res/layout/ folder and name it quickaction.xml. This layout will be for quick actions that will have their elements arranged horizontally. Your layout should look like this:
In this layout, we will define how the pop up will appear.
<?xml version="1.0" encoding="utf-8"?>
<RelativeLayout xmlns:android="http://schemas.android.com/apk/res/android"
    android:layout_width="wrap_content"
    android:layout_height="wrap_content">

     <FrameLayout
        android:layout_marginTop="10dip"
        android:id="@+id/header2"
        android:layout_width="fill_parent"
        android:layout_height="wrap_content"
        android:background="@drawable/quickaction_top_frame"/>
       <ImageView
           android:id="@+id/arrow_up"
           android:layout_width="wrap_content"
           android:layout_height="wrap_content"
           android:contentDescription="@string/contentdesc4pic1"
           android:src="@drawable/quickaction_arrow_up" />

    <HorizontalScrollView
        android:id="@+id/scroll"
        android:layout_width="fill_parent"
        android:layout_height="wrap_content"
        android:fadingEdgeLength="0dip"
        android:layout_below="@id/header2"
        android:paddingLeft="1dip"
        android:background="@drawable/quickaction_slider_background"
        android:scrollbars="none">
        <LinearLayout
            android:id="@+id/tracks"
            android:layout_width="wrap_content"
            android:layout_height="wrap_content"
            android:paddingTop="4dip"
            android:paddingBottom="4dip"
            android:orientation="horizontal">

            <ImageView
                android:layout_width="wrap_content"
                android:layout_height="wrap_content"
                android:contentDescription="@string/contentdesc4pic1"
                android:src="@drawable/quickaction_slider_grip_left" />
            <ImageView
                android:layout_width="wrap_content"
                android:layout_height="wrap_content"
                android:contentDescription="@string/contentdesc4pic1"
                android:src="@drawable/quickaction_slider_grip_right" />

        </LinearLayout>

    </HorizontalScrollView>
    <FrameLayout
        android:id="@+id/footer"
        android:layout_width="fill_parent"
        android:layout_height="wrap_content"
        android:layout_below="@id/scroll"
        android:background="@drawable/quickaction_bottom_frame" />
    <ImageView
        android:id="@+id/arrow_down"
        android:layout_width="wrap_content"
        android:layout_height="wrap_content"
        android:layout_marginTop="-1dip"
        android:layout_below="@id/footer"
        android:contentDescription="@string/contentdesc4pic1"
        android:src="@drawable/quickaction_arrow_down" />
</RelativeLayout>
Now, at the main activity that you'd like pop-up appear, add something like this:
Note that, if you want to implement this pattern in your application, just copy all resources related in the source code that I provided at the first line of this article. It looks like in Java application, you just import some packages that you need into your project. So, you might probably dont focus on so much the content of those packages ( or libraries ).
In assumption, MainActivity is the activity that you will implement Quick Action in there, so just add some code like this:
package vn.com.enclaveit.phatbeo.quickaction;
import android.app.Activity;
import android.os.Bundle;
import android.view.Menu;
import android.view.View;
import android.view.View.OnClickListener;
import android.widget.ImageView;
import android.widget.Button;
import android.widget.Toast;
public class MainActivity extends Activity {
@Override
public void onCreate(Bundle savedInstanceState) {
super.onCreate(savedInstanceState);
setContentView(R.layout.main);
ActionItem addAction = new ActionItem();
addAction.setTitle("Phone");
addAction.setIcon(getResources().getDrawable(R.drawable.phone));
ActionItem accAction = new ActionItem();
accAction.setTitle("Gmail");
accAction.setIcon(getResources().getDrawable(R.drawable.gmail));
ActionItem upAction = new ActionItem();
upAction.setTitle("Talk");
upAction.setIcon(getResources().getDrawable(R.drawable.talk));
final QuickAction mQuickAction = new QuickAction(this);
mQuickAction.addActionItem(addAction);
mQuickAction.addActionItem(accAction);
mQuickAction.addActionItem(upAction);
mQuickAction.setOnActionItemClickListener(new QuickAction.OnActionItemClickListener() {
public void onItemClick(int pos) {
if (pos == 0) {
Toast.makeText(MainActivity.this,
"PHONE item selected",Toast.LENGTH_SHORT).show();
} else if (pos == 1) {
Toast.makeText(MainActivity.this,
"GMAIL item selected",Toast.LENGTH_SHORT).show();
} else if (pos == 2) {
Toast.makeText(MainActivity.this, "TALK selected",Toast.LENGTH_SHORT).show();
}
}
});
ImageView ivPic1 = (ImageView) this.findViewById(R.id.ivPic1);
ivPic1.setOnClickListener(new OnClickListener() {
public void onClick(View v) {
mQuickAction.show(v);
mQuickAction.setAnimStyle(QuickAction.ANIM_GROW_FROM_CENTER);
}
});
Button btClickMe = (Button) this.findViewById(R.id.button1);
btClickMe.setOnClickListener(new OnClickListener() {
public void onClick(View v) {
mQuickAction.show(v);
mQuickAction.setAnimStyle(QuickAction.ANIM_GROW_FROM_CENTER);
}
});
}
@Override
public boolean onCreateOptionsMenu(Menu menu) {
getMenuInflater().inflate(R.menu.main, menu);
return true;
}
}
Points of Interest
+ Learn an awesome pattern in Android : Quick Action.
+ Learn how to write an interactive article/tut.
Reference
+ http://www.androidpatterns.com/uap_pattern/quick-actions
History
First release on Jan 04, 2012.


 General
  News
News  Suggestion
  Question
  Bug
Bug  Answer
  Joke
Joke  Praise
  Rant
Rant  Admin
Admin 


