Picture: 1
Introduction
There are several ways Visual Studio manages inserting of defined code in projects. Code snippets are one of it. A lot of functions in
the MS IDE and other extensions are written with snippets. Having commands or “pages” of tested code at the fingertips, respectively accessible by pressing a
few keys, is a fabulous thing. Auto-complete in Visual Studio is a great example and works with snippets. Snippet files (*.snippet) often contain several
snippets in form of a container.
The Code Snippet Composer offers the user the whole facility of generating snippets without having to get bothered about the syntax of the
snippet itself. Typing mistakes in the syntax of a snippet result in the rejection of Visual Studio to accept the snippet file and hence the snippets
are not available. The search for errors in the snippet starts all over again. The Code Snippet Composer itself deals with the syntax of the snippet, and the
user can fully focus on the programming code. Where HTML syntax is used can be found in <Declarations>. The declaration syntax is generated by the
composer so the user has only to add the desired text.
The Code Snippet Composer finds the installed version(s) of Visual Studio by itself and offers in addition access to the user snippet
folder. This folder can be declared in the configuration file but that is not mandatory.
A whole variety of facilities are offered in the code editors
as code complete, bookmarks, syntax highlighting and several actions found in
the context menus pending on which editor is in use. The already defined words
are shown in the auto complete list. Additional words for code complete can be added
in the configuration file. That keeps code completion flexible over time. Copy
the configuration file on to a new PC and all your commands are available. No
reentering needed. Copy the Snippet files over, import them in Visual Studio and
use them right away.
The Code Snippet Composer was written as an external tool,
thus is not Visual Studio version dependent and does not load up the IDE or the
Windows registry additionally. It can be installed under IDE in the Tools menu
and be copied in any directory on the hard disk.
Currently the composer is written for C# snippets.
The cost? Well use it, it has no serial number!
The Code Snippet Composer was written for wide screens, 20.5”
will be ideal. Closing the folder view will reduce the width, thus makes some
more space for smaller screens.
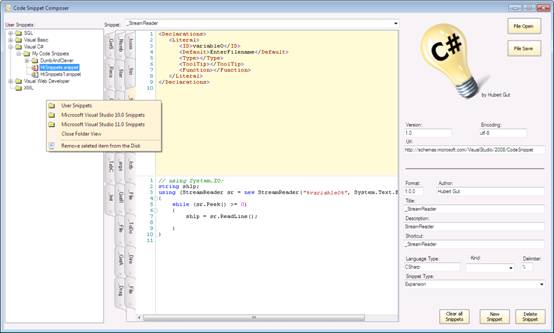
The Code Snippet Composer in action shows several areas
(Picture: 1):
- The folder view: Snippet folders are shown and include installed Visual Studio versions.
- The snippets area: Shows an opened snippet container with a snippet declaration.
- The snippet header: On the right side with mandatory and optional fields.
- Buttons: For saving, opening, deleting and creating snippets.
In the picture 1, the HTML tag’s where auto generated by the Snippet Composer.
Managing snippet files

Picture: 2
Where are the Visual Studio Snippet main folders located?
For Visual Studio 2010 to 2012:
C:\Program Files\Microsoft Visual Studio (version)\VC#\Snippets
C:\Program Files\Microsoft Visual Studio (version)\\VB\Snippets
C:\Program Files\Microsoft Visual Studio (version)\\Web\Snippets
C:\Program Files\Microsoft Visual Studio (version)\\Xml\1033\Snippets
For Visual Studio 2012 additionally:
C:\Program Files\Microsoft Visual Studio 11.0\VC\Snippets
C:\Program Files\Microsoft Visual Studio 11.0\JavaScript\Snippets
-The installation of Visual Studio 2012 overwrites the installation of Visual 2011 but creates or renames the version 2011 folder to a Visual Studio 2012 snippet user folder.
For Visual Studio Extensions additionally:
C:\Program Files\Microsoft Visual Studio (version)\
     Common7\IDE\Extensions\Microsoft\SQLEditor\Snippets
For the user folder
C:\Users\ht\Documents\Visual Studio (version)\Code Snippets
All snippet files from a folder are read into Visual Studio
when Snippets are imported. Visual Studio allows multiple snippets having the identical
names. So files copied in these folders as a backup, e.g., (xxx.snippet) must be
renamed to e.g., (xxx.txt). Otherwise the snippets show double or multiple in
Visual Studio and contribute to the confusion of the programmer. Snippet files
are loaded newly into Visual Studio at every startup, so Snippet files can be
edited whilst Visual Studio is not running.
Opening, closing and deleting of a snippet file or folder:
In the folder view:
Double click on a snippet file or right click to choose a different folder from the context menu. The context menu shows the
snippet folders from the Visual Studio version(s) installed. The title
above the folder view hints which folder is displayed. In case this
reads User Snippets, the folder will be the standard user folder in “C:\Users\(User)\Documents\Visual Studio 2010\Code Snippets” or, if defined, the specified folder in the
configuration.
With buttons:
A standard file opening dialog will be shown to open a snippet file in a different
folder. Click the save button to save any opened snippet or snippet container.
Deleting a Snippet or Snippet
folder removes the item permanent from the drive! This can be invoked over the
menu or by pressing the DEL key.
The folder view can be closed in the context menu of the
folder view. To reopen it, right click on the main form which will show its
context menu. This is also the menu to open the configuration editor.
Picture: 3
The Snippet Header:
Picture: 4
This is located on the right side of the snippet editors.
Mandatory fields are: Version, Encoding, Help URL, Format, Title, Shortcut and Language
type.
The snippet type is mandatory only if the snippet is a
surrounding or refactory snippet. These fields, except the title, are auto
generated by the composer or read from the snippet file.
Hint: Using a leading underscore in the title allows elegant
distinguishing between Visual Studio and own snippets during the auto complete
process as they are grouped at the start of the list.
Author and description are extra snippet information.
The shortcut is invoked when in the Visual Studio code
editor the shortcut text is typed in followed by pressing the tab key which
executes the snippet code. When code completion is enabled in Visual Studio
then the shortcut text also appears in the completion list.
Delimiter is the surrounding character for variables used in
the program code editor. E.g. %variable1%. Typing Shift + Ctrl + % in the code
editor inserts a variable statement.
The Snippet Code Editor:
Picture: 5
A snippet container was opened and the first snippet taken
into a fully featured code container. Two bookmarks where set and the context menu
activated. All this took 5 mouse clicks only! One more click and a full snippet
including declarations is created.
Tip: If at any place in the code editor a “%” is pressed, an
automatic variable and in declarations a new literal will be inserted. If no
HTML editor is open one will be created.
Insert Literal Body / Object Body:
This will open a HTML editor above the code editor and
insert the body into the editor.
Picture: 6
The HTML editor supports syntax, bookmarks, highlighting and
code complete. Shortcuts as Ctrl + [ and Ctrl + ] are disabled in the HTML code
editor. Additional tags can be entered in the configuration. This should not be
necessary as snippets are edited but who knows.
Special attention was given to the code editors.
Here a list of
shortcuts for the code editor, available by pressing F1.
Picture: 7
The Configuration Editor:
Picture: 8
The configuration is dealt with as it would be a snippet. It
is highly case sensitive. Syntax highlighting and code complete are disabled as
the configuration file is a plain ASCII file (config.txt) in the program
folder. If this file is missing, run the Code Snippet Composer and it will be
generated.
Each line starting with an asterisk or a blank line is a remark
line. Blank lines also serve as delimiter for a definition.
Start page:
If the following line is empty then
the snippet folder “C:\Users\(User)\Documents\Visual Studio 2010\Code Snippets” is
used.
Leave an empty line after any
declaration as delimiter.
HTML tags:
As the Code Snippet Composer deals with snippets only, these tags are already defined internally and the definition can be left empty. If tag’s are entered then
they need to be put each on one line.
END HTML tags:
Is the delimiter for the HTML definition
and is mandatory.
C# elements:
Represents a group of 4 different (Snippets, DeclarationSnippets, Methods, Keywords) definitions. See (Predefined words for the code editors);
END C# elements: Is a mandatory entry on the last line of
all declarations.
Record and Replay
The Code Snippet Composer contains a record and replay
functionality. The recorder function is activated in the configuration file if
a line contains the word “Trace:”. This function captures the activities in the
composer directly and does not hook Windows in any way. This is useful if a
crash did happen. The Code Snippet Composer realizes when an abnormal
termination occurred and asks if a replay shall be executed on the next
startup. Keystrokes are not recorded. Thus minimal loss can occur as if changes
in the last edited code have not been saved. Playback runs at full speed, so it
might cause a bit a flashing screen activity.
Exit Menu:
The Code Snippet Composer does not know of any standard menu
nor is there a serial number, a registration, a help or help file etc. It is a straight
to the job mentality. It is written for programmers, for outmost speed and
comfort. What shows is the editor help box width the editor commands upon clicking
the main form. Only the absolute necessary is put on the form and this is
facilitated.
That is the exit button!
Picture: 9
You will find it in the upper right corner of the
application! Right? Of course, in case you did not save the file yet, you will get
a reminder.
Predefined internal words for the code editors.
Html Tags:
"<Declarations>",
"</Declarations>", "<Literal>", "</Literal>",
"<ID>", "</ID>",
"<ToolTip>", "</ToolTip>", "<Default>",
"</Default>", "<Function>", "</Function>",
"<Literal Editable=”false”>", "<Literal Editable=”true”>", "<ID></ID>", "ToolTip></ToolTip>", "<Default></Default>", "<Function></Function>"
Keywords:
"abstract",
"as", "base",
"bool", "break",
"byte", "case",
"catch", "char",
"checked", "class", "const",
"continue", "decimal", "default",
"delegate", "do", "double",
"else", "enum",
"event", "explicit",
"extern", "false",
"finally", "fixed", "float",
"for", "foreach",
"goto", "if",
"implicit", "in", "int",
"interface", "internal", "is",
"lock", "long",
"namespace", "new", "null",
"object", "operator",
"out", "override",
"params", "private",
"protected",public", "readonly",
"ref", "return",
"sbyte", "sealed",
"short", "sizeof",
"stackalloc", "static", "string",
"struct", "switch",
"this", "throw",
"true", "try",
"typeof", "uint",
"ulong", "unchecked",
"unsafe", "ushort",
"using", "virtual",
"void", "volatile",
"while", "add",
"alias", "ascending",
"descending", "dynamic", "from",
"get", "global",
"group", "into",
"join", "let",
"orderby", "partial", "remove",
"select", "set",
"value", "var",
"where", "yield"
Methods:
"Equals()",
"GetHashCode()", "GetType()", "ToString()"
Snippets:
"if(^)\n{\n;\n}",
"if(^)\n{\n;\n}\nelse\n{\n;\n}", "for(^;;)\n{\n;\n}", "while(^)\n{\n;\n}", "do${\n^;\n}while();", "switch(^)\n{\ncase : break;\n}"
DeclarationSnippets:
"public
class ^\n{\n}", "private class
^\n{\n}", "internal class
^\n{\n}", "public struct
^\n{\n;\n}", "private struct
^\n{\n;\n}", "internal struct
^\n{\n;\n}", "public void
()\n{\n;\n}", "private void
^()\n{\n;\n}", "internal void
^()\n{\n;\n}", "protected void
^()\n{\n;\n}","public ^{ get; set;
}", "private ^{ get; set; }",
"internal ^{ get; set; }", "protected ^{ get; set;
Localization:
The Snippet Composer GUI is available in English only.
Programmers have no trouble with that.
Other:
Getting the snippets into Visual Studio? In the IDE select
the menu Tools, Code Snippet Manager, or hit Ctrl +K Ctrl + B. Then click on
Import and find your snippet file. The next step is selecting the category to
put the snippet into. Or restart Visual Studio. Should this fail, there is
still an error in the snippet file. Test the snippets now and modify them as desired.
Contributors
Liability
There is absolute no warranty what so ever implied or assumed. Use it at your own risk. It does a marvelous job for the author.
Trademarks
Copyrights and Trademarks shall belong to their respective owners. I am not going to fight over that!
References:
- Farsi (Pavеl Tоrgаshоv) tp_soft[at]mail.ru
- Visual Studio® 2010 and .NET 4 six in one www.wiley.com
- Visual Studio Help (F1 in the IDE)
Special thanks:
Thanks to Farsi (Pavеl Tоrgаshоv) which provided the (skeleton for a useful) code editor and my gal’s allowing me plenty of time to code.
Motto: It’s not the developer’s duty to pay up for the engineer’s ignorance.
Grew up in a metal processing company and did industrial HW/SW development since the birth of Intel’s 8080. Lectured IT since 1986 at several levels. Hobbies, sidesteps: Woodworking and deep sea diving. Background: ASM, C, C++. Platforms: Win, Novel, CP/M, MP/M, DOS, (Linux).
It’s not the developer’s duty to pay up for the engineer’s ignorance.


 General
  News
News  Suggestion
  Question
  Bug
Bug  Answer
  Joke
Joke  Praise
  Rant
Rant  Admin
Admin 


