Introduction
SSO stands for Single Sign-On, a property of access control in independent software systems. With SSO, the user logs in once and then has access to all the systems which are configured to support it. One of the areas where SSO might be handy is the case when the client application accesses a number of secure service providers. In order to establish such an SSO-enabled environment, all the participants of the infrastructure (identity/service providers and client applications) should know how to interoperate between each other, using the SSO technique.
This article, based on a research performed in that area, describes ways on how to create Axis Web Services with advanced security control policies, and how to write Flex client applications which can access and authorize on these services using the power of SSO.
All the examples referenced in this article, along with their full source code, are available inside the zip archives attached to this article. To minimize the size of the article, some configuration related information was moved from the article to the Appendix.rtf document, which is available in the root of the archives.
Model an interaction
Our model infrastructure will be represented with a number of Web Services which all interact with the same identity provider. After the client successfully logs into the identity provider, it is able to use any of the services which are connected to that identity provider, without the need to log in on each of the services individually.
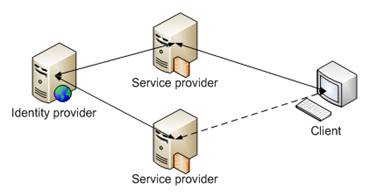
To setup the infrastructure, we will define the concrete technologies to use. Sun OpenSSO will act as an identity provider. Service providers will be written using Apache Axis2 for Java. All the services mentioned above will operate on an Apache Tomcat server. The client application will be written using Flex technology.

Now, we need to define a way for how our client, the service provider, and the identity provider will interact (authorize and retrieve data) between each other. One of the possible workflows may be as follows:
- The unauthorized client calls the Web Service provider.
- Web Service checks the identity provider security token (the object which holds the information about the logged user) to be available in a client request. Since there is no token there, the service sends the "need to login" message to the client.
- The client receives a "need to login" message, displays the login dialog for the user, and then calls the identity provider directly with the user supplied credentials.
- If such a user is registered on the identity provider, it will create a security token for that user and sends this token back to the client application.
- When a client application receives the security token, it retries the request to the Web Service (with the token included in the request).
- The Web Service in turn passes the received token to the identity provider.
- By using a supplied token, the identity provider checks which user this token belongs, gets the set of Roles which are assigned to that user, and sends that set of Roles to the Web Service.
- The Web Service, based to its own Role to functions mappings, decides if it should allow or disallow that Role to access the requested functionality. If the user receives a green light, the data requested by the client is sent back to it. An appropriate error message is sent back otherwise.
Prepare the environment
We need to have a prepared environment to go on. For simplicity, we will use a single Tomcat installation on which the identity provider and the service providers are running and from where the Flex client application is executed. In the real world, these applications may be located on different machines, and for such configurations, some additional tasks should be performed (take a look at OpenSSO Identity Services Configuration and Flash security policy configuration in the Appendix, for details).
First, we need to have up and running Sun OpenSSO (identity services) and Apache Axis2 (Apache SOAP implementation), both deployed on a Tomcat server (consult OpenSSO and Axis2 Installation, which is presented in the Appendix).
Our example Web Services use the number of roles which should be then granted to identity provider users. If you are not familiar with the roles administration, look at Creating users and groups in the OpenSSO in the Appendix. The Roles, which should be created inside the OpenSSO administration for the example Web Services to work, are as follows:
- mathematician
- summator
- multiplier
- divider
- increaser
- decreaser
- editor
- upper
- lower
Secure Axis2 services
The first thing we need to do is to establish communication between the OpenSSO identity provider and the Axis service. To make it an easy thing, we write a special service-side library. Details on installing this library are presented in Custom SSO library installation instructions in the Appendix. With the help of the library (look at by.intexsoft.ws.sso.OpenSSOServiceInteractor), we will get, from the identity provider, the list of SSO roles which are assigned to the currently logged user.
As soon as we have the identity provider roles list, we can define the security settings for our service methods.
One way to protect the service methods is to add parts of code in each of the methods which will validate the availability of a specific Role in the profile of a currently logged user.
We decided to simplify this functionality and to extend it by introducing permissions. We define permissions as special purpose service-side security entities, which make it possible to have a more flexible control over security directly on a Web Service. Permissions are assigned to Roles (one Role can have a number of permissions assigned to it).
When the security check for the method invocation is performed, the system finds the Role which belongs to the permission defined on a method, and if that role is granted to the currently logged user, the method is invoked. So, the permissions will give us the possibility to provide a more granular control over security, than the SSO Roles do, and minimize the need to manage Roles on the identity provider when a new service is introduced.
In our implementation, the mappings between identity provider roles and services permissions are managed using a simple property file which is located in webapps/axis2/WEB-INF/lib/sso.jar/config/PermissionChecker_mapping.properties. This file contains the key-value pairs of role names as a key, and a comma separated list of permission names which belong to that role as values. The following Role-to-Permission mappings are defined by default:
| add | subtract | multiply | divide | upper | lower |
| Mathematician | X | X | X | X | | |
| Summator | X | X | | | | |
| Multiplier | | | X | | | |
| Divider | | | | X | | |
| Increaser | X | | X | | | |
| Decreaser | | X | | X | | |
| Editor | | | | | X | X |
| Upper | | | | | X | |
| Lower | | | | | | X |
To simplify the actual process of defining permissions for service methods, we decided to do this through Java annotations. To provide such security management, we found it useful to utilize the Spring framework. The functionality required for this to work is available inside our custom library sso.jar, which was already mentioned.
Each method of the service class can be secured by annotation using the following syntax: @Secured("PERMISSION_NAME"), where PERMISSION_NAME could be any permission taken from the permission mapping file.
During development of an example service, we faced a problem that Axis2 is not able to obtain the necessary data from the class because Spring creates a proxy for the class (look at http://issues.apache.org/jira/browse/AXIS2-3258). To solve this, we introduce an interface for the service class:
public interface MathService
{
    Double add(Double n1, Double n2);
}

public class MathServiceImpl implements MathService
{
    public Double add(Double n1, Double n2)    {return n1 + n2;}
}
And, here is an example of a secure service class:
public interface MathService
{
  @Secured("by.intexsoft.add")
    Double add(Double n1, Double n2);
}
Note that when a service is ready to be deployed, some additional configuration steps should be performed. Look at Configure and package the service in the Appendix for more information.
Example services reside in the services folder of the archive. To deploy a service to the Tomcat server, place the AAR file into the webapps/axis2/WEB-INF/services directory.
There are two example services available:
- MathService - provides a set of mathematical operations
- StringService - can convert the supplied string between lower and upper case
The following table lists the example services functions and permissions required to invoke them:
| Service name | Operation | Permission |
| Math Service | Add | by.intexsoft.add |
| Subtract | by.intexsoft.subtract |
| Multiply | by.intexsoft.multiply |
| Divide | by.intexsoft.divide |
| String service | Upper | by.intexsoft.upper |
| Lower | by.intexsoft.lower |
Access SSO-enabled Services from Flex
Our next step is to make it possible to access the protected services from the Flex application. This application should authorize through an identity provider and call the protected Web Service methods using the SSO technique. The existing Flex service access API does not provide such features. So, we create our own library package which exposes a new API. To make it easier to use, we put attention on making this new API as close as possible to the existing Flex service access API.
To access the secured Axis2 Web Service, the only thing you need is to add the SSOWebServiceClient.swc library, which is located in the flex-sso-library folder of the archive, to your project (this library is recommended for use as RSL).
Now, you can use the by.intexsoft.soap.sso.SSOEnabledServiceHelper class to pass the SSO call to the service from inside the Flex application (for details on the class constructor parameters, look at SSOEnabledServiceHelper parameters in the Appendix). Here is an example of usage of the helper class:
private var webServiceHelper: SSOEnabledServiceHelper;
private function onGetResultClick(): void
{
    webServiceHelper = new SSOEnabledServiceHelper(wsdlUrl.text,
                           "add", onResult, onFault);
    webServiceHelper.call(number1.value, number2.value);
}

private function onResult(data: Object, token: Object): void
{
    additionResult.text = data.result;
}

private function onFault(data: Object, token: Object): void
{
    Alerter.showError(data.fault.faultString, "Error...");
}
Important note: It is necessary to hold a link to SSOEnabledServiceHelper in your application to prevent the garbage collector from getting rid of it while the call method is executing.
When the webServiceHelper.call method is invoked, the SOAP request is sent to a service provider. If a service requires the client to authorize and the user is not yet logged in (a SOAP message does not contain a security token), the user is asked to authenticate on the identity provider (the user gets the login and the password dialog). Using the supplied credentials, the system contacts the identity provider (OpenSSO, in our case), and on success, the SOAP call is resent to the service automatically. If data is received from the service, the onResult handler is executed. If the service does not respond to the call, the onFault handler is executed.
If the functionality of SSOEnabledServiceHelper is not enough for you and you need more flexibility, then you can access the services in a more verbose way. Look at Accessing services in an advanced way in the Appendix. For more detailed information, look at the library source code, which is available inside the flex-sso-library folder of the source archive.
When designing a client application, we met with a well known problem: Flash Player ignores any message that has a status code > 200 (take a look at https://bugs.adobe.com/jira/browse/FB-13337 for more details). To workaround this problem, we've created a service-side filter which transforms the status code 500 to the status code 200. This filter is available inside the sso.jar library we already deployed. We only need to define its configuration inside the webapps/axis2/WEB-INF/web.xml file (under the <web-app> tag) of the Tomcat server on which the Web Services are located:
<filter>
    <filter-name>StatusCode500To200Filter</filter-name>
    <filter-class>by.intexsoft.ws.filter.StatusCode500To200Filter</filter-class>
</filter>
<filter-mapping>
    <filter-name>StatusCode500To200Filter</filter-name>
    <servlet-name>AxisServlet</servlet-name>
</filter-mapping>
The example Flex client application is available in the flex-client folder of the archive. The Flex based client application should be executed from a Web Server. In our example, we place it on the same Tomcat server by copying the flex-client folder to the web-app directory of Tomcat. You can also examine the sources of a client application to get in-depth details on how it was written.
Watch SSO in Action
So, finally, we can do a test of the functionality described in this article. The checklist to proceed is as follows:
- We have up and running the OpenSSO identity provider on which the example roles are defined.
- We have a configured Axis2 installation with example services (MathService and StringService) deployed there. The PermissionChecker_mapping.properties file contains the mappings between the example identity provider roles and the example services permissions.
- An example client application (SSOWSPrototype) is available on a Web Server.
Let us go to the OpenSSO administration, create a new user "test", and assign the "summator" and "upper" roles to him.
Now, we execute the client by opening the following URL: http://localhost:8080/flex-client/SSOWSPrototype.html.
A screen with the client interface opens.
From this interface, we can perform all the operations provided by the example Math and String services. Input some numbers into the Addition area, and click on a button with the "=" sign:
The system will contact the Math service, and it will respond that we are not logged in yet. Therefore, a login dialog will be displayed. Input test user credentials there, and click on the Login button.
System authorizes us on the identity provider, and contacts the Math service again so the result of an "addition" operation is immediately displayed.
Now, we will try to use the second service (the String service). Type some text in the text area field (for example, "sso" in lowercase) and click on the "UPPER" button.
As you will see, the supplied string is successfully converted to uppercase. And this is a real example of how SSO works. We logged in on a Math service and we are able to use the String service with the same credentials without the need to repeat the login procedure.
Now, try to click on the "lower" button. You will then receive an error message "User has no necessary permissions". This is because the Role "upper", that our user has, does not have the permission to use the "lower" action of the String service.
You can play with it further by going to the identity provider administration and changing the current user Roles and seeing how the client responds to the service permission changes. You can also use the available sources to extend them with additional functionality, or to get ideas when designing your own projects.
History
This is the first revision of this article.
IntexSoft (Intellectual Export Software) is dynamic software development company offering high quality cost-effective IT services to customers worldwide. We develop custom software across a range of industry, such as Media Production, Product Information Management, Translation Management.
The company possesses high expertise in J2EE, Adobe Flex/AIR and also in software integration with products like Adobe Indesign Server, Quark Xpress Server, Across Server and others.
Founded in 1999, our development centre is located in Grodno, Belarus - historically the most technically advanced region in the former USSR.
This member has not yet provided a Biography. Assume it's interesting and varied, and probably something to do with programming.


 General
  News
News  Suggestion
  Question
  Bug
Bug  Answer
  Joke
Joke  Praise
  Rant
Rant  Admin
Admin 


