What are Collection Controls?
Actually it's a term I just made up, but when I say it I am referring to
those user interface controls that present themselves as lists. The more obvious
examples of these are listboxes, listviews and treeviews. Less obvious are
things like toolbars. They all maintain a collection of objects which are
displayed.
In some cases, these objects in the collection have collections of subitems
themselves. An example of this is the listview, where each item can have
subitems when the control is in Report view mode.
When you introduce a collection to your control, your job suddenly gets a lot
harder. You end up having to write at least three more classes than you would if
you were just developing a simple control with properties, such as a Button.
Requirements of a Collection Control
When writing one of these controls, it is usual to spend a little more time
in code when you are still writing the object model. You have to define the
property on the main control used to access the collection. You have to write
the class which will represent each individual item (for example, the
ListViewItem class). You have to write the class which will act as
a collection for your subitems. And that's just to get it functional.
To add design time support, you have to write a class to act as a Type
Converter for your subitems. When the user has populated your control at design
time, the code serializers go through each object in your collection and use
this converter class to inspect it and give it the best way of recreating it
(i.e. which constructor to use).
Although this type of control has subitems, they are typically not
responsible for drawing themselves. They do not actually have windows of their
own, instead it is up to the parent control to calculate their positions and
draw them.
Rich Design Time Support
Is another term I've invented. I use it to refer to doing that little bit of
extra work to really make your control easy to work with at design time. I have
a couple of my own controls posted, and neither of them use the Collection
Editor which is the standard way of modifying collections at design time.
Instead, they use a system of designer verbs and selections to make the changes
visually.
To add rich design time support, you will likely be writing a designer for
the main control, and a designer for the subitems. It's in these designers and
in extensions of the code in your control that you will add the necessary
code.
One of the requirements is that your subitems are selectable and modifiable
with the usual property grid control. To enable this, every subitem must be
present on the design surface. This means that it has to implement the
IComponent interface, and the easiest way to do that is to derive
them from Component.
The beauty of rich design time support is the user being able to select each
subitem just by clicking on it. It's not a trivial task, and as far as the
designer is aware (by default) you're just clicking on part of the main control.
It's up to our design time code to use the interfaces provided by the host
environment to select the subitem the user has clicked on and draw it as
such.
We also need to listen to selection change events from the host environment,
so that when the user selects a different control, we are notified and can
redraw.
Designing the Object Model
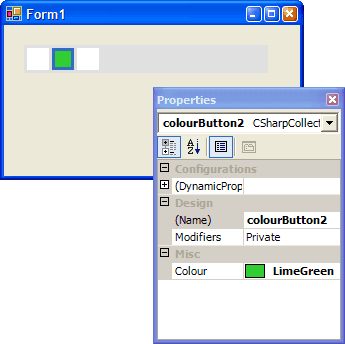
For this article we will create a control which is laid out like a toolbar.
All the "buttons" will have a Colour property which will be the
only way of controlling their appearance. The buttons will be selectable and
modifiable at design time.
The main control will feature only one custom property, which we will call
"Buttons". We will hide this property at design time using the
BrowsableAttribute class, because we want to use our own logic to
add and remove them, rather than the collection editor.
Our subitems, which we will call ColourButtons, will have just one property -
Colour. When a button is selected, a thick border will be drawn
around it. I know this is a pretty useless control we're developing, but you
would use exactly the same method to develop any advanced control, such as a
toolbar or a list of some kind.
One of the most important things to get right with a control like this is
separating the layout logic from the drawing logic. Internally, the control
needs to keep a list of rectangles maintained, one for each button. We will
implement a CalculateLayout function that loops through the
collection and generates the rectangles. This function will be called whenever a
button is added to or removed from the collection, or the main control is
resized.
The drawing code is much easier if all the rectangles are pre-calculated like
this. You should never calculate positions in drawing code, because it just
isn't necessary. Drawing is required far more of the time than calculating
positions.
Starting Off
I won't put all the code in to this article, because it would just get
cluttered. Instead I will paste the important bits, and attempt to describe the
rest. I will be developing the control in both VB and C# as I write, and the
resultant solution will be available for download at the end.
First things first, we add the new usercontrol to our project. As we don't
want our drawing to flicker, we use the protected SetStyle function
in the constructor to turn on the DoubleBuffer and
AllPaintingInWmPaint styles. These two go hand in hand. We also
define the CalculateLayout function, which we will be calling from
the collection and when the control is resized.
Next comes defining the subitem class, and the strongly-typed collection
class which we'll use to contain the buttons. At this point we add the Buttons
property to the main control, which exposes a private instance of this
collection, instantiated in the main control's constructor. The
ColourButton has an internal Bounds member of type
Rectangle, which will hold the position of the button in the
control.
For simplicity, our collection will only implement the Add and
Remove functions, and the indexer. Normally you would add a few
more strongly-typed helper functions to it, such as IndexOf. The
constructor of the collection is internal and takes an instance of the main
control as a parameter. This is so that this instance can be passed on to
buttons as they are added, because when the user changes the colour of a button
it needs to signal that a redraw is needed. Here is the code for the
ColourButton and ColourButtonCollection classes:
public class ColourButton : Component
{
    private Color _Colour = Color.White;

    internal CollectionControl Control = null;
    internal Rectangle Bounds;

    public Color Colour
    {
        get
        {
            return _Colour;
        }
        set
        {
            _Colour = value;
            if (Control != null)
                Control.Invalidate();
        }
    }
}

public class ColourButtonCollection : CollectionBase
{
    private CollectionControl Control;

    internal ColourButtonCollection(CollectionControl Control)
    {
        this.Control = Control;
    }

    public ColourButton this[int Index]
    {
        get
        {
            return (ColourButton) List[Index];
        }
    }

    public bool Contains(ColourButton Button)
    {
        return List.Contains(Button);
    }

    public int Add(ColourButton Button)
    {
        int i;

        i = List.Add(Button);
        Button.Control = Control;
        Control.CalculateLayout();

        return i;
    }

    public void Remove(ColourButton Button)
    {
        List.Remove(Button);
        Button.Control = null;
        Control.CalculateLayout();
    }
}
Drawing and Layout Logic
We have already created the CalculateLayout function (although
it is blank at this point) and are calling it when buttons are added to or
removed from the collection. We also need to override OnResize and
call it there. For this example control we will display the buttons in one
horizontal line, from left to right. We will leave some padding at the sides,
then the buttons will take up the rest of the space vertically and make
themselves as wide as they are tall.
The CalculateLayout function will also invalidate the control.
Although you often redraw without calculating positions, you never calculate
positions without redrawing.
internal void CalculateLayout()
{
const int PADDING = 3;
int buttonSize, x, i;
ColourButton button;
Rectangle wrct;
x = PADDING;
buttonSize = ClientRectangle.Height - (2 * PADDING);
for (i = 0; i < _buttons.Count; i++)
{
button = _buttons[i];
wrct = new Rectangle(x, PADDING, buttonSize, buttonSize);
button.Bounds = wrct;
x += buttonSize + PADDING;
}
Invalidate();
}
Next is the drawing code, which for this example is incredibly simple. We
override the OnPaint method to draw the buttons, simply filling
their rectangles with a brush we create from their defined colour.
Note that there is another method, OnPaintBackground, which we
do not touch. If we were doing anything special with the background of the
control, like a different colour, we would. As it is, if we leave it we don't
have to worry about painting the background at all. In fact since we're
inheriting from UserControl our control already features a
BackColor property and even a way to have an image as the
background.
protected override void OnPaint(System.Windows.Forms.PaintEventArgs e)
{
Brush b = null;
Rectangle wrct;
foreach(ColourButton button in _buttons)
{
if (b != null)
b.Dispose();
b = new SolidBrush(button.Colour);
wrct = button.Bounds;
if (highlightedButton == button)
{
e.Graphics.FillRectangle(SystemBrushes.Highlight, wrct);
wrct.Inflate(-3, -3);
}
e.Graphics.FillRectangle(b, wrct);
}
}
Note that I've introduced a variable scoped to the control to contain a
reference to the button which should have a highlight drawn on it, if any. This
will be important later when we deal with the user selecting buttons as design
time. At this point, the control actually works. Since I haven't hidden the
Buttons property from the propertygrid yet, after adding the control to a form I
can go in to the collection editor and add buttons to it. The buttons all show
up as white squares, but we're well on our way.
Controlling Serialization
Before any changes we make to the Buttons collection will be serialized to
code, we need to add a TypeConverter class and associate it with
ColourButton. A TypeConverter helps the serializers
know how to recreate an object that is already instantiated. I'm going to use a
very simple TypeConverter in this example, which simply tells the
serializers to use the default, parameterless constructor.
internal class ColourButtonConverter : TypeConverter
{
    public override bool CanConvertTo(ITypeDescriptorContext context,
        Type destType)
    {
        if (destType == typeof(InstanceDescriptor))
            return true;

        return base.CanConvertTo(context, destType);
    }

    public override object ConvertTo(ITypeDescriptorContext context,
        System.Globalization.CultureInfo culture, object value,
        Type destType)
    {
        if (destType == typeof(InstanceDescriptor))
        {
            System.Reflection.ConstructorInfo ci =
                typeof(ColourButton).GetConstructor(
                System.Type.EmptyTypes);

            return new InstanceDescriptor(ci, null, false);
        }

        return base.ConvertTo(context, culture, value, destType);
    }
}
We also need to tell the serializers that they have to go in to our Buttons
property before they will even get that far, and we do this with the
DesignerSerializationVisibilityAttribute class. Apart from its name
being such an impressive length, all this attribute does it inform the
serializers what to do with our property. We want them to delve in to the
collection, so we specify Content.
When we add buttons to the control at design time, save, close the designer
and re-open it, the buttons are there again. That's all we have to do with
regards to serialization, and it's a big step out of the way.
Adding the Designer
Just before we add the designers, we'll clean up a couple of things. Firstly,
we apply a BrowsableAttribute to the Buttons property,
specifying False so the property doesn't appear in the propertygrid. Secondly,
you may have noticed that when testing the control, adding buttons to the
collection caused the buttons to appear in the component tray area of the form.
This is normal since we are using components, but in this case we want to hide
them. We do so using the DesignTimeVisibleAttribute class, again
specifying False. Lastly, and this is a very minor detail, we use the
ToolboxItemAttribute class to stop our ColourButton
classes from appearing in their own right in the toolbox.
Now, we can go on to creating our designer. It will inherit from
ControlDesigner. What we need it to do is handle clicks on the main
control so that they select individual buttons, and listen for events on the
design surface so we know when the user has selected something else. We also
need to listen for an event fired when the user deletes one of the button
components. Lastly, we need to override the AssociatedComponents
property and simply pass it the Buttons collection, so it knows they go along
with the control. It makes use of this information when the user copies the
control to the clipboard and pastes it somewhere else.
This is a good time to tell you about the GetService function.
The VS.NET IDE hosts a great deal of services, tied to a hierarchical chain of
resources. They go up as high as the project level, and as low as a view of a
particular source file (design view and code view). The services we are
interested in are ISelectionService and
IComponentChangeService. Every design view of a source file has
these, and we can access them through the protected GetService
method of the ComponentDesigner class, which
ControlDesigner inherits from.
Designers have an Initialize function, which is called pretty much
immediately after they are created. This function accepts a parameter which
contains the object the designer is to provide support for. It is in this
function that we will get a hold of ISelectionService and
IComponentChangeService and wire up the events we need, which are
SelectionChanged and ComponentRemoving. It is
important to remember to unwire the events, which we do by overriding the
Dispose method.
It's important to note that when writing designers, things can go wrong. They
certainly have for me. Because designers are integrated quite tightly with the
host environment, if you code something wrong or forget to clean up after
yourself, things can really go awry. The kind of things it takes a restart of
the IDE to fix. This is referred to as "playing nice with the other designers".
Heaven forbid you should cause an exception to be thrown in designer code -
debugging them is a real pain.
Anyway - here's the code to start off our designer. I've also tied the
designer to the main control by using the DesignerAttribute class.
This designer does nothing apart from wiring up the events we need and calling
an internal function (with no code as yet) in the main control.
internal class CollectionControlDesigner : ControlDesigner
{
private CollectionControl MyControl;
public override void Initialize(IComponent component)
{
base.Initialize(component);
MyControl = (CollectionControl) component;
ISelectionService s = (ISelectionService) GetService(
typeof(ISelectionService));
IComponentChangeService c = (IComponentChangeService)
GetService(typeof(IComponentChangeService));
s.SelectionChanged += new EventHandler(OnSelectionChanged);
c.ComponentRemoving += new ComponentEventHandler(
OnComponentRemoving);
}
private void OnSelectionChanged(object sender, System.EventArgs e)
{
MyControl.OnSelectionChanged();
}
private void OnComponentRemoving(object sender, ComponentEventArgs e)
{
}
protected override void Dispose(bool disposing)
{
ISelectionService s = (ISelectionService) GetService(
typeof(ISelectionService));
IComponentChangeService c = (IComponentChangeService)
GetService(typeof(IComponentChangeService));
s.SelectionChanged -= new EventHandler(OnSelectionChanged);
c.ComponentRemoving -= new ComponentEventHandler(
OnComponentRemoving);
base.Dispose(disposing);
}
public override System.Collections.ICollection AssociatedComponents
{
get
{
return MyControl.Buttons;
}
}
}
Adding Buttons
The first thing we want the user to be able to do is to add buttons. We will
make use of a designer verb to do this. For an explanation of designer verbs,
see my article "Introduction to Designers". We only want one verb, and we'll
simply title it "Add Button".
In the code that executes when the user activates this verb, we have to
create a button and add it to the collection. This may sound trivial, but this
is one of those times when we have to play nice with the other designers. If we
simply created a button and added it to the collection, how would the IDE know
anything had changed? How would it know WHAT had changed, so the user can
undo/redo?
Enter the DesignerTransaction class. When you perform a
significant action (or group of actions) to something on the design surface, you
should wrap it in a transaction. Every transaction has a friendly name, which
appears on the dropdown by the Undo/Redo buttons in the host environment. Also,
every distinct change to make to an object (in this case, the Buttons
collection) needs to be wrapped with a call to OnComponentChanging
and OnComponentChanged, on the
IComponentChangeService.
Lastly, you should not attempt to instantiate a ColourButton
directly - let the designer host (another service we'll use) do the creating for
you. This ensures that the object is on the design surface, and it keeps
everyone happy. If the ColourButton class had a designer itself,
that would get created too. I know this all sounds like a lot of work, and it
is, but you get used to it and most of it is boilerplate that can be copy/pasted
easily.
public override System.ComponentModel.Design.DesignerVerbCollection Verbs
{
get
{
DesignerVerbCollection v = new DesignerVerbCollection();
v.Add(new DesignerVerb("&Add Button", new EventHandler(OnAddButton)));
return v;
}
}
private void OnAddButton(object sender, System.EventArgs e)
{
ColourButton button;
IDesignerHost h = (IDesignerHost) GetService(typeof(IDesignerHost));
DesignerTransaction dt;
IComponentChangeService c = (IComponentChangeService)
GetService(typeof(IComponentChangeService));
dt = h.CreateTransaction("Add Button");
button = (ColourButton) h.CreateComponent(typeof(ColourButton));
c.OnComponentChanging(MyControl, null);
MyControl.Buttons.Add(button);
c.OnComponentChanged(MyControl, null, null, null);
dt.Commit();
}
Note that even after writing all that, our implementation isn't quite
complete yet - you can add buttons, and the undo and redo buttons will remove
the button from the design surface ok but they won't remove the button from the
Buttons collection - we'll come back to that later.
Selecting Buttons
Designers offer a useful method to override, called GetHitTest.
This is passed some coordinates, and it's up to your logic to let the designer
know whether or not to pass the event (usually a click) on to the control
underneath. We will override this method, and see if the mouse cursor is within
the bounds of any of the buttons on the control. If it is, we'll return
true.
protected override bool GetHitTest(System.Drawing.Point point)
{
    Rectangle wrct;

    point = MyControl.PointToClient(point);

    foreach (ColourButton button in MyControl.Buttons)
    {
        wrct = button.Bounds;
        if (wrct.Contains(point))
            return true;
    }

    return false;
}
This way, our MouseDown event in the control will be fired if
the user clicks on a button. In this event, we check if we're in design mode
(with the DesignMode property) and if we are, find which button the
cursor is on. Then we get a reference to ISelectionService and set
the selection to that button.
protected override void OnMouseDown(System.Windows.Forms.MouseEventArgs e)
{
    Rectangle wrct;
    ISelectionService s;
    ArrayList a;

    if (DesignMode)
    {
        foreach (ColourButton button in Buttons)
        {
            wrct = button.Bounds;
            if (wrct.Contains(e.X, e.Y))
            {
                s = (ISelectionService) GetService(
                typeof(ISelectionService));
                a = new ArrayList();
                a.Add(button);
                s.SetSelectedComponents(a);
                break;
            }
        }
    }

    base.OnMouseDown(e);
}
At this point, clicking on an individual button in the control at design time
will select it, and you can even modify its properties in the propertygrid.
We've one last piece of code to write before the selection stuff is complete
though, and that's filling in the function we created earlier that is called
when the selection changes. It's in here that we'll set the
highlightedButton variable we created so the selection is indicated
visually too.
internal void OnSelectionChanged()
{
ColourButton newHighlightedButton = null;
ISelectionService s = (ISelectionService) GetService(
typeof(ISelectionService));
foreach (ColourButton button in Buttons)
{
if (s.PrimarySelection == button)
{
newHighlightedButton = button;
break;
}
}
if (newHighlightedButton != highlightedButton)
{
highlightedButton = newHighlightedButton;
Invalidate();
}
}
We're almost there. We can now add the control to a form, use the designer
verb to add buttons, and select those buttons visually, changing their
properties in the propertygrid.
Removing Buttons
This is another question of playing nicely with the designers. We will be
writing the code to go in the OnComponentRemoving function in our
designer. We need to handle two things in here. Firstly, the user removing the
main control. When this happens we need to destroy all the buttons that are on
the design surface. Secondly, when the user removes a button by selecting it and
pressing delete. We need to remove it from the Button collection when this
happens. Again, any changes we make to anything need to be wrapped in
OnComponentChanging and OnComponentChanged calls.
private void OnComponentRemoving(object sender, ComponentEventArgs e)
{
IComponentChangeService c = (IComponentChangeService)
GetService(typeof(IComponentChangeService));
ColourButton button;
IDesignerHost h = (IDesignerHost) GetService(typeof(IDesignerHost));
int i;
if (e.Component is ColourButton)
{
button = (ColourButton) e.Component;
if (MyControl.Buttons.Contains(button))
{
c.OnComponentChanging(MyControl, null);
MyControl.Buttons.Remove(button);
c.OnComponentChanged(MyControl, null, null, null);
return;
}
}
if (e.Component == MyControl)
{
for (i = MyControl.Buttons.Count - 1; i >= 0; i--)
{
button = MyControl.Buttons[i];
c.OnComponentChanging(MyControl, null);
MyControl.Buttons.Remove(button);
h.DestroyComponent(button);
c.OnComponentChanged(MyControl, null, null, null);
}
}
}
Now that we've added that code, the user can delete buttons visually as they
would delete any other control or component on the design surface. Also, Undo
and Redo now work when adding buttons.
Conclusion
We have created the basics of a toolbar control with rich design time
support. Adding more properties to the buttons is easy compared to the code
we've had to write to enable this support. I hope you've found this article
useful, it has certainly demonstrated a lot of the techniques you'll use when
writing both design time and runtime code. The toolbar doesn't actually do
anything at run time except sit there and look pretty, but we already have the
elements in place to add support for mouseovers and a ButtonClick
event.
On my website is a copy of this
article with VB.NET source included, as well as other articles and free Windows
Forms Controls.
History
This member has not yet provided a Biography. Assume it's interesting and varied, and probably something to do with programming.


 General
  News
News  Suggestion
  Question
  Bug
Bug  Answer
  Joke
Joke  Praise
  Rant
Rant  Admin
Admin 


 This one deserves it. It contains a lot of knowledge simply not available in one concise book or text. Well done research work.