Introduction
Twitter bootstrap is a powerful and easy to use layout framework supplying a huge set of features. While being able to build different website layouts it is easy to make the layouts work responsive.
So if you don't want to use the project template built in microsoft's css styles it's an alternative solution to use twitter bootstrap.
This article will show you the first simple steps to use twitter bootstrap.
Background
The articles background is the author's wish to bundle all the different helper classes and methods evolving from developing different web projects and making them more reusable by creating a simple cms project template. This article is the first documentation of doing this.
Creating the project
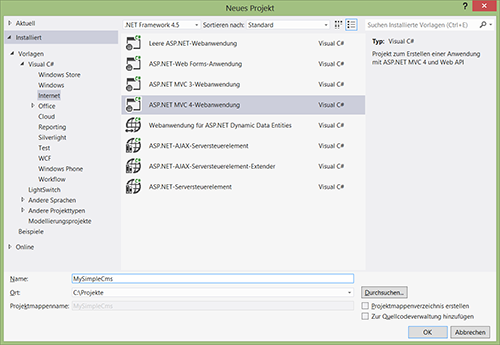
After starting Visual Studio 2012 (I think this is the preferred IDE every enthusiastic developer is currently using) and clicking „Neues Projekt“ please select „ASP.NET MVC 4 Webanwendung“ and after clicking „Ok“ use „Internetanwendung“ as project template. You can surely start with an empty project but if you later want to implement login functionality it is very useful to get all the membership and external login (like facebook) support microsoft has integrated in this template.
Create a new ASP.NET MVC 4 project:
Select "Internetanwendung" as project template:

Get the basic project:
After the project is created, the first start using F5 will check if the project is running correctly. Actually there is a set of styles integrated and the default layout is used.
Preparing the layout
With the project you got a demo layout from microsoft. To build a new website you can use These prepared styles as well as creating an own layout completely from scratch.
But now you want to use the twitter bootstrap library because it's very simple to integrate it in the project and there are many websites offering templates for free or for a small fee.
The needed library files can be downloaded under http://twitter.github.io/bootstrap/ by clicking the large blue download button (which is layoutet itself by a bootstrap default style you can use later in your own layout).
The downloaded bootstrap.zip file includes css, js and img folders.
Please ensure that the files in the css folder are the following:
The bootstrap website also supplies an easy to use layout creator resulting in one optimized bootstrap.css file. Later you'll see that it's useful to first load the basic styles and the bootstrap-responsive.css styles separately.
Insert the bootstrap library into the project by dragging the complete bootstrap folder and dropping it into the project’s Content folder.
Open the Views/Shared/_Layout.cshtml file and replace the present markup with this code:
<!DOCTYPE html>
<html lang="de">
<head>
<meta http-equiv="Content-Type" content="text/html; charset=utf-8"/>
<meta charset="utf-8" />
<meta name="viewport" content="width=device-width, initial-scale=1.0">
<title>@ViewBag.Title - MySimpleCms</title>
<link href="~/favicon.ico" rel="shortcut icon" type="image/x-icon" />
<!-- Bootstrap -->
<link href="~/Content/bootstrap/css/bootstrap.min.css" rel="stylesheet" media="screen">
<link href="~/Content/bootstrap/css/bootstrap-responsive.min.css" rel="stylesheet" media="screen">
<!-- jQuery -->
<script type="text/javascript" src="<a href="https:
</head>
<body>
@RenderBody()
<!-- Bootstrap -->
<script src="<a href="http:
<script src="~/Content/bootstrap/js/bootstrap.min.js"></script>
</body>
</html>
As shown you replace the complete theme integration cointained in the project template by using your own things.
In addition to inserting the two bootstrap css files (one for default page rendering and one for responsive support) it's a good idea to add links to jQuery for later usage.
Creating a simple index page
Let’s start with creating an index page. The project even contains one and you only have to change the html markup. So open Views/Home/Index.cshtml and edit it as shown here:
<div class="navbar navbar-inverse navbar-fixed-top">
   <div class="navbar-inner">
     <div class="container">
       <button type="button" class="btn btn-navbar" data-toggle="collapse" data-target=".nav-collapse">
         <span class="icon-bar"></span>
         <span class="icon-bar"></span>
         <span class="icon-bar"></span>
       </button>
       <a class="brand" href="#">Project name</a>
       <div class="nav-collapse collapse">
         <ul class="nav">
           <li class="active"><a href="#">Home</a></li>
           <li><a href="#about">About</a></li>
           <li><a href="#contact">Contact</a></li>
         </ul>
       </div><!--/.nav-collapse -->
     </div>
   </div>
 </div>
 <div class="container">
   <h1>Bootstrap starter template</h1>
   <p>Use this document as a way to quick start any new project.<br> All you get is this message and a barebones HTML document.</p>
 </div> <!-- /container -->
Notice:I’ve simply used the html from the bootstrap starter template found under http://twitter.github.io/bootstrap/getting-started.html
After running the project (use F5) you'll see that there is a missing margin at the top of the page.
Before fixing this effect please resize your browser and notice that this error only occurs in desktop rendering and not in smaller resolutions for mobiled devices (to view reduce the browser window's width).
So while correcting the styles you have to ensure not to change the css definitions for smaller resolutions. Because of only being necessary if using a top navigation bar, a more flexible solution is a good idea. Thus you can fix it as shown here.
On top of Views/Home/Index.cshtml file insert this:
@{
     ViewBag.TopMargin = "<style type=\"text/css\">\n\t\t\tbody { padding-top: 60px; padding-bottom: 40px; }\n\t\t</style>"; }
In Views/Shared/_Layout.cshtml insert this:
<!-- Bootstrap -->
<link href="~/Content/bootstrap/css/bootstrap.min.css" rel="stylesheet" media="screen">
@Html.Raw(ViewBag.TopMargin)
<link href="~/Content/bootstrap/css/bootstrap-responsive.min.css" rel="stylesheet" media="screen">
Use F5 to check your changes and be happy: the first step building a website using twitter bootstrap is finished.
See final project under http://MySimpleCms.azurewebsites.net
To be continued...
According to the guidelines of the Windows Azure Development Challenge this is my article for level 2 "Creating a website". As my next step I plan to extend the layout with some more pages using the bootstrap demo templates and maybe wrap the creation of html markup with html helper methods.
In a separate article (and regarding to level 3 of the contest) the usage of sql azure is planned.
History
Contest level 2:05/10/2013 Creating a project and include twitter bootstrap library
This member has not yet provided a Biography. Assume it's interesting and varied, and probably something to do with programming.


 General
  News
News  Suggestion
  Question
  Bug
Bug  Answer
  Joke
Joke  Praise
  Rant
Rant  Admin
Admin 


