Table of Content
Introduction
ASP.NET MVC has always supported the concept of "view engines" that are pluggable modules that implement various template syntax options. The "default" view engine for ASP.NET MVC uses the same .aspx/.ascx/.master file templates as ASP.NET Web Forms. In this article I go through the Razor View Engine to create a view of an application. Razor was in development beginning in June 2010 and was released for Microsoft Visual Studio in January 2011.
Razor is not a new programming language itself, but uses C# syntax for embedding code in a page without the ASP.NET delimiters: <%= %>. It is a simple-syntax view engine and was released as part of ASP.NET MVC 3. The Razor file extension is "cshtml" for the C# language. It supports TDD (Test Driven Development) because it does not depend on the System.Web.UI.Page class.
Razor Syntax
To understand the Razor View Engine we should learn its syntax so let's start with the syntax.
Single statement block and inline expression
Each code block will start and end by opening and closing curly brackets {..}, respectively. A statement is defined in a code block, in other words between opening and closing curly brackets, and end with a semicolon (";"). But when it's used as an inline expression then it does not need to use a semicolon.
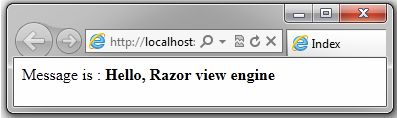
@{ var message = "Hello,Razor view engine";}
Message is : @message
Here we declare message as a variable and assign a string to it and this variable is accessible globally with the @ character. So the @ character is used in both cases when we define a code block as well as a variable call and we get output as below.
Multi statement block
We can also define a multiline statement block as a single-line statement block. In a multiline statement block, we can define multiple code statements and can process data. A multiline block will exist between opening and closing curly braces but the opening brace will have the "@" character in the same line; if we define the "@" and opening curly braces in different lines, then it will generate an error.
@{
var priciple = 100;
var rate = 12;
var time = 2;
var interest = (priciple * rate * time) / 100;
}
Each statement will end with a semicolon in a multi-statement code block so finally we get the result as:

Conditional statements
We can create a dynamic web page in Razor View Engine as condition based. We can define a condition inside a code block or outside the code block. The if statement works the same as it does in other programming languages.
@{
var isValid = true;
if(isValid)
{
    It is an if statement in code block
}
else
{
    It is an else statement in code block
}
}
@if(true)
{
    It is a single if block
}
It is a default rule that a block statement or statements must exist within curly braces even if the block has a single statement. In the code block above we have two types of if conditions, one inside the code block so the @ character is used with the code block's starting braces, and another outside the code block so the @character is used with an if. Finally we get the output of these two if statements.
Looping
All loops work the same as in other programming languages, we can define looping inside a code or outside a code block. We can define a for, do while, or while loop in a code block and use the same syntax for initialization, increment/decrement, and to check a condition.
@{
    for(var count = 1;count,=3;count++)
    {
        @Count is : @count
    }

    string [] nameArray = {"Sandeep","Mandeep","Kuldeep","Pradeep"};
    foreach(var name in nameArray)
    {
        Your Name is : @name
    }
}
We can also define a foreach in a code block that accesses data forwardly from any collection. The code block above has both for and foreach statements and their output is:
Comments
Razor View Engine has two types of comments, one is single-line and another is multiline. Razor uses the syntax "@* ..*@" for the comment block but in a C# code block, we can also use /* */ or //. HTML comments are the same, <!-- -->.
@{
@* for(var count = 1;count,=3;count++)
{
@Count is : @count
}*@
}
Use of Object
We can also use an object in both a code block and HTML using Razor syntax.
Date :@System.DateTime.Now.Date.ToString("D")
Hour :@System.DateTime.Now.Hour
Minute :@System.DateTime.Now.Minute
Second :@System.DateTime.Now.Second
So we have a rule of thumb that C# code is used in a code block that starts with "@{" and ends with "}" and whenever a variable is used in an HTML block, the variable is used with the prefix "@".
It is not a complete list of Razor syntax but I think that you now have the basic syntax of Razor so we should proceed to an example.
Creating a User Registration Application using Razor
Step 1: Create a new project
First of all we create a new MVC project for our example.
Thereafter we get installed templates where we choose MVC application. Now we have the following screen as per the above action.
As in the screen above, we perform an action from 1 to 5 and action number 6 moves us from the select template for the MVC application and we get the result of this action as:
So finally we get a default empty application in Visual Studio. The empty application doesn't mean that we have no folder and layout. We also have a default shared layout (view), CSS, and JavaScript files. The default folder structure is:
Step 2: Create a Model
Right-click on the "Models" folder in Solution Explorer then move to "Add" and click on "Class".
Model is a C# class with properties. We define properties in the model according to our UI. In other words, what we show in the UI should be defined in the model. The Model is created according to the UI template, not according to the database table. Sometimes we think that our model should have properties according to the database table, in other words we create a mapping between the model and the database table. But we should create an entity according to the database table and make the mapping between them, whereas a Model should be designed according to our UI screen. So our user registration model is "UserRegisterModel.cs".
namespace UserRegistrationApplication.Models
{
    public class UserRegisterModel
    {

        public string Name { get; set; }
        public string Password { get; set; }
        public string Email { get; set; }
    }
}
Step 3: Create Controller
We create a controller that sends a response on the browser as per request. We are developing a user registration UI so create a UserRegisterController. Right-click on the "Controllers" folder in Solution Explorer then move to "Add" and click on "Controller".
Thereafter we get the Add Controller screen where we provide the controller name. We want to create an empty controller, in other words we don't want a default action method to create, update, delete, and details in the controller so we leave unchecked the checkbox on the "Add Controller" screen. An empty controller doesn't mean that a controller that doesn't have any action methods, but a controller that has a single action method which is the "Index" action.
Now we have a controller that has an action method UserRegister that returns a view with an empty UserRegister model. This method calls using an HTTP GET request from the browser.
namespace UserRegistrationApplication.Controllers
{
    public class UserRegisterController : Controller
    {
        public ActionResult UserRegister()
        {
            UserRegistrationApplication.Models.UserRegisterModel model = new UserRegistrationApplication.Models.UserRegisterModel();
            return View(model);
        }
    }
}
The UserRegister() action method would return an empty UserRegisterModel model to bind to the UserRegister view with the UserRegister view.
Step 4: Create View
We create a view that renders on the browser and shows a user registration form. The View will be created according to an action method in the controller so first of all, right-click on the UserRegister( ) action method in the UserRegisterController controller.
Whenever we click on the "Add View.." item, we get the "Add View" screen.
We create a strongly typed view that binds with the UserRegisterModel model. It does not have much of an effect on the view; when created, it just imports the model on the view (CSHTML file). We get the default UserRegister view.
@model UserRegistrationApplication.Models.UserRegisterModel
@{
    ViewBag.Title = "UserRegister";
    Layout = "~/Views/Shared/_Layout.cshtml";
}
UserRegister
There are two points: one is that UserRegisterModel is bound because we create a strongly typed view and another is the master layout has been implemented on a new view by the Layout property in the code block. Here ViewBag.Title is assigned a string value UserRegister that is the title of the page so whenever we want to modify the title of the page, we just modify the value of the ViewBag.Title property.
Before going into the details of the view design, we need a little bit of the idea of HTML Helpers in MVC. HTML Helpers are much like traditional ASP.NET Web Form controls. An HTML Helper, in most cases, is just a method that returns a string. We will use three methods of HTML Helpers as follows:
LabelFor: It is a method of the LabelExtensions class under the System.Web.Mvc.Html namespace that returns an HTML Label element. The model property displays text and for the attribute value in the specified expression for the UI. It is an extension method of the HtmlHelper instance.
For example, when the model Name property is used in the LabelFor() method then it's rendered in HTML like:
<label for="Name">Name</label>
TextBoxForIt is a method of the InputExtensions class in the System.Web.Mvc.Html namespace that returns an HTML text input element. The model property is used for ID and name attribute values. The Input element type property sets "text" by the TextBoxFor() method. It is also an extension method for the HtmlHelper instance. It also shows a model property value in TextBox. For example when the model Name property is used in the TextBoxFor() method then it's rendered in HTML like:
<input id="Name" name="Name" type="text" value="" />
PasswordFor: It is a method of the InputExtensions class in the System.Web.Mvc.Html namespace that returns an HTML password input element. The model property is used for the ID and name attribute value. The Input element type property sets "password" by the PasswordFor() method. It is also an extension method for the HtmlHelper instance. It also shows the model property value in the TextBox. For example, the model Password property is used in the PasswordFor() method and it's rendered in HTML like:
<input id="Password" name="Password" type="password" />
To design the user registration form, we create a stylesheet BaseStyleSheet.css under the Content folder.
.formRowContainer
{
  width: 100%;
  padding-top: 10px;
}
.labelContainer
{
    padding-top: 2px;
    float: left;
    min-width: 155px;
}
.valueContainer
{
    float: left;
}
.buttonContainer
{
   padding-top: 5px;
   padding-left :155px;
}
.clearStyle
{
    clear: both;
}
Then we give this CSS in this view and add code in the view UserRegister.cshtml to create the user registration form. We are creating a registration form so all the forms will exist in <form></form> tags but in MVC, we create the entire form in a html.BeginForm() code block that is rendered in a <form> tag that has a controller action method in the action attribute value and a method will be used in an HTTPPost request to submit data.
@model UserRegistrationApplication.Models.UserRegisterModel
@{
    ViewBag.Title = "UserRegister";
    Layout = "~/Views/Shared/_Layout.cshtml";
}
<link href="@Url.Content("~/Content/BaseStyleSheet.css")" rel="stylesheet" type="text/css" />
<h2>User Register Form</h2>@using(Html.BeginForm())
{
<div>
    <div class="formRowContainer">
        <div class="labelContainer">
            @Html.LabelFor(model => model.Name)
        </div>
        <div class="valueContainer">
            @Html.TextBoxFor(model=>model.Name,Model.Name)
        </div>
    </div>
    <div class="clearStyle"></div>
    <div class="formRowContainer">
        <div class="labelContainer">
            @Html.LabelFor(model => model.Password)
       </div>
        <div class="valueContainer">
            @Html.PasswordFor(model => model.Password, Model.Password)
        </div>
    </div>
   <div class="clearStyle"></div>
    <div class="formRowContainer">
        <div class="labelContainer">
            @Html.LabelFor(model => model.Email)
        </div>
        <div class="valueContainer">
            @Html.TextBoxFor(model => model.Email, Model.Email)
        </div>
    </div>
    <div class="clearStyle"></div>
    <div class="buttonContainer">
        <button>Register</button></div></div>
}
Our view is ready. Press F5 or run the application to show the form in a browser screen. Now the result on the screen is:
Oh, we get an HTTP 404 error (The resource cannot be found) for our URL http://localhost:3581/. It's not good that we do a lot of stuff for this application and the application doesn't run successfully. But don't worry, we should be happy that we get an error from our code because each error teaches us something more.
Now open the Global.asax.cs file from Solution Explorer in Visual Studio and look at the RegisterRoutes() method. This method defines the application route for the URL and it is called on application startup. According to the RegisterRoutes() method, our application default controller is "Home" and the default controller action method is "Index" but we don't define this in our user Registration application so we get the error that the resource cannot be found. To remove this error we have two options, one is to set a static hard-coded string value in the MapRoute() method parameter of the RouteCollection instance in the RegisterRoutes() method for the UserRgisterController controller and the action method, and another option is to pass a controller and action method in the URL in the browser. We choose the second option because each application has multiple pages where the Home controller is the default controller and Index is the default action method for controllers.
public static void RegisterRoutes(RouteCollection routes))
{
routes.IgnoreRoute("{resource}.axd/{*pathInfo}");
routes.MapRoute(
"Default",
"{controller}/{action}/{id}",
new { controller = "Home", action = "Index", id = UrlParameter.Optional }
);
}
protected void Application_Start()
{
AreaRegistration.RegisterAllAreas();
RegisterGlobalFilters(GlobalFilters.Filters);
RegisterRoutes(RouteTable.Routes);
}
Now give the user register controller and action method URL http://localhost:3518/UserRegister/UserRegister in a browser request. Or we can change the MapRoute() method parameter in a RegisterRoutes() method of a RouteCollection instance, as in the following:
public static void RegisterRoutes(RouteCollection routes)
{
routes.IgnoreRoute("{resource}.axd/{*pathInfo}");
routes.MapRoute(
"Default",
"{controller}/{action}/{id}",
new { controller = "UserRegister", action = "UserRegister",
id = UrlParameter.Optional }
);
}
After that I click on the Register button to show my data. Where is my input data? To show the input data I want to clarify a few things. When we access a view from a browser then the browser request looks at the HttpGet action method in the controller but when we send a request by button click then the request looks at the HttpPost action method in the controller. If we don't define explicitly the path of the action method then it looks at the default action method that has the same name as the view name. To show our form data we create an action method in the controller that has a parameter that is a model that passes from the view to the controller on postback and we get data from that model in the action method.
[HttpPost]
public ActionResult UserRegister(UserRegisterModel model)
{
    System.Text.StringBuilder sbMessage = new System.Text.StringBuilder();
    sbMessage.Append("Your Name is : "+ model.Name + "</br/>");
    sbMessage.Append("Your Password is : " + model.Password + "</br/>");
    sbMessage.Append("Your Email is : " + model.Email + "</br/>");
    return Content(sbMessage.ToString());
}
Thereafter we get the result on a button registration click. Our URL does not change, in that case only the content will change.
Using Data Annotation Validator Attribute to perform Validation
We use validator attributes to perform validation. The System.ComponentModel.DataAnnotations namespace includes the following validator attributes:
Range: Enables you to validate whether the value of a property falls between a specified range of values.ReqularExpression: Enables you to validate whether the value of a property matches a specified regular expression pattern.Required: Enables you to mark a property as required.StringLength: Enables you to specify a maximum length for a string property.Validation: The base class for all validator attributes.
Now we implement three attributes (Required, StringLength, and RegularExpression) out of five attributes on our UserRegisterModel model so we need to modify our existing model as:
using System.ComponentModel.DataAnnotations;
using System.ComponentModel;

namespace UserRegistrationApplication.Models
{
    public class UserRegisterModel
    {
        [DisplayName("User Name")]
        [Required(ErrorMessage="Name can not be blank")]
        public string Name { get; set; }

        [Required(ErrorMessage = "Password can not be blank")]
        [StringLength(6,ErrorMessage="Password should be equal or less than 6 character")]
        public string Password { get; set; }

        [Required(ErrorMessage = "Email can not be blank")]
        [RegularExpression(@"\w+([-+.']\w+)*@\w+([-.]\w+)*\.\w+([-.]\w+)*",ErrorMessage="Email is not Valid")]
        public string Email { get; set; }
    }
}
Here we are using DisplayName also to display the custom name for the Name field, in other words on the UI screen the model Name property label will have "User Name" as a text value. Here we defined a custom message for string length and regular expression so that the UI screen shows our custom message when validation is applied, otherwise we get the default error message of the data annotation validator attribute.
We applied a data annotation validator attribute on the model properties that would show the message on the UI screen so we need to add a ValidationMessage() method of the HtmlHelper class for each field and we've also modified our view as in the following:
@model UserRegistrationApplication.Models.UserRegisterModel
@{
    ViewBag.Title = "UserRegister";
    Layout = "~/Views/Shared/_Layout.cshtml";
}
<link href="@Url.Content("~/Content/BaseStyleSheet.css")" rel="stylesheet" type="text/css" />
<h2>User Register Form</h2>@using(Html.BeginForm())
{
<div>
    <div class="formRowContainer">
        <div class="labelContainer">
            @Html.LabelFor(model => model.Name)
        </div>
        <div class="valueContainer">
            @Html.TextBoxFor(model=>model.Name,Model.Name)
            @Html.ValidationMessage("Name")
        </div>
    </div>
    <div class="clearStyle"></div>
    <div class="formRowContainer">
        <div class="labelContainer">
            @Html.LabelFor(model => model.Password)
       </div>
        <div class="valueContainer">
            @Html.PasswordFor(model => model.Password, Model.Password)
            @Html.ValidationMessage("Password")
        </div>
    </div>
    <div class="clearStyle"></div>
    <div class="formRowContainer">
        <div class="labelContainer">
            @Html.LabelFor(model => model.Email)
        </div>
        <div class="valueContainer">
            @Html.TextBoxFor(model => model.Email, Model.Email)
            @Html.ValidationMessage("Email")
        </div>
    </div>
    <div class="clearStyle"></div>
    <div class="buttonContainer">
        <button>Register</button></div></div>}
We are using ValidationMessage() of the HtmlHelper class that takes an argument in string form that is the property name in the model and shows an error message defined in the model property when the model is not valid on submitting the form. We need to check that the model is valid in the action method under the controller so we update our existing post action method in the UserRegisterController controller.
[HttpPost]
public ActionResult UserRegister(UserRegisterModel model)
{
    if (ModelState.IsValid)
    {
        System.Text.StringBuilder sbMessage = new System.Text.StringBuilder();
        sbMessage.Append("Your Name is : " + model.Name + "
");
        sbMessage.Append("Your Password is : " + model.Password + "
");
        sbMessage.Append("Your Email is : " + model.Email + "
");
        return Content(sbMessage.ToString());
    }
    else
    {
        return View(model);
    }
}
Here we used an If condition to determine whether the UserRegisterModel model is valid. If the model is valid according to validation rules, then the if block will be executed otherwise it will not. Now we run our MVC UserRegistrationApplication to test validation. We perform two tests, one for the required field message and another for the custom validation message. First of all, we leave blank all textboxes on the form and submit the form by the registration button click. We get the result as below.
Now we perform another test by inserting the wrong values in the input fields and submitting the form by the registration button click.
I hope that we have learned the basics of Razor View Engine in MVC 3.
Conclusion
This article introduced ASP.Net MVC 3 but same concept is use in MVC 4. If you have any doubt, post as a comment or directly connect through https://twitter.com/ss_shekhawat. If you want learn MVC with Entity Framework using code first approch then here is a series MVC Learning Series with Entity Framework Code First Approach for you.


 General
  News
News  Suggestion
  Question
  Bug
Bug  Answer
  Joke
Joke  Praise
  Rant
Rant  Admin
Admin 


