Introduction
I decided to write these tutorials after I realized that I didn’t really
understand how C# handled transparency. I was doing some alpha blending and the
resulting colors were not what I expected. So I built a tool, AlphaBlender
Figure 1, to show a Venn diagram of the colors mixed like in standard color
theory texts and I was further puzzled that the tool produced an image unlike
any I’d seen in school.
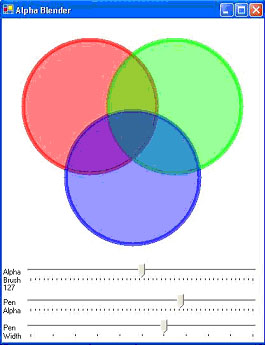
Figure 1 AlphaBlender demo application
Figure 2 shows what I got versus what I expected.

Figure2, Alpha blend versus my expectations of ‘real’ blended colors
Well… nobody told me that alpha blending was supposed to be like my
expectations; in fact, I am frequently surprised at how little anything works
like I first expect it too. So I decided to write these tutorials to help me
understand what’s really going on with transparency in C#.
In each of these tutorials, we consider the ‘what’ before the ‘how’-- a
discussion is presented of the concepts behind the code, and then at the end, we
look at the code behind the concepts. In the code section, I’ll introduce each
relevant new element of GDI+ as it occurs, and I won’t mention it again if it
reoccurs in later code. This should help with redundancy and get the elementary
stuff over with quickly.
Also a word of caution: I’m no C# guru. I’ve written the demonstration code
to illustrate the transparency concepts, not to demonstrate good programming
practice. I encourage any and all to send me comments on my coding practices and
how I might improve them.
The Concepts
What Is Color?
Color is a human thing. It is defined by our ability to perceive a narrow
band of the electromagnetic spectrum that we call visible light. Our eyes have
’rod’ cells that sense variations in black and white, and we have three types of
cone cells, one each for red, green and blue.
We can simulate our perception of color by mixing red, green, and blue, which
is what a computer monitor does. This brings us to the natural use of these
components to create colors in C#, where a color is a 32-bit structure of four
bytes for Alpha, Red, Green, and Blue
Alpha is a transparency parameter that defines how much of the existing
display color pixel that should ‘show through’ the new color.
Visualization Tools
I propose that if a picture is worth a thousand words, then a demo program is
worth a ten thousand. The following demonstrations show some things about
transparency use in C#.
I wrote ColorMaker, Figure 3, to show the effect of varying each of the color
structure parameters. The color is created over a gradient, black to white, to
illustrate how the Alpha value affects the ‘show through’ of the background
color
Figure 3, ColorMaker demo application
Next I wrote WhatColorIsIt, Figure 4, to show the color parameters for any
pixel on the screen. (This demo is based on Charles Petzold’s WhatColor example
from his C# book).
Figure 4, WhatColorIsIt demo application
I combined what I learned with these two programs and wrote Spectrum, Figure
5, which simulates the color spectrum of visible light and allows the user to
read the color parameters.
Figure 5 Light spectrum simulation demo application
Transparency
I started this tutorial because I didn’t understand how alpha blending
actually worked. Figure 1 shows what I was getting versus what I was expecting,
and it also shows fairly obviously what is really going on. Alpha blending does
not work like blending light; it works like stacking glass filters.
If you take a red, green, and blue glass filters and lay them on a
background, you would get an effect like what we see in the demo. Filters with
50% transparency should look like the demo with alpha set to 127.
Here’s the alpha blend algorithm:
displayColor = sourceColor×alpha / 255 + backgroundColor×(255 – alpha) / 255
I did some calculations starting with an opaque white background to see what
this gives
Add a 50% transparent red pixel over an opaque white
pixel:
sourceColor(127,255,0,0) ( Red, 50% transparent)
background
Color(255,255,255,255) (Opaque white)
displayColor Red = ( 255 * 127/255) + (255)*(255 – 127)/255 =
255;<br />displayColor Green = (0 * 127/255) + (255)*(255 – 127)/255 =
127;<br />displayColor Blue = (0 * 127/255) + (255)*(255 – 127)/255 =
127;
Resulting Color (127,255,127,127)
Add a 50% transparent green pixel over the
results:
sourceColor(127,0,255,0) ( Green, 50%
transparent)
backgroundColor(127,255,127,127)
displayColor Red = (0 * 127/255) + (255)*(255 – 127)/255 =
127;<br />displayColor Green = (255 * 127/255) + (127)*(255 – 127)/255 =
192;<br />displayColor Blue = (0 * 127/255) + (127)*(255 – 127)/255 =
65;
Resulting Color (127,127,192,64)
Add a 50% transparent blue pixel over the
results:
sourceColor(127,0,0,255) ( Blue, 50% transparent)
background
Color(127,127,192,64)
displayColor Red = (0 * 127/255) + (127)*(255 – 127)/255 =
64;<br />displayColor Green = (0 * 127/255) + (192)*(255 – 127)/255 =
96;<br />displayColor Blue = (255 * 127/255) + (64)*(255 – 127)/255 = 159;
Resulting Color (127,64,96,159)
Compare the ‘real’ world to the GDI+ world with 50% transparent colors: ‘Real
World’ GDI+ World
Red over white (255,0,0) - Pink. (255,0,0) - Pink
Green
over results (255,255,0) - Yellow (127,192,64) – Light Olive?
Blue over
result (255,255,255) - White. (64,96,159) – Dark Slate Blue?
I did the same calculations starting over opaque black and got:
Red over black (127,0,0) – Med. Red (127,0,0) – Med. Red
Green over
results (127,127,0) – Med. Yellow (64,127,0) – Dark Olive?
Blue over results
(127127,0) – Med. Gray (32,64,127) – Gray Navy?
Conclusion: Alpha blending simulates real world transparency for one layer
only.
I wrote a tool, Alpha Demonstrator Figure 6, to show the effect of ‘stacking’
order and background color to further illustrate what’s really going on. You can
change the stacking order and background color in the demo to view each stacking
and background color permutation.
Figure 6, Alpha Demonstrator
To wind things up for this tutorial, I wrote Color Demo, Figure 7, which
shows additive and subtractive color and effects of various backgrounds, the way
I think they should look to simulate the ‘real’ world.
Figure 7 Color Demo illustrates additive and subtractive color theory
The Code
Note on flicker-free drawing
Some of these tutorial demos push the systems resources and flicker like
crazy using ‘standard’ C# coding practices. There are many ways to prevent
flicker and I present one way to use a double buffering technique to get fairly
flicker free drawing. I say ‘fairly’ because Windows© will draw your image
buffer to the screen when it damn well pleases. It would be best to put your
buffer into screen memory during the CRT’s vertical blanking interval when
nothing is being written to the screen (I’m not sure if this is true for LCD’s).
If Windows© is in the process of writing your image in memory as the CRT
‘paints’ the screen through the memory you are using, the loaded part will show,
but the rest won’t since it hasn’t been loaded yet. Windows© finishes loading
and on the next screen painting cycle the full image shows up. This causes a
kind of flicker called ‘tear’ and I know of no way to prevent this in GDI+. In
DirectDraw you would load your buffered image during the vertical blanking
interval and avoid tear. That said, the double buffering used here prevents most
of the flicker that you’d see if you don’t use double buffering and yields
results that I can live with.
First you set the style using the Control.SetStyle method for
setting flags that categorize supported behavior. The flags are listed in the
ControlStyles enumeration. We will use three:
AllPaintingInWmPaint – the control will ignore the
WM_ERASEBKGND message and paint its own background.
UserPaint – the control paints itself rather than letting the
OS do the painting. You do not use the form’s Paint event, you instead override
the OnPaint method.
DoubleBuffer – the drawing is done in a buffer and the buffer
is drawn to the screen.
In your form constructor add the following styles:
public Form1()
{
InitializeComponent();
SetStyle(ControlStyles.AllPaintingInWmPaint |
ControlStyles.UserPaint |
ControlStyles.DoubleBuffer,
true);
}
Next you override the OnPaint method and draw the background:
protected override void OnPaint(System.Windows.Forms.PaintEventArgs e)
{
e.Graphics.FillRectangle(new SolidBrush(SystemColors.Window),
e.ClipRectangle.X,
e.ClipRectangle.Y,
e.ClipRectangle.Width,
e.ClipRectangle.Height);
}
Color Maker
The ColorMaker, Figure 3, allows the user to use slider controls to set the
red, green, blue, and alpha parameters of the color structure and paint the
results over a black to white gradient background.
We create a rectangle for the gradient and the color.
private Rectangle rect = new Rectangle(8, 48, 272, 72);
The user uses scroll bars sets the color elements.
private void trackBarRed_Scroll(object sender, System.EventArgs e)
{
  int temp = trackBarRed.Value;
  if(temp>255)temp = 255;
  red = (byte)temp;
  labelRed.Text = "Red: " + red.ToString();
  Refresh();
}
In the OnPaint method we create the gradient box by first creating a gradient
brush that will make a black to white horizontal gradient.
LinearGradientBrush lgBrush =
new LinearGradientBrush(backRectangle,
Color.Black,
Color.White,
LinearGradientMode.Horizontal);
We then draw this box to the screen using the Graphics FillRectangle method.
e.Graphics.FillRectangle(lgBrush,backRectangle);
Next we create the colorBrush from color elements provided by the slider
values.
SolidBrush colorBrush =
new SolidBrush(Color.FromArgb(alpha,red,green,blue));
We then draw the color over the gradient
e.Graphics.FillRectangle(colorBrush,rect);
And don’t forget to clean up.
lgBrush.Dispose();
colorBrush.Dispose();
AlphaBlender
This is the demonstration that got me to thinking about all this in the first
place. As I said in the beginning, it didn’t behave like I expected, instead it
did just what it was supposed to.
AlphaBlender, Figure 1, adds FillEllipse to the prior discussion.
e.Graphics.FillEllipse(redBrush,redRectangle);
e.Graphics.FillEllipse(greenBrush,greenRectangle);
e.Graphics.FillEllipse(blueBrush,blueRectangle);
WhatColorIsIt
WhatColorIsIt, Figure 4, is derived from WhatColor.cs © 2002 by Charles
Petzold, www.charlespetzold.com. It uses COM Interoperability, which allows C#
users to access non-GDI+ functions from the Win32 API.
This is hardly a beginner topic, but I’ve included it here because the tool
itself is so useful and it gives quick insight in how to expand your C# toolset.
Make certain that you dispose of anything you create from a DLL since it is
unmanaged and doesn’t get garbage collected when you close.
At the top of the code we add:
using System.Runtime.InteropServices;
In the Form1 class we define the external Win2 functions:
[DllImport("gdi32.dll")]
public static extern IntPtr CreateDC(string strDriver,
  string strDevice, string strOutput, IntPtr pData);
[DllImport("gdi32.dll")]
public static extern bool DeleteDC(IntPtr hdc);
[DllImport("gdi32.dll")]
public static extern int GetPixel(IntPtr hdc, int x, int y);
We use the form designer to add a timer. Then we use the properties box to
add the Tick event. To this we add our (well, Petzold’s) code.
private void timer1_Tick(object sender, System.EventArgs e)
{
Point pt = MousePosition;
IntPtr hdcScreen = CreateDC("Display", null, null, IntPtr.Zero);
int cr = GetPixel(hdcScreen, pt.X, pt.Y);
DeleteDC(hdcScreen);
clr = Color.FromArgb((cr & 0x000000FF),
(cr & 0x0000FF00) >> 8,
(cr & 0x00FF0000) >> 16);
if (clr != clrLast)
{
Invalidate();
}
}
In our OnPaint method we only do something if something has changed:
if (clr != clrLast)
{
  clrLast = clr;
…
And, to previously discussed concepts we add DrawString
e.Graphics.DrawString("\nRed: " +
clr.R.ToString("X00") +
" - " +
clr.R.ToString() +

…More strings… );
LightSpectrum
To the concepts we’ve looked at so far, LightSpectrum, Figure 5, elaborates
on the gradient brush to simulate a full spectrum of visible light. I reuse this
code in several subsequent demonstrations, so in a real-world coding situation
(this is an unreal-world) I’d put this stuff in its own class. This, as is,
really has nothing to do with transparency, but I use it later as a backcolor
for transparency demos.
In the OnPaint method we add a new
LinearGradientBrush
with some dummy colors.
LinearGradientBrush brBrush =
  new LinearGradientBrush(
  rect, Color.Blue, Color.Red,
  LinearGradientMode.Horizontal);
Then we create a color array for the gradient. This array is based on the
assumption that the values used will give a good simulation, and to my eye it
does.
Color[] clrArray =
{
  Color.FromArgb(255,0,0,0),
  Color.FromArgb(255,128,0,128),
  Color.FromArgb(255,255,0,255),
  Color.FromArgb(255,128,0,255),
  Color.FromArgb(255,0,0,255),
  Color.FromArgb(255,0,128,255),
  Color.FromArgb(255,0,255,255),
  Color.FromArgb(255,0, 255,128),
  Color.FromArgb(255,0,255,0),
  Color.FromArgb(255,128,255,0),
  Color.FromArgb(255,255,255,0),
  Color.FromArgb(255,255,128,0),
  Color.FromArgb(255,255,0,0),
  Color.FromArgb(255,128,0,0),
  Color.FromArgb(255,0,0,0)
};
As with the color array, a points array is created with values that we assume
will give use a good continuum in our simulation.
float[] posArray =
{
  0.0f,
  1.0f/14.0f,
  2.0f/14.0f,
  3.0f/14.0f,
  4.0f/14.0f,
  5.0f/14.0f,
  6.0f/14.0f,
  7.0f/14.0f,
  8.0f/14.0f,
  9.0f/14.0f,
  10.0f/14.0f,
  11.0f/14.0f,
  12.0f/14.0f,
  13.0f/14.0f,
  1.0f
};
Next we create an instance of the ColorBlend class, which defines color and
position arrays used for interpolating color blending in a multicolor gradient
ColorBlend colorBlend = new ColorBlend();
We then set the properties.
colorBlend.Colors = clrArray;
colorBlend.Positions = posArray;
And next we set the LinearGradientBrush InterpolationColors property to our
ColorBlend.
brBrush.InterpolationColors = colorBlend;
AlphaDemonstrator
I built AlphaDemonstrator, Figure 6, to show more variations on alpha
blending as it actually works and contrary to my expectations. No new code
concepts are added, so no extra discussion is given.
ColorDemo
I wrote ColoDemo to provide a simulation of how I thought color and
transparency should be simulated for the ‘real world’. That is, what do we need
to do to get the effect of mixing paints or projecting colored lights?
I hacked around a bit and came up with the following function:
private Bitmap trueColorMix(Bitmap bitmap1, Bitmap bitmap2,
  int X, int Y, byte alpha)
{
  Color clrPixel1;
  Color clrPixel2;
  int redMix,greenMix,blueMix;

  for(int i = 0; i < bitmap2.Width; i++)
  {
    for(int j = 0; j < bitmap2.Height; j++)
    {
      clrPixel1 = bitmap1.GetPixel(i+X,j+Y);
      clrPixel2 = bitmap2.GetPixel(i,j);
      redMix = ((int)clrPixel1.R + (int)clrPixel2.R);
      if(redMix > 255) redMix = 255;
      greenMix = ((int)clrPixel1.G + (int)clrPixel2.G);
      if(greenMix > 255) greenMix = 255;
      blueMix = ((int)clrPixel1.B + (int)clrPixel2.B);
      if(blueMix > 255) blueMix = 255;
      bitmap1.SetPixel(i+X,
          j+Y,
          Color.FromArgb(alpha,
          (byte)redMix,
          (byte)greenMix,
          (byte)blueMix));
    }
  }

  return bitmap1;
}
This function receives the background bitmap1, the source bitmap2, the source
X and Y locations and alpha for the blend. It iterates through each pixel of
bitmap2 that overlays bitmap1, adds each pixel together, limiting the maximum
value to 255, then resets the bitmap1 pixel to the new red, green, and blue
values and sets alpha to the given alpha.
This provides a good simulation of additive color over a black background.
But it doesn’t work over white since, for white, bitmap1 starts out with all
color values already at 255. Putting color over white, subtractive color, is
what printers do, using Cyan, Magenta and Yellow as their primary colors. They
also use black, since they can’t get a good black mixing the colors, calling
their system CYMK, where K is the black. In the Color Demo code, all that’s
needed to demo subtractive color is to start with a white background and
subtract the pixels in bitmap2.
In the next tutorial, we’ll begin with images by looking at the
CompositingMode Enumeration and the ColorMatrix, and
ImageAttributes
classes for making color changes to entire images.


 General
  News
News  Suggestion
  Question
  Bug
Bug  Answer
  Joke
Joke  Praise
  Rant
Rant  Admin
Admin 


 )
)