Introduction
As the role of JavaScript is increasing day by day in my recent projects, currently we are using Dojo and Angular JS part SOA based projects. My managers are forcing me to TDD style of development including JavaScript code. I am able to find few interesting tools to support Test Driven Development (TDD) with JavaScript also well integrated with Visual Studio 2012, that I want to share with you in this article.
Currently Used Tools in my Projects
- Jasmine - BDD, framework independent, easy integration with Ruby projects and continuous builds.
- Js-test-driver - The goal of
JsTestDriver is to build a JavaScript test runner which easily integrates with continuous builds systems and allows running tests on multiple browsers quickly to ease TDD style development.
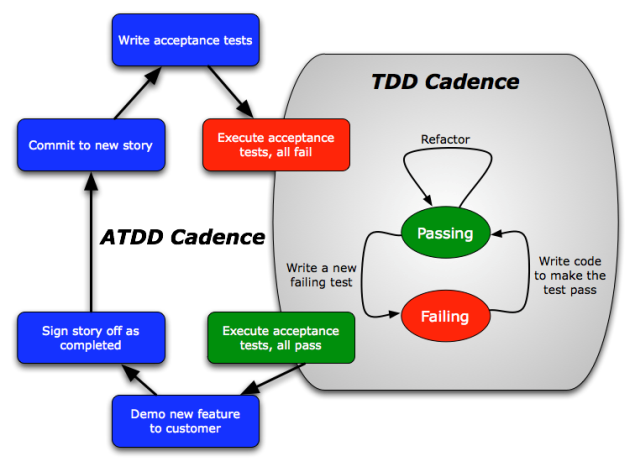
Acceptance Test Driven Development (ATDD)
TDD is extremely valuable, but you need more to achieve great unit test coverage and still not deliver value to the customer. ATDD focuses on complete features and functionality:
- ATDD: macro view
- TDD: micro view
JsTestDriver is a powerful framework for running unit tests for JavaScript code. The main advantage of it is that it can be executed from the command line on automated continuous integration environment, part of your unit testing framework. I usually use Visual Studio 2012 and JsTestDriver can be attached to it using “External Tools” mechanism.
Overview of How JsTestDriver Works at Runtime

Part 1: How to Run JavaScript Test Cases using JsTestDriver Without Any Plugins (Visual Studio and Eclipse)
File structure as shared in code files with folder name js-test-driver:
Steps to Setup and Run the JavaScript Tests
Step 1: Download the JsTestDriver jar file from here and place in your local machine.
Step 2: For small projects, just create two folders name with “src” and “tests” including configuration file name with “jsTestDriver.conf”.
Step 3: Place your JavaScript code files in the folder name with “src” and created TestCases either using prototype or using inline declaration are placed in the folder “tests”, find the detailed description as given below related to how to write Test Cases in JstestDriver and details of command line options in JsTest Driver as given below.
Step 4: Just create bat files name with “run-server.bat” (used to start server on specified port) and “run-tests.bat” (used to run different tests on specified browsers ).
Step 5: Run the server “run-server.bat“ to start the server and later run “run-tests.bat” contains tests with specified command line switches. Or call the same execute from command line on automated continuous integration environment, currently we are using Team City for the same.
run-server.bat
java -jar JsTestDriver-1.3.5.jar --port 1234
run-tests.bat
java -jar JsTestDriver-1.3.5.jar --tests all --browser "C:\Program Files\Mozilla Firefox\firefox.exe"
How to Write Test Cases in JsTestDriver
There are two ways to declare tests in the TestCase.
Using prototype
MyTestCase=TesCase("MyTestCase");
MyTestCase.prototyp.testA=function( ) {
};
MyTestCase.prototype.testB=function( ) {
};
Using inline declaration
TestCase("MyTestCase", {
MyTestCase.prototype.testA=function( ) {
};
MyTestCase.prototype.testB=function( ) {
};
Screen spec of my JavaScript test case file
TestCase("GreeterTest", {

	testGreet: function(){
		var greeter = new myapp.Greeter();
		assertEquals("Hello Vivek", greeter.greet('Vivek'));
	}
});
Used configuration files as shared name with (jsTestDriver.conf)
As mentioned below, the JavaScript code and tests folders paths with “load:” switch and used referenced file paths inside JavaScript libraries with “serve:” switch part of the configuration file. In a nutshell, mention all base paths of JavaScript files including used libraries in the “load:” and all referenced JavaScript libraries paths should be in “serve:”
Server: http://localhost:4321
load:
- src/*.js
- tests/*.js
- src \work\dojo\dojo.js
- src \work\openlayers\OpenLayers.js
- src\test\js\mock\mock4js.js
- src\test\js\mock\jsUnitMockTimeout.js
serve:
- src/test/json/*.json

run-server.bat

java -jar JsTestDriver-1.3.5.jar --port 1234

run-tests.bat

java -jar JsTestDriver-1.3.5.jar --tests all
Output window
.
Total 1 tests (Passed: 1; Fails: 0; Errors: 0) (1.00 ms)
  Safari 528.16: Run 1 tests (Passed: 1; Fails: 0; Errors 0) (1.00 ms)
    ConsoleTest.testGreet passed (1.00 ms)
      [LOG] JsTestDriver Hello World!
      [LOG] Browser Hello World!
Part 2: How to Run JsTestDriver with Visual Studio 2012
Code files are attached with this article folder name with “JS-TestDriver-VS2012Plugin-Code”.
Prerequisites
- Visual Studio 2012
- Java Runtime
- JsTestDriver (http://code.google.com/p/js-test-driver/downloads/list). Just download it and put to local directory. On my machine, it's D:\builds\js-test-driver\JsTestDriver-1.3.5.jar.
Sample ASP.NET Solution with JavaScript Unit Tests
For the purpose of demonstration, let's create a small sample project, which contains some JavaScript unit tests.
- Open Visual Studio 2010 and above.
- On the File menu, choose "New Web Site".
- Create "js" folder for client scripts in the root of web site.
- Create "production" and "testing" folders within "js" folder. First one - for production scripts and the second one for unit tests, test doubles, test configuration files.
Note: Do not forget to configure build scripts to delete "testing" folder and "jsTestDriver.conf" from final release - it is not acceptable to have testing code on production.
- Put production scripts in "production" folder. For example - "Greeter.js" with the following contents.
- Put tests into "testing/tests" folder. For example - "GreeterTest.js" with the following contents.
- Put configuration file “jsTestDriver.conf” into “testing” folder with the following contents.
After all operations, you will have ASP.NET solution with structure like this:
Configure JsTestDriver tests runner external application:
- Open Visual Studio.
- On the Tools menu, choose External Tools.
- In the External Tools dialog box, choose Add, and enter a name "JsTestDriver Run" in the Title box.
- In the Command box, enter the path to the Java Runtime. For example "C:\Program Files\Java\jre6\bin\java.exe".
- In the Arguments box, enter arguments in the following format - "-jar {Enter Path to Jar here}JsTestDriver-1.3.5.jar --tests all". For example, from my machine: -jar d:\builds\js-test-driver\JsTestDriver-1.3.5.jar --port 9876 --browser "C:\Program Files\Mozilla Firefox\firefox.exe" in the Initial directory, enter "$(ProjectDir)\js" For example - "$(ProjectDir)\js".
- Select use output window and then choose OK.
If you want, now just assign keyboard shortcut to run "JsTestDriver Run" (In the example below, it is assigned to "Ctrl + F9"): Happy coding!
This member has not yet provided a Biography. Assume it's interesting and varied, and probably something to do with programming.


 General
  News
News  Suggestion
  Question
  Bug
Bug  Answer
  Joke
Joke  Praise
  Rant
Rant  Admin
Admin 


