"ASP.NET Web API is a framework that simplifies the creation of HTTP services".
Using ASP.NET Web API, we can create HTTP services that are non-SOAP based like plain XML or JSON strings, etc. with added advantages.
- Allowing to create resource-oriented services using the full features of HTTP
- Exposing services to a variety of clients easily like browsers or mobile devices, etc.
Before diving into details, I would like to clarify one misconception that ASP.NET Web API has replaced WCF. WCF is still a powerful programming model for creating SOAP based services that uses a variety of transport protocols like HTTP, TCP, Named Pipes or MSMQ, etc. You can find the same implementation by using WCF REST in another article, i.e., "5 simple steps to create your first RESTful service".
Apart from Visual Studio 2010 or 2012, we also need MVC 4.0 to implement this HTTP service. For the purpose of this implementation, I am going to use Visual Studio 2010.
You can download MVC 4.0 for Visual Studio 2010 from Microsoft as follows:
Following are 3 simple steps to create an HTTP service that returns non-SOAP based data:
- Create Web API Project
- Prepare domain Model
- Adding Controller class
Let's move forward step by step to create a simple HTTP service using ASP.NET Web API.
1. Create Web API Project
- Open Visual Studio and create "New Project", i.e., File -> New Project.
- Choose "ASP.NET MVC 4 Web Application" template and name project as "
FirstWebAPIService". - When you click "OK" button, a new window will appear for selecting a sub-template. Actually for ASP.NET MVC 4 Web Application, we have multiple sub-options, i.e., Empty, Internet Application, Web API, etc.
- Choose "Web API" and simply press "OK" button.


- A default ASP.NET MVC 4 Web API template project is created. As it is an MVC application template, you will easily find "Model", "View" and "Controller" folders inside it.
2. Preparing Domain Model
Now in a second step, we need to prepare the model.
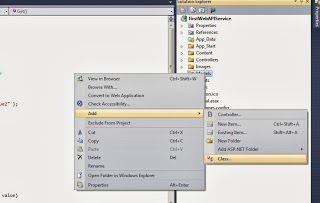
- Right click on the "Model" folder and choose "Class" under "Add" from the context menu as shown in the figure.
- Name the class as "Product.cs".

Here is the code for Product class:
public class Product
{
    public int ProductID { get; set; }
    public string ProductName { get; set; }
    public string ProductCategory { get; set; }
    public int Price { get; set; }
}
3. Adding Controller Class
Controller class plays an important role, because request coming from client hits the controller first. Then the controller decides which model to use to serve the incoming request. So, in order to add a controller:
- Right click on the "Controller" folder and choose "Controller" under "Add" from the context menu as shown in figure.
- Name the controller as "
ProductsController".

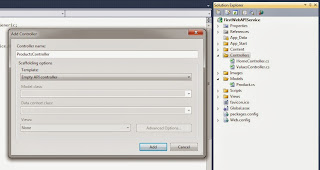
- Click the "Add" button, a new controller class will be added.
In order to make things simple, we will load the model with data inside this controller instead of loading it from database. Following is the code for controller class.
public class ProductsController : ApiController
{
        Product[] products = new Product[]
         {
             new Product { ProductID = 1, ProductName = "Product 1",
                           ProductCategory= "Category 1", Price = 120 },
             new Product { ProductID = 2, ProductName = "Product 2",
                           ProductCategory= "Category 1", Price = 100 },
             new Product { ProductID = 3, ProductName = "Product 3",
                           ProductCategory= "Category 2", Price = 150 },
             new Product { ProductID = 4, ProductName = "Product 4",
                           ProductCategory= "Category 3", Price = 90 }
         };
        public IEnumerable<Product> GetProducts()
        {
            return products;
        }
}
Don't forget to add "using FirstWebAPIService.Models;" at the top of the controller class.
Now, it's time to test your HTTP service using ASP.NET MVC Web API.
Run the application by pressing "CTRL+F5", Welcome window will appear as follows:

In order to call our Product controller, change the URL as "http://localhost:XXXX/api/products". You will see the results as shown in the following output window.

Final output returned can be displayed differently by different browsers. Here is the output of Google Chrome version 29.0.1547.66.
Hopefully, this simple web development tutorial will be helpful for developers to code their first HTTP service using ASP.NET MVC Web API. Further, I'll provide Web API HTTP service with all CRUD (Create, Read, Update, Delete) operations in the following weeks, In Shaa Allah.
Related Web Development Tutorials
CodeProject


 General
  News
News  Suggestion
  Question
  Bug
Bug  Answer
  Joke
Joke  Praise
  Rant
Rant  Admin
Admin 


