Introduction
Welcome to Step 3 of our DCOM tutorial. In this series, I will strip the mystique, the headache, and confusion from DCOM by giving you a comprehensive tutorial with a straightforward example. OK, no promises -- but I will give it a good try.
If you want to follow along with this tutorial and add code and use the Visual C++ Wizards as we go along, that's great. In fact, I very very highly recommend that, because otherwise this tutorial is a big waste of electronic ink (?). However, I follow along exactly with the tutorial myself, as I write it, and develop the code and use the Visual C++ wizards just as I say you should. The screenshots, in fact, are from my development of the files for each step! To download this already-developed code to compare with your own, simply click the 'Download the Step n Files - n KB" links at the top of each step. There's also an archive of the files for all the steps at the Questions and Answers page for this tutorial. I still recommend that you follow along with us as we go; this way, you can learn while you code. If you ever have problems along the way with this tutorial, feel free to:
A diagram of how our software will eventually work is shown in Figure 1. The client calls a method on the server, which then fires an event back to the client using a connection point. This connection point's event sink is implemented in the client (using MFC and ClassWizard!!!), and the client shows its user a message telling the user that the server said "Hello!":
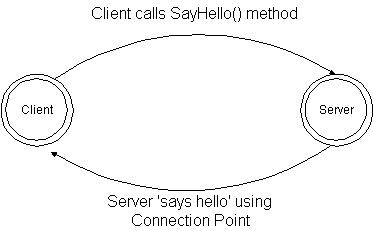
Figure 1. Diagram of our DCOM client/server set-up.
Remember, our steps in developing the software in this tutorial are as follows:
- Step 1: Create the server,
HelloServ, using the ATL COM AppWizard. - Step 2: Modify the starter files provided by AppWizard.
- Step 3: Use the New ATL Object Wizard to add a simple COM object, the
HelloWorld object, to the server. - Step 4: Modify the
IHelloWorld interface to include a SayHello() method. - Step 5: Add an event method,
OnSayHello(), to the connection point source interface, DHelloWorldEvents. - Step 6: Build the server, and install it on the server computer.
- Step 7: Create a MFC client,
HelloCli, which calls the server and handles the connection point event sink.
We're currently on Step 3 of this tutorial, where we will use the ATL Object Wizard to add a simple COM object, the HelloWorld object, to the server. This step will go by real fast, so instead of my blathering any further, let's plunge in:
Step 3: Add a Simple HelloWorld COM Object to the Server
To add COM objects to ATL servers, we can either use the New ATL Object Wizard provided by Visual C++, or we can add code by hand. I prefer to use the Wizards provided by Visual C++ whenever I can, but then again, I'm lazy :)
Let's proceed. Open ClassView, and then right-click on the 'HelloServ classes' text at the very top, and then click New ATL Object on the menu. The New ATL Object Wizard appears, as shown in Figure 2, below. All we want for this tutorial is a simple COM object, so click the Simple COM Object icon, and then click Next.

Figure 2. The New ATL Object Wizard with Simple COM Object selected.
After you've clicked Next, the ATL Object Wizard Properties dialog box should appear. The cursor starts off with being in the Short Name text box. Type HelloWorld in this box; as you type, the other fields are filled in automatically. Figure 3 below shows how everything should look when you're done. Don't click OK yet, though!
Figure 3. The ATL Object Wizard Properties dialog with the Names tab filled in.
Now, click on the Attributes tab of the ATL Object Wizard Properties dialog box. Make these selections:
- Under Threading Model, select Apartment.
- Under Interface, select Custom.
- Under Aggregation, select No.
- Check the Support Connection Points check box.
When everything is set correctly, the Attributes tab should appear as that in Figure 4, below. When everything's ready, click OK to have the New ATL Object Wizard generate code for us and add our new COM object to the server.
Figure 4. The Attributes tab of the ATL Object Wizard Properties dialog when we're done changing settings.
When everything's been added, ClassView should look like that shown in Figure 5. There is still one more change we need to make, though. Notice that, in Figure 5, the name of the event interface (for the connection point) is not _IHelloWorldEvents but instead DHelloWorldEvents? This is the result of a little change I made to the code.
Figure 5. ClassView after adding the HelloWorld object and changing the name of the event interface.
The DHelloWorldEvents name for our event interface is a loose convention of Microsoft's which I'm following. DHelloWorldEvents is a dispinterface, so a D belongs in front of its name. Make sense? Good. Double-click the _IHelloWorldEvents icon in ClassView. This jumps you to the project's IDL source code, which declares all of the OLE stuff that our project uses. Next, replace all instances of _IHelloWorldEvents, highlighted in bold in Listing 1 below, and change them to DHelloWorldEvents, highlighted in bold in Listing 2 below.
[
         ...
]
library HELLOSERVLib
{
	importlib("stdole32.tlb");
	importlib("stdole2.tlb");

	[
		uuid(...),
		helpstring("_IHelloWorldEvents event interface")
	]
	dispinterface _IHelloWorldEvents
	{
                ...
	};

	[
		uuid(...),
		helpstring("HelloWorld Class")
	]
	coclass HelloWorld
	{
		[default] interface IHelloWorld;
		[default, source] dispinterface _IHelloWorldEvents;
	};
};
Listing 1. The instances of the
_IHelloWorldEvents interface, which we need to replace with
DHelloWorldEvents:
[
         ...
]
library HELLOSERVLib
{
	importlib("stdole32.tlb");
	importlib("stdole2.tlb");

	[
		uuid(...),
		helpstring("DHelloWorldEvents event interface")
	]
	dispinterface DHelloWorldEvents
	{
                ...
	};

	[
		uuid(...),
		helpstring("HelloWorld Class")
	]
	coclass HelloWorld
	{
		[default] interface IHelloWorld;
		[default, source] dispinterface DHelloWorldEvents;
	};
};
Listing 2. The
_IHelloWorldEvents name replaced with
DHelloWorldEvents.
Notes From the Rear
That's it! We're finished with Step 3! See, that wasn't so bad, was it? Once you've made the changes specified in the two Listings above to the IDL source code, click Save All on the Visual C++ Toolbar. This should save changes to all your project files, and ClassView should match Figure 5.
You're now ready to proceed to Step 4. To do so, either click the link preceeding this sentence, or click Next below. You can find the source code from this step of the tutorial available from the Download Link above. To go back to Step 2 of this tutorial, click Back below.
<< Back | Next >>
Questions and Answers
Brian C. Hart, Ph.D., is a strategic engagement leader on a mission to leverage space technology to protect U.S. interests and assets against adversaries. Throughout Dr. Hart's career, he has enjoyed: Working closely with business executives to provide strategic direction and leadership, translating customer and competitive intelligence into compelling capture strategies and solutions, and mentoring teams to enhance individual and company capabilities while fostering an engaging and accountable environment, being involved in STEAM initiatives and education to develop greater awareness in the community, and serving the armed forces with the U.S. Navy and U.S. Army National Guard. He is excited to begin developing his career in Jacobs's Critical Mission Systems business unit, supporting NORAD and the U.S. Space Force.


 General
  News
News  Suggestion
  Question
  Bug
Bug  Answer
  Joke
Joke  Praise
  Rant
Rant  Admin
Admin 


