Introduction
This article is a sequel to my previous article - Hello Longhorn. In my last article I said that I will write a XAML version of Hello Longhorn. I changed my mind a bit, and decided to write something a bit more interesting. Thus I came with idea of writing the famous Tic-Tac-Toe using XAML and C#. Oh Ya! If you are a Xbox of Playstation developer, I will say that there is no need to panic as I have no plans to take over the gaming industry (at least not with this game :)).
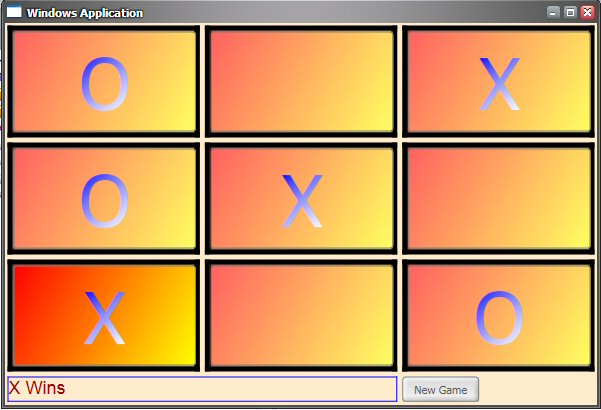
Even though this article is a beginners tutorial, it does demonstrate some powerful concepts of WinFX, such as writing UI in mark-up linked to some serious code. I know that you are anxious to get right to the nuts and bolts here, so without wasting any time I will quickly show you the screenshot and then we will get into the code.
Basics
In this program I have written my UI using XAML and code using C# all in one file. You can write these in separate files, which I think is a better way to do it. The only reason I wrote everything in one file is because I do not have a copy of Whidbey (note to self: rub it in at every opportunity). I did not want to tinker too much with the proj files and the rest of the stuff. I will admit that I took an easy approach. Never the less the thing works fine.
The top level of my application is NavigationApplication. NavigationApplication which inherits for the Application object is the core of the Longhorn application model.
<NavigationApplication xmlns="http://schemas.microsoft.com/2003/xaml"
StartupUri="TicTacToe.xaml"/>
The attribute StartUri has the value of “TicTacToe.xaml” which means that my NavigationApplication Object will look for this file and will display it on startup. This piece of code resides in the file named TicTacToeApplication.xaml
Creating the UI
As mentioned above I have created my UI in the file called “TicTacToe.xaml”. This is the file where all of my applications Interface objects and functionality resides. On the top I have a window application
<Window xmlns="http://schemas.microsoft.com/2005/xaml/"
        xmlns:def="Definition"
        ID="myWindow"
        Visible="true"
        Text="TicTacToe">
I can have more than one window in my application and each can have an ID. I only have one window with the text “TicTacToe” in the title bar.
Next I have my Border element
<Border
       xmlns="http://schemas.microsoft.com/2003/xaml"
       Background="BlanchedAlmond">
This will display a nice and clean border on edges of my window. After this I have an interesting section called Border.Resources
<Border.Resources>
 <LinearGradientBrush
   def:Name="lineargradient"
   StartPoint="0,0"
              EndPoint="1,1"  >
              <LinearGradientBrush.GradientStops>
          <GradientStopCollection>
            <GradientStop Color="red" Offset="0"/>
            <GradientStop Color="yellow" Offset="1"/>
          </GradientStopCollection>
          <LinearGradientBrush
         def:Name="textgradient"
         StartPoint="0,0"
        EndPoint="1,1"  >
        <LinearGradientBrush.GradientStops>
            <GradientStopCollection>
              <GradientStop Color="blue" Offset="0"/>
              <GradientStop Color="white" Offset="1"/>
            </GradientStopCollection>
            </LinearGradientBrush.GradientStops>
            </LinearGradientBrush>
These are the resources that are available to any object within this border. Of course the object must know how to use that resource. Here I have defined two gradients one for the background, and other for the text.
Next I declare a Table inside a DocPanel. The table has 3 columns. Further I will be creating 3 rows with 3 columns each to give me a total of 9 blocks to play with
<DockPanel
  ID="root"
        xmlns="http://schemas.microsoft.com/2003/xaml"
       Width="100%"
       Height="100%">
<Table
    xmlns="http://schemas.microsoft.com/2003/xaml"
  xmlns:def="Definition"
  Width="100%"
  CellSpacing="5">

  <Column Width="25%"/>
  <Column Width="25%"/>
  <Column Width="25%"/>
After this I have defined my rows
<Body>
      <Row>
        <Cell BorderThickness="5">
          <Border
    BorderThickness="1,1,1,1"
    BorderBrush="Black"
    Background="{lineargradient}"
    Width="100%">
      <Button ID="btn1"
      FontSize="72"
      HorizontalAlignment="Center"
      VerticalAlignment="Center"
      Width="100%" Height="100"
      Foreground="{textgradient}"
      Background="{lineargradient}"
      Click="HandleClick">

      </Button>
            </Border>
        </Cell>
        <Cell BorderThickness="5">
          <Border
    BorderThickness="1,1,1,1"
    BorderBrush="Black"
    Background="{lineargradient}"
    Width="100%">
      <Button ID="btn2"
      FontSize="72"
      HorizontalAlignment="Center"
      VerticalAlignment="Center"
      Width="100%" Height="100"
      Foreground="{textgradient}"
      Background="{lineargradient}"
      Click="HandleClick">

      </Button>
            </Border>
        </Cell>

        <Cell BorderThickness="5">
          <Border
    BorderThickness="1,1,1,1"
    BorderBrush="Black"
    Background="{lineargradient}"
    Width="100%">
      <Button ID="btn3"
      FontSize="72"
      HorizontalAlignment="Center"
      VerticalAlignment="Center"
      Width="100%" Height="100"
      Foreground="{textgradient}"
      Background="{lineargradient}"
      Click="HandleClick">
      </Button>
            </Border>
        </Cell>
      </Row>
Within each row I have a cell which has a Border and a Button. The user clicks the button and “X” or “O” is displayed based on the player. I will not go into the actual code for the game, which is pretty much simple. However I would like to bring your attention to the point that the code is enclosed within <def:code>tags
<def:Code>
<

 General
  News
News  Suggestion
  Question
  Bug
Bug  Answer
  Joke
Joke  Praise
  Rant
Rant  Admin
Admin 


 . So please give it a try, it should work. And if you have any problems, I can be reached at support at vgdotnet.com