Table of Contents
- SharePoint 2013 Administration Center
- Managing Site Collection
- User Profile
- Term Store
- Record Management
- Secure Store
SharePoint 2013 Administration Center
The SharePoint Online Administration Center shows the SharePoint Online Administrator how to manage and maintain site collections, and enable the features that work across site collections such as user and organizational profiles, the secure store, Apps, Record Management, Business Connectivity Services and InfoPath Forms Services.
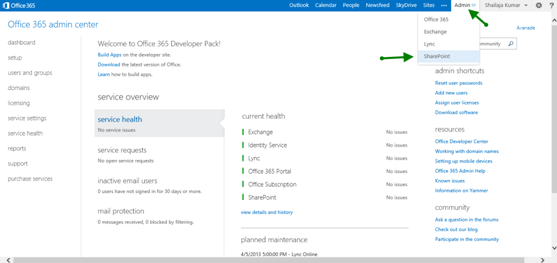
The following is the administrator home page for the Global administrator. The global administrator of the Microsoft Online Services Portal, with permissions to manage service licenses, users and groups, domains, and subscribed services will be able to view the following screen. Now to navigate to the SharePoint Administrator Center, click on the Admin link located on the top right corner of the site and click on the SharePoint in the menu.
The following is the SharePoint Administrator Center home page for users of SharePoint Online administrator role. The SharePoint Online administrator of the SharePoint Online Administration Center has permissions to create and manage site collections, designate site collection administrators, decide tenant settings, configure Business Connectivity Services and Secure Store, InfoPath Forms Services, Records Management, Search, and User Profiles.

Managing Site Collection
A SharePoint 2013 Online site collection is a group of SharePoint sites that are organized hierarchically. A site collection has one top-level site called as the parent site and a number of subsites called child sites built within it. Site collections can include various types of subsites, including team sites, meeting workspaces, document workspaces, blogs, and wikis. Along with the each sub sites, it may contain libraries, lists, etc.
Creating Site Collection
Let’s start creating our first Site Collection in Office 365 SharePoint 2013. Navigate to the site collection under SharePoint Administration Center and click on the New. We will see Private Site Collection and Public Web Site. Here in this demonstration, we will see how to create Private Site Collection.
Now after clicking on the Private Site Collection, the user will be prompted with the screen with Site Collection properties to fill out for the Site Collection to be created.
Title, Public Website Address, Template Selection, Time Zone, Administrator, Storage Quota, Sever Resource Quota are the list parameters. There is no new parameter in the SharePoint 2013 Site Collection creation process.
But in the Template Selection, you can see few new templates like Developer Site, Express Hosted Site, etc. Even all other known Site Templates are loaded with SharePoint 2013 features.
The following screen capture image shows how the newly created Site Collection looks.
So now, see how to manage the Site Collection in the role of administrator. The administrator users will have access to the SharePoint Administrator Centre, select the site collection you want to manage and the option will be enabled in Site Collection ribbon menu to navigate. Properties menu will show the Site Properties such as Title, Web Site Address, Primary Administrator, Administrators, Number of Subsites, Storage Usage, Storage Quota, Storage Warning Level, Resource Usage, Server Resource Quota and Resource Usage Warning Level.
Now let’s see how the owners for the site collection are managed. When you click on the Owners in the site collection ribbon menu, you can see two options Manage Administrator and Support Partner.
Manage Administrators will help manage the Primary Administrator and the Administrators of the Site Collection. There can be only one Primary Administrator and Site Collection can have more than one Administrator.
Add support partner is the Microsoft Support administrator group to our Site Collection. There are groups for user to select HelpDeskAdmins and TenantAdmins.
The next option in the Site Collection ribbon menu is the Sharing. Sharing will help you share site collection with external users and anonymous users by invitation.
Next is the Storage Quota management for the Site Collection.
Next the Server Resource Quota.
Upgrade, the upgrade option is for the SharePoint 2010 site collections in Office 365 environment.
Here in this environment, our Site Collection is in SharePoint 2013 version so you can see the Allow Upgrade option is set as No and it’s greyed.
Note: Office 365 Developer Site is a development and testing environment to shorten your setup time and start creating, testing, and deploying your apps for Office and SharePoint. Deploy the "Napa" Office 365 Development Tools to this preconfigured SharePoint site.
User Profile
The User Profile is a service application which stores information about users in a central location. User profiles enable social computing features like enabling search and connect with people for productive interactions so that users can collaborate efficiently within your organization.
The User Profile service is a common service in SharePoint Server 2013 that allows the creation and administration of user profiles that can be accessed from multiple sites and farms. User Profile is managed in three categorized groups under SharePoint Administration Center.
- People
- Organizations
- My Site Settings
People
Here under the people section, User properties, Profiles, Sub types, permissions, policies and audiences are managed.
Manage User Properties: Administrator can use this option to add, edit, organize, delete or map user profile properties. Profile properties can be mapped to Active Directory or LDAP compliant directory services. And apart from mapping the profile properties to AD, it can also be mapped to Application Entity Fields exposed by Business Data Connectivity (BDC). The following is the screen capture image that will show the Manage User Properties screen with all self explanatory options under the same.
Manage User Profiles: Using manage user profiles, we can administer user profiles in this User Profile Service Application. Using the edit my profile in the context menu, you can edit user profile by changing values for the properties. If the properties are mapped to the external data source, then those properties will be overwritten the next time user profiles are imported.
Manager personal site option will lead us to MySite’s Site Settings. We will study in more detail about the same in forthcoming article covering MySite.
Manage User Sub-types: Profile sub-types can be used to create a diverse set of properties for a group of users. For example, you can create a sub-type that categorizes a user as a permanent employee or contract employee, etc.
Use this page to manage sub-types for profiles. You can create new sub-types or delete existing sub-types.
- On the User Profile page, click Manage User Sub-types.
- Use this page to manage sub-types for profiles. You can create new sub-types or delete existing sub-types.
- Type values for the required properties (Sub-Type Name) and type values for any other properties you want to include for this Sub-Type.
- Click Create.
The successfully created Sub-type will appear under the Remove Existing Sub-types.
Manage Audiences: Audiences in SharePoint 2013 are groupings of users that can be used to target content on a SharePoint Web site. SharePoint 2013 allows targeting to the list level or to the list-item level. Groupings are determined by membership in membership in SharePoint groups, rules that are configured by an administrator or Microsoft Exchange Server distribution lists.
- On the User Profile page, click Manage Audiences.
- Use this page to create audiences and add rules. Set the name and owner for the audience.
- Here add the rules to be validated for the audience. Here in the example, we have created a rule where Department contains contract.
- Click OK.
- The audience will be created and shown in the summarized view as per the following screen capture.
Manage User Permissions: Use these permissions to control who can create My Sites and use other features provided by User Profile Service.
Manage Policies: On the User Profile page, click Manage policies. Use this page to manage policies for User Profile Service Application. These settings will affect user profiles and My Sites.
Organizations
The User Profile service is a shared service in SharePoint Server 2013 that enables the creation and administration of user profiles that can be accessed from multiple sites and farms. Administration of User Profile service applications is much simpler in SharePoint Server 2013 and can be delegated to a service application administrator by the farm administrator.
Here in the organizations section, we will manage the following:
- Manage Organization Properties
- Manage Organization Profiles and
- Manage Organization Sub-types
Manage Organization Properties
Use this page to add, edit, organize, delete or map organization profile properties. Profile properties can be mapped to Active Directory or LDAP compliant directory services. Profile properties can also be mapped to Application Entity Fields exposed by Business Data Connectivity.
Manage Organization Profiles
Use this page to manage the organization profiles in this User Profile Service Application
Manage Organization Sub-types
Use this page to manage sub-types for profiles. You can create new sub-types or delete existing sub-types.
My Site Settings
In order to provision My Sites, enable social computing features such as social tagging and news feeds, and create and distribute profiles across multiple sites and farms, you must enable the User Profile service application. User profile information is also used to generate a personal site in the portal for individual users.
Users can personalize their view of this site, called My Site. In addition, user profile information is used by index and search services to provide better search results, and is used in targeting content to audiences. You can import user profile information directly from Microsoft Active Directory directory service or enter it manually.
You can also customize the properties of the user profile according to the needs of your organization or to map to Active Directory properties.
Setup My Sites
Setup My Sites is the one primary configuration sections for MySites. In this section, the administrator will be able to configure for Search Center, My Site Host, Personal Site Location, Site Naming Format, Language Options, Permission Level, News feed, Security Options, Notifications and Privacy Settings, etc. We will key important areas discussed in this section.
Preferred Search Center
Here the administrator can control and configure the Search Center and define scope for finding document and people.
My Site Host
Setting a My Site Host allows you to use a designated site to host personal sites. All users accessing personal sites for this Shared Services Provider will be automatically redirected to the server you specify.
If there are any existing personal sites, you must manually transfer their contents to the new location.
Note: To change the location hosting personal sites, create a new site collection at the desired location using the My Site Host site template
Personal Site Location
Select the location at which to create personal sites. This should be a wildcard inclusion managed path defined on the web application hosting My Sites. Existing personal sites will not be affected.
Site Naming Format
Select the format to use to name new personal sites.
Existing personal sites will not be affected.
Language Options
Select whether users are allowed to choose the language of their personal site. The list of languages offered to users will correspond with the installed language packs on the hosting server.
Read Permission Level
Enter the accounts that will be granted the Read permission level in the personal site when it is created. Verify that the accounts have the correct Personalization services permissions to use personal features and create personal sites. Also, verify that the public page has the correct permissions by browsing to the permissions page on the My Site host.
Note: Accounts you add will only affect personal sites created after you added the accounts.
News feed
Select whether you want to enable activities on My Site news feeds.
Activities notify users of new events from people and content the user follows. Examples of activities include birthdays, job title changes, social tagging of content, new follow notifications, and more. Users can explicitly decide what activities get posted about them, and all are private by default except microblogging, which is visible to all users.
You can also enable migration if your organization makes use of legacy SharePoint 2010 activities
Security Trimming Options
Links in activity feeds, ratings, social tags and notes can be hidden from viewers without permissions to see them. Checking links can delay them from appearing on My Sites.
Email Notifications
This email address will be used for sending certain email notifications. This need not be a real monitored email address.
Select whether you want users to receive emails for news feed activities, such as replies to conversations in which they've participated and mention.
My Site Cleanup
When a user's profile has been deleted, that user's My Site will be flagged for deletion after fourteen days. To prevent data loss, access to the former user's My Site can be granted to the user's manager or, in the absence of a manager, a secondary My Site owner. This gives the manager or the secondary owner an opportunity to retrieve content from the My Site before it is deleted. Select whether or not ownership of the Site should be transferred to a manager or secondary owner before the site is deleted. Set a secondary owner to receive access in situations in which a user's manager cannot be determined.
Privacy Settings
Choose whether you want to make all users' My Sites public by default.
By default, a user's My Site is private. This means that each person's list of followers and who that person is following is not shared with anyone. Additionally, all activities (including new follow notifications, social tagging and rating of content, birthdays, job title changes, workplace anniversary, updating ask me about, posting on a note board, and new blog posts) will be private. Choosing this option will enable all of these activities by default for all users and override whatever policies are set within People and Privacy in the Manage Policies page.
Configure Trusted Host Locations
Use this list to identify trusted My Site host locations, serviced by other User Profile Service Applications. Apply audiences to identify which user's My Sites are hosted in that location.
Manage Promoted Sites
Use this list to promote certain sites to users. Sites added here will appear on Sites page in user's My Sites. Use audiences if you want a link to only appear for a specific set of users.
Publish Links to Office Client Applications
Use this list to publish links to SharePoint sites and lists when opening and saving documents from Office client applications. Links published here will show up under the My SharePoints tab when opening and saving documents. Use audiences to specify if a link should only be published to a specific set of users.
Manage Social Tags and Notes
Use this list to publish links to SharePoint sites and lists when opening and saving documents from Office client applications. Links published here will show up under the My SharePoints tab when opening and saving documents. Use audiences to specify if a link should only be published to a specific set of users.
XE: "Technical Requirements"
Term Store
A Term Store contains a set of related keywords organized into a hierarchy of information called managed terms, such as a well-defined product category or materials list, that you can then use to control the entry of list values.
A Term Store helps improve the consistency, reliability, and discoverability of information within a site collection.
Managed navigation using term store in SharePoint 2013
XE: WSS vs SharePoint Foundation 2010
Points to be remembered
- The term driven navigation seems to work with publishing sites only– if you try it with a collaboration site, the navigation doesn’t appear at all.
- There seems to be some caching going on between the term store and the site.
- While SharePoint 2013 automatically generates a term in your navigation term set if you create a page, it doesn’t work the other way around. If you click on any term without hooking it up to a page, you will get a page not found by default, or the page inherited from its term set parent.
Record Management
Record management is the identification of records and control of those records throughout the life cycle. Record management includes storing and retaining, retrieving based on request, user and roles based access, archive and delete based on the policy and expiry periods.
Creating Record Centre Site
The Records Center is envisioned to aid as a central repository in which an organization can store and manage all of its documents and records.
The Records Center supports the entire records management process, from records collection through records management to records disposition. Typically, a Records Center site is designed and configured by an organization's records management professionals and information technology (IT) staff to support an organization's file plan.
More RecordCentre details will be covered in future articles.
Secure Store
The Secure Store contains credentials such as account names and passwords, which are required to connect to external business applications. The Secure Store provides a method of mapping the credentials, and associating them to an identity or group of identities.
By default, there are no Secure Store Target Applications in this Secure Store Service Application. You can create a new Target Application from the Manage Target Applications group in the Edit ribbon group.
More SecureStore details will be covered in future articles.
Summary
In this chapter, we learned about SharePoint 2013 Administration Center, Managing Site Collection, User Profile, Term Store, Record Management and Secure Store. Future articles will cover each topic in more detail.
This member has not yet provided a Biography. Assume it's interesting and varied, and probably something to do with programming.


