Introduction
When it is necessary to create a GUI, one of the big headaches is to arrange the several components (buttons, text fields, lists, ...) into the window. The problem turns bigger if the window must be resized and all
the components must be repositioned. And more complicated if in the middle of the process you must create another component and place
it in the middle of your window. It is not a complicated task but gives a lot of work.
Java has a list of some layouts that help to create your GUIs but this task can be tricky if you are not familiar with them or the layout that you pretend to use is too complex. You can use a simple GUI tool where you drag and drop the components into the window and design the layout that you wish. But I do not like to use those tools (I feel more comfortable writing each line of code).
So, in this article, I propose a class that deals with this problem without the programmer doing
anything (almost nothing). I have called it FreeLayout.
Using the code
FreeLayout is composed of only two methods and a constructor.
There are three constructors available and all of them must receive the dimension of the container (or the container itself) to
be able to position the components into the container.
public FreeLayout(Dimension size)
public FreeLayout(int width, int height)
public FreeLayout(Container container)
Next, let's look at the method that is responsible for positioning the components into the container:
public void relativeTo(Component component,
		Anchor leftAnchor,
		Anchor topAnchor,
		Anchor rightAnchor,
		Anchor bottomAnchor)
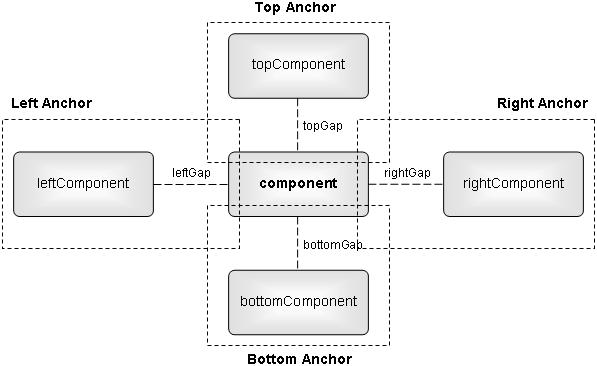
FreeLayout assumes that the component position to be added is defined
by four Anchors and each Anchor is defined by a component and a gap.
The component can take two possible values: a valid component object (by valid,
I mean that the component has already been added using the relativeTo method and in this case, the Anchor refers to a component, like a button, text editor, ...), or a null object (in this case, the Anchor refers to the border of the container).
The gap is an integer number that can be a positive value or negative one, and the fact being a positive or negative influences the position of the component to be added into the container. Let's assume that the component of the Anchor is non null. In this case, whatever the value of gap is, positive or not, will always correspond to the space that separates the component of the Anchor and the component to be added.
On the other hand, if the component of the Anchor is null and the gap is a positive value, then this value refers to the space that separates the border and the component to be added. If the gap is a negative value (and the component remains null), this value refers to a dimension of the component to be added (for the top and bottom anchors, this gap refers to the height of the component, for the left and right anchors, the gap refers to the width of the component).
The following table summarizes what has been explained:
| | | Component |
| | non null | null |
| Gap | positive | gap between
components | gap between component
and container border |
| negative | gap between
components | component width/height |
So, let's see an example:
freeLayout.relativeTo(btn3,
		new Anchor(null, 5),
		new Anchor(btn1, 5),
		new Anchor(null, 5),
		new Anchor(null, -20));
In this example, I am adding a component, btn3, to the container, in the following disposition:
new Anchor(null, 5): the left side of the btn3 component will be referenced to the left border of the container and the gap between them will be of 5new Anchor(btn1, 5): the top side of the btn3 component will be referenced to the bottom side of btn1 and the gap between them will be of 5new Anchor(null, 5): the right side of the btn3 component will be referenced to the right side of the container and the gap between them will be of 5. This makes the button width go from one end to the other of the containernew Anchor(null, -20): the bottom side of the btn3 component is not referenced to any surrounding component because the component is a null object and the gap is a negative value. In this case, I am define that my btn3 component will have a height of 20
In the next table, we can see all possible combinations that a component can receive:
Left Component/
Top Component | Left Gap/
Top Gap | Right Component/
Bottom Component | Right Gap/
Bottom Gap | Comments |
| null | negative | null | negative | Invalid |
| null | negative | null | positive | Width/Height - Container border |
| null | negative | non null | negative | Width/Height - Component |
| null | negative | non null | positive | Width/Height - Component |
| null | positive | null | negative | Container border - Width/Height |
| null | positive | null | positive | Container border - Container border |
| null | positive | non null | negative | Container border - Component |
| null | positive | non null | positive | Container border - Component |
| non null | negative | null | negative | Component - Width/Height |
| non null | negative | null | positive | Component - Container border |
| non null | negative | non null | negative | Component - Component |
| non null | negative | non null | positive | Component - Component |
| non null | positive | null | negative | Component - Width/Height |
| non null | positive | null | positive | Component - Container border |
| non null | positive | non null | negative | Component - Component |
| non null | positive | non null | positive | Component - Component |
So far the components are in the right position that we desire but if the window is resizable, the components must be adapted to the new size of the container. This is done by simply calling the invalidate method in the callback method that is called when the container is resized (this method only updates the components that were added using
the relativeTo method):
public void invalidate(int width, int height)
public void invalidate(Dimension size)
public void invalidate(Container container)
This method just accepts the new size of the container (or the container
itself, as in the constructor) and FreeLayout will position all components keeping the same
parameterization defined previously.
Example
Using this layout is very simple as you will see. I will create a simple window to exemplify how to use the
FreeLayout class.
There are two things that are essential to making this layout work: set the frame layout to null and give a size to the pane container. I will also implement a component listener to grab the resize event.
Here is the sample code:
import java.awt.Dimension;
import java.awt.GridLayout;
import java.awt.event.ComponentEvent;
import java.awt.event.ComponentListener;
import javax.swing.*;
import freelayout.*;
public class Main extends JFrame implements ComponentListener {
FreeLayout freeLayout = new FreeLayout(300, 300);
public Main() {
super("FreeLayout Demo");
setDefaultCloseOperation(JFrame.EXIT_ON_CLOSE);
setLayout(null);
getContentPane().setPreferredSize(new Dimension(300, 300));
pack();
JButton open = new JButton("open");
freeLayout.relativeTo(open,
new Anchor(null, -80),
new Anchor(null, 5),
new Anchor(null, 5),
new Anchor(null, -20));
getContentPane().add(open);
JTextField textField1 = new JTextField("Text field 1");
freeLayout.relativeTo(textField1,
new Anchor(null, 5),
new Anchor(null, 5),
new Anchor(open, 5),
new Anchor(null, -20));
getContentPane().add(textField1);
JLabel label = new JLabel("Label: ");
freeLayout.relativeTo(label,
new Anchor(null, 5),
new Anchor(textField1, 5),
new Anchor(null, -40),
new Anchor(null, -20));
getContentPane().add(label);
JButton cancel = new JButton("cancel");
freeLayout.relativeTo(cancel,
new Anchor(null, -80),
new Anchor(null, -20),
new Anchor(null, 5),
new Anchor(null, 5));
getContentPane().add(cancel);
JButton ok = new JButton("ok");
freeLayout.relativeTo(ok,
new Anchor(null, -80),
new Anchor(null, -20),
new Anchor(cancel, 5),
new Anchor(null, 5));
getContentPane().add(ok);
JPanel panel = new JPanel();
panel.setLayout(new GridLayout(3,3));
panel.add(new JButton("1"));
panel.add(new JButton("2"));
panel.add(new JButton("3"));
panel.add(new JButton("4"));
panel.add(new JButton("5"));
panel.add(new JButton("6"));
panel.add(new JButton("7"));
panel.add(new JButton("8"));
panel.add(new JButton("9"));
freeLayout.relativeTo(panel,
new Anchor(null, 5),
new Anchor(null, -150),
new Anchor(null, 5),
new Anchor(cancel, 5));
getContentPane().add(panel);
JTextArea textArea = new JTextArea("Texta area: ");
freeLayout.relativeTo(textArea,
new Anchor(label, 5),
new Anchor(textField1, 5),
new Anchor(null, 5),
new Anchor(panel, 5));
getContentPane().add(textArea);
addComponentListener(this);
}
public static void main(String[] args) {
new Main().setVisible(true);
}
@Override
public void componentHidden(ComponentEvent e) {
}
@Override
public void componentMoved(ComponentEvent e) {
}
@Override
public void componentResized(ComponentEvent e) {
freeLayout.invalidate(((JFrame) (e.getComponent())).getContentPane().getSize());
}
@Override
public void componentShown(ComponentEvent e) {
}
}
The result of the code is shown in the next figure:

Conclusions
As you can see, to create a window using FreeLayout is very simple, and repositioning all components when the window is resized
is not a problem. FreeLayout handles
everything for you.
Any comments will be welcome!
History
- 17/12/2013 - Original article.
This member has not yet provided a Biography. Assume it's interesting and varied, and probably something to do with programming.


 General
  News
News  Suggestion
  Question
  Bug
Bug  Answer
  Joke
Joke  Praise
  Rant
Rant  Admin
Admin 


