Introduction
In the first part of this article, TkCOMApplication, we have seen how to instantiate and use COM objects in Tcl/Tk. In this article, I would like to show you how to use it in Python which is a powerful object oriented scripting language. This article assumes that the reader already has good understanding of COM. This article also cannot be held good to understand Python fully. The reader is expected to get a hold on Python using other available resources. This article is intended only to demonstrate the use of COM objects in Python. Before showing how to instantiate COM component and use the interfaces in Python, I would like to give a brief introduction about Python itself.
Background
Python is a very handy tool whenever you need to put together a small script that manipulates some files in a few minutes. Moreover, it is also useful for bigger projects, as you get all the power from data structures, modularization, object orientation, unit testing, profiling, and the huge API.
Python has connection with almost everything. You have very advanced string and regular expression handling, you have threading, networking (with many protocols built-in), compression, cryptography, you can build GUIs with Tcl/Tk, and these are just a few of the built-in features.
If you look around on the Internet, you will be surprised to see how many applications and libraries have Python bindings: MySQL, ImageMagick, SVN, Qt, libXML, and so on.
There are applications that provide plug-in interface through Python, like Blender and GIMP.
Beyond that, you can even write extension modules for Python in C or C++ using the Python/C API, or in the reverse case, you can use the Python interpreter as a module of your native application, that is, you can embed Python into your software. My article Python_Embedded_Dialog shows the use of the Python Interpreter for parsing mathematical expressions and making use of the results in GUI programming in C/C++.
However, unlike Tcl/Tk, Python doesn't have GUI support out of the box. It supports GUI programming via extensions written for existing toolkits like Tk (TkInter), Qt (PyQt), GTK+ (PyGtk), Fltk (PyFltk), wxWidgets (wxPython) -- to name a few popular toolkits. TkInter is, however, the default implementation packaged with Python.
Python is available for most of the platforms: Linux, Solaris, Windows, Mac, AIX, BeOS, OS/2, DOS, QNX, or PlayStation, for example.
Setting Up Your Programming Environment
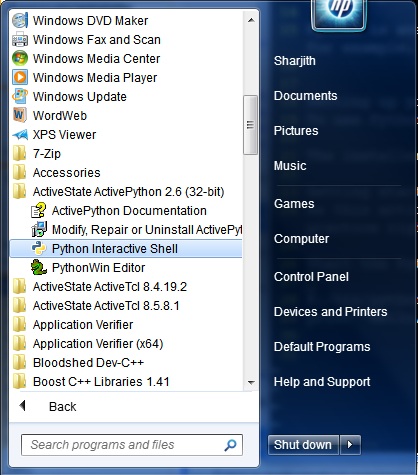
To use Python on Windows, download the installer from http://www.activestate.com.
The installer will install a Python interpreter shell and a useful editor called PythonWin editor.
We also need to install the comtypes extension that would add the COM support for Python. This is available for Windows platform only. You can download the corresponding version of the comtypes from http://sourceforge.net/projects/comtypes/files/.
Getting Started
As this article cannot explain much of the Python theory, syntax or anything like that, let's get started with some practice right away. Let us see a typical hello world in Python:
Start the Python interpreter:
Type the following line followed by a carriage return.
print "Hello World!"
The interpreter will print out the statement "Hello world!"
Now let us see the power of the Python interpreter as a mathematical calculator.
Type the following lines each followed by a carriage return and see the results.
from math import*
x = sin(pi/4)
print x
x = 10.0/(12.5*1.25)*log(2)
print x
pow(12, 2)
And now let us see a small class. Note, Python is a language which depends heavily on indents. Proper indentation is the only way to delimit blocks of code.
Type the following lines each followed by a carriage return. For clarity, I have shown the '__' symbol as one level of indent.
class Point:
__x = 100
__y = 200
__def setCoord(self, x, y):
____self.x = x
____self.y = y
__def printCoord(self)
____print "X %0.3f Y %0.3f" % (float(self.x), float(self.y))
That's the end of the class definition. Finally one more carriage return to get the prompt back.
Now let us instantiate an object of the class and use the methods, type the following lines each followed by a carriage return and see the results.
pnt = Point()
pnt.printCoord()
pnt.setCoord(10, 20)
pnt.printCoord()

All this can be put into a file with the extension .py and executed by double clicking it in the explorer. For GUI applications, using the extension .pyw will show only the GUI window. The console window will not be shown. I hope you might have now got a feel of the Python language. Let us see how to use TkInter to create the GUI similar to the one we saw in the first part of this article and then instantiate a COM object in the SimpleCOM library and use its methods.
In this article, we have a COM Library called SimpleCOM (source code and VS2008 project provided in the download) which has an object called GraphicPoint. GraphicPoint implements three interfaces, all derived from IDispatch for scripting support...
IPoint
- Methods --
SetCoord, GetCoord and Distance - Properties --
X, Y and Z
IGraphicPointIColor
- Methods --
SetColor and GetColor (OLE_COLOR)
We would instantiate 2 GraphicPoint objects, get their IPoint interfaces and set the coordinates of the Points using the method SetCoord. The coordinates are obtained from the user input through the GUI that we would develop using Python TkInter. We will also set the colors for both the points by getting the interface IColor. Here, we will see how to convert RGB components, obtained from the color dialog, into OLE_COLOR. Then we will calculate the distance between the 2 points by calling the Distance method from the IPoint interface. We will also simulate the drawing of the point by popping up message boxes which show the coordinates and colors of each point. For this, we call the Draw method of the IGraphicPoint interface. When the points are instantiated, from the Python code, we will also pop a messagebox showing the coordinates we have set. For this we will call the X, Y and Z properties of the point object. All this will cover the activities of instantiating a COM object, Querying for respective interfaces and using the methods and properties.
The script begins with the necessary importing for system related, TkInter and COM related extensions.
import sys

# for TkInter GUI support
from Tkinter import *
import tkMessageBox
import tkColorChooser

# for COM support
import comtypes.client as cc
import comtypes

# Load the typelibrary registered with the Windows registry
tlb_id = comtypes.GUID("{FA3BF2A2-7220-47ED-8F07-D154B65AA031}")
cc.GetModule((tlb_id, 1, 0))

# Alternately you can use this method also by direct loading the dll file
#cc.GetModule("SimpleCOM.dll")

# Import the SimpleCOMLib library from comtypes
import comtypes.gen.SimpleCOMLib as SimpleCOMLib
Now the class definition for the application GUI:
# Application class for the GUI
class AppDlg:
	# member variables
	X1 = 0.0
	Y1 = 0.0
	Z1 = 0.0
	X2 = 0.0
	Y2 = 0.0
	Z2 = 0.0
	distVal = 0.0
	# methods
	# constructor
	def __init__(self, master):
		master.title("Test COM InterOp in Python/Tkinter")
		master.maxsize(400, 210)
		master.minsize(400, 210)

		frame1 = Frame(master, padx=5, pady=5)
		frame1.pack(anchor=N, side="top", fill=X, expand=Y)

		# Point 1 Data
		self.labelframe1 = LabelFrame
		(frame1, padx=5, pady=5, relief="groove", text="Point 1 Data")
		self.labelframe1.pack(side=LEFT, fill=BOTH, expand=Y)

		self.frameX1 = Frame(self.labelframe1)
		self.frameY1 = Frame(self.labelframe1)
		self.frameZ1 = Frame(self.labelframe1)
		self.frameX1.pack()
		self.frameY1.pack()
		self.frameZ1.pack()

		self.labelX1 = Label(self.frameX1, text="X")
		self.labelX1.pack(side=LEFT, padx=2, pady=2)
		self.entryX1 = Entry(self.frameX1)
		self.entryX1.insert(0, self.X1)
		self.entryX1.pack()
		...
		...
		<code skipped for brevity>
		...

 		# variable to store colors
		self.colorTuple1 = ((255, 255, 255), '#ffffff')
		self.colorTuple2 = ((255, 255, 255), '#ffffff')

	# Apply button callback
	def onApply(self):
		self.X1 = self.entryX1.get()
		self.Y1 = self.entryY1.get()
		self.Z1 = self.entryZ1.get()
		self.X2 = self.entryX2.get()
		self.Y2 = self.entryY2.get()
		self.Z2 = self.entryZ2.get()

		#print self.colorTuple1
		#print self.colorTuple2

		# Check if the user selects cancel on the color chooser
		# in that case the tuple will contain None, None values
		if self.colorTuple1[0] is None:
			r = 255
			g = 255
			b = 255
		else:
			r = self.colorTuple1[0][0]
			g = self.colorTuple1[0][1]
			b = self.colorTuple1[0][2]
		self.color1 = (((0xff & b) << 16) | ((0xff & g) << 8) | (0xff & r))
		#print "Color Point1 is %d\n" % self.color1

		if self.colorTuple2[0] is None:
			r = 255
			g = 255
			b = 255
		else:
			r = self.colorTuple2[0][0]
			g = self.colorTuple2[0][1]
			b = self.colorTuple2[0][2]
		self.color2 = (((0xff & b) << 16) | ((0xff & g) << 8) | (0xff & r))
		#print "Color Point2 is %d\n" % self.color2

		# Create COM Point1
		self.aGrPoint = cc.CreateObject
		("SimpleCOM.GraphicPoint", None, None, SimpleCOMLib.IGraphicPoint)
		self.aPoint = self.aGrPoint.QueryInterface(SimpleCOMLib.IPoint)
		#help(self.aPoint)
		self.aPoint.SetCoord(float(self.X1), float(self.Y1), float(self.Z1))
		tkMessageBox.showinfo("From Python-Tkinter App",
		"Point 2 Created At X%0.3f, Y%0.3f, Z%0.3f"\
		% (float(self.aPoint.X), float(self.aPoint.Y), float(self.aPoint.Z)))
		self.aColor = self.aGrPoint.QueryInterface(SimpleCOMLib.IColor)
		if self.colorTuple1:
			self.aColor.SetColor(self.color1)
		self.aGrPoint.Draw()

		# Create COM Point2
		self.aGrPoint2 = cc.CreateObject("SimpleCOM.GraphicPoint",
			None, None, SimpleCOMLib.IGraphicPoint)
		self.aPoint2 = self.aGrPoint2.QueryInterface(SimpleCOMLib.IPoint)
		#help(self.aPoint2)
		self.aPoint2.SetCoord(float(self.X2), float(self.Y2), float(self.Z2))
		tkMessageBox.showinfo("From Python-Tkinter App",
		"Point 2 Created At X%0.3f, Y%0.3f, Z%0.3f"\
		% (float(self.aPoint2.X), float(self.aPoint2.Y), float(self.aPoint2.Z)))
		self.aColor2 = self.aGrPoint2.QueryInterface(SimpleCOMLib.IColor)
		if self.colorTuple2:
			self.aColor2.SetColor(self.color2)
		self.aGrPoint2.Draw()

		self.distVal = self.aPoint.Distance(self.aPoint2)

		self.entryDist.delete(0, END)
		self.entryDist.insert(0, self.distVal)

	# Color selection button callbacks
	def onSelectColor1(self):
		# tkColorChooser returns a tuple containing the RGB tuple
		and the html color value
		self.colorTuple1 = tkColorChooser.askcolor()
		if self.colorTuple1:
			self.colorbtn1.configure(bg=self.colorTuple1[1])

	def onSelectColor2(self):
		self.colorTuple2 = tkColorChooser.askcolor()
		if self.colorTuple2:
			self.colorbtn2.configure(bg=self.colorTuple2[1])

# Start the TkInter root window
rootwin = Tk()

# Instantiate the GUI class object
AppDlg(rootwin)

# Run the TkInter main event loop
rootwin.mainloop()
The callback for the color selection buttons simply show up a color chooser dialog and store the selected color in a global variable which is accessed by the callback procedure for Apply button. The color is stored as a list of 3 values of RGB. We take each element and with the following code convert it into the OLE_COLOR equivalent.
# Check if the user selects cancel on the color chooser
# in that case the tuple will contain None, None values
if self.colorTuple1[0] is None:
	r = 255
	g = 255
	b = 255
else:
	r = self.colorTuple1[0][0]
	g = self.colorTuple1[0][1]
	b = self.colorTuple1[0][2]
	# code for converting RGB values into OLE_COLOR
	self.color1 = (((0xff & b) << 16) | ((0xff & g) << 8) | (0xff & r))
To create an object of the COM class, use the comtypes.client method CreateObject and to access an Interface call the method QueryInterface method on the interface variable. e.g.
self.aGrPoint = cc.CreateObject("SimpleCOM.GraphicPoint",
	None, None, SimpleCOMLib.IGraphicPoint)
self.aPoint = self.aGrPoint.QueryInterface(SimpleCOMLib.IPoint)
self.aPoint.SetCoord(float(self.X1), float(self.Y1), float(self.Z1))
tkMessageBox.showinfo("From Python-Tkinter App",
	"Point 2 Created At X%0.3f, Y%0.3f, Z%0.3f"\
% (float(self.aPoint.X), float(self.aPoint.Y), float(self.aPoint.Z)))
self.aColor = self.aGrPoint.QueryInterface(SimpleCOMLib.IColor)
if self.colorTuple1:
	  self.aColor.SetColor(self.color1)
self.aGrPoint.Draw()
I hope you enjoyed this article. The Python script file for this demo and the COM VS2008 project file is included in the downloadable zip file. Windows 7 users would need to run Visual Studio in Administrator mode to build the project and register the COM DLL.
Points of Interest
The power is COM and the IDispatch is once again proven. The flexibility it provides to access Components from RAD tools and scripts is immense. Python has many extensions for developing robust and flexible applications like numerical and scientific applications, games, cad and graphics.
References
History
- 18th April 2010: First release
Sharjith is a Mechanical Engineer with strong passion for Automobiles, Aircrafts and Software development.


 General
  News
News  Suggestion
  Question
  Bug
Bug  Answer
  Joke
Joke  Praise
  Rant
Rant  Admin
Admin 


