Introduction
There comes
a time in every desktop applications developer’s career where he/she has to
make a website. This article is an attempt to bring up to speed, a frontend
desktop applications developer (WPF or WinForms), with building websites using
ASP.NET MVC. Why MVC and not Web Forms, etc? Simply because I think MVC is
newer, cooler and more powerful than any other technology stack from Microsoft
for building websites. Yes, it my personal opinion and am entitled to have one!
Also please note, since I am passionate about desktop applications development
you will frequently see comments about WPF/WinForms applications being better than web
applications. Now that we are done with the disclaimers
let us get started.
Desktop vs. Web Application
There is a complete paradigm shift between the two technologies. Desktop apps are stateful and web apps are stateless. To me it felt like learning event driven programming after mastering procedural programming. It helps to accept the fact you are embarking on a steep learning curve. Go at your own comfortable pace, rushing it will not help. For desktop developers a lot of unlearning is required to understand web programming concepts. For example, desktop programmers might be grappling with object deep copy issues, garbage collection, etc. While in the web programming world you have to tackle basics like object lifetimes. Every request to the web server requires you to recreate the objects from scratch. If you try to cheat and make your web app stateful using sessions, etc. you will soon run into scaling issues. Your website will slow to a crawl just with a few online users pounding on your website. So take a deep breath, forget all you know about stateful computing and open your mind to a technology stack that may seem very inefficient!
Assumptions
I am assuming the following.
- You are at least 3-4 years into desktop development (WPF or WinForms).
- You understand the MVC design pattern.
- You know what is HTML and can create a simple static HTML webpage.
Background
I have gone
through multiple tutorials on the web on how to learn web programming using
ASP.NET MVC. Majority of those use the Internet or Intranet website template that
Visual Studio provides as the starting point. This makes the learning curve
very steep.
You land up
with a project that has numerous files with no clue where to start. Just the
site of so many files in the Solution Explorer can feel overwhelming. The only thing
nice about this template is that you have a fully functional website that will
run if you press F5. The website itself looks complicated as it has a home
page, about page, contact page, login page and even a register user page!

Hello World Website
Let us
create our first hello world website using ASP.NET MVC. I am deliberately keeping
things simple here so that we can learn what exactly is going on behind the
scenes and how the website actually works.
In this
tutorial we will start with the Basic template in Visual Studio. Let us begin
by creating a new project.
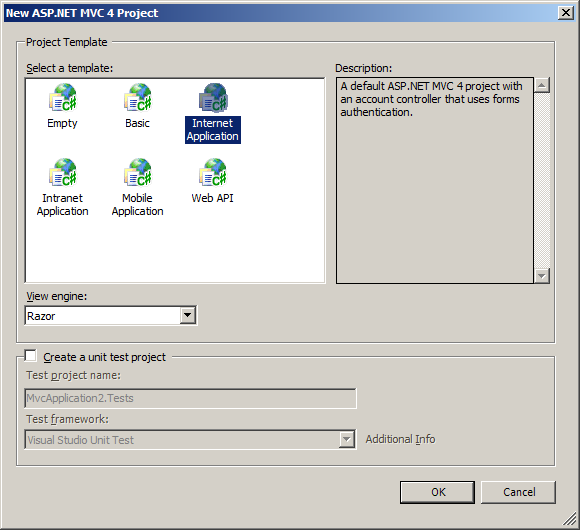
If you do
not see ASP.NET MVC 4 Web Application or ASP.NET MVC 5 Web Application in the
New Project dialog in Visual Studio then please Google on how to install the
same. Once successfully installed you should see a similar screen. Click on ASP.NET
MVC 4 Web Application or ASP.NET MVC 5 Web Application and click OK.
In the next
screen select the Basic template and make sure the View engine is Razor. I will
explain what a view engine is later. Click OK.
You will
agree that this time the Solution Explorer looks a little less overwhelming. But
this comes at a cost. If you press F5 now you will get this error.
This is
because the Basic template only creates a skeleton that you can build on as opposed
to Internet or Intranet templates that create a complete website that you can
run right away. To help us better understand how the website actually works we
will add files to the project one by one.
When a user
types in the URL for our website into a web browser and clicks Go, the request
is routed to the web server. The web server is located using the information
present in the URL itself. For further details see this http://www.w3.org/wiki/How_does_the_Internet_work
Once the web
server receives the request it identifies to which website the request belongs to and invokes
the Index action in the Home controller, if the website is made using ASP.NET
MVC. Let’s take a step back and find out why and how this happens. In the Solution
Explorer expand folder App_Start and double click file RouteConfig.cs. You
should see something similar to this.
public class RouteConfig
{
    public static void RegisterRoutes(RouteCollection routes)
    {
        routes.IgnoreRoute("{resource}.axd/{*pathInfo}");

        routes.MapRoute(
            name: "Default",
            url: "{controller}/{action}/{id}",
            defaults: new { controller = "Home", action = "Index", id = UrlParameter.Optional }
        );
    }
}
This is the
default route map entry for your website that the Basic template created. For
now pay attention to the defaults entry. It says the default controller is
going to be Home and the default action in that controller is going to be
Index. In ASP.NET MVC all requests received by the web server is forwarded to
controllers and actions present in those controllers. The controller’s actions interact
with the model and views to return a response back to the web server which
eventually gets routed back to the web browser.
Finally why
did the defaults entry in the route map get invoked? This is because the user
did not specify which controller and action they want invoked. Let us say we
are building the Google website. When the user types in the URL http://www.google.com into the web browser the
URL does not contain information about the controller and action that has to be
invoked and hence the defaults are used. Instead if the user types in http://www.google.com/search/images
then the request will be routed to the Images action inside the Search
controller. If this sounds confusing or exhausting do not worry. We will revisit
routing in ASP.MVC and it will make more sense then.
It is clear
now why our website is not working, we do not have the Home controller. Let us
go ahead and create one. In Solution Explorer right click the empty Controllers
folder and click Add->Controller
For the
controller name enter HomeController and for Template select Empty MVC
Controller. Click Add. A new file called HomeController.cs will be created in
the Controllers folder. Open this file. You should see something similar to
this.
using System;
using System.Collections.Generic;
using System.Linq;
using System.Web;
using System.Web.Mvc;
namespace MvcApplication1.Controllers
{
public class HomeController : Controller
{
public ActionResult Index()
{
return View();
}
}
} The Index
action is already added to your controller. The current code will try to return
the default view for this controller action. So let us go ahead and create
the default view for this controller action. In Solution Explorer right click
the Views folder and Add->New Folder. Name the folder Home. Now right click
the newly created Home folder and click Add->View.
View name should
be Index and View engine should be Razor (CSHTML). For other settings see the
dialog box image. Click Add. A new file called Index.cshtml will be created in
Views/Home folder. Open this file. You should see something similar to this.
@{
    ViewBag.Title = "Index";
}

<h2>Index</h2>
Replace Index with the text “Hello World”. Like this
@{
    ViewBag.Title = "Index";
}

<h2>Hello World!</h2>
Now press F5
or Ctrl+F5. You should see something similar to this.
Congratulations
your Hello world website is up and running! It is time to find out what all happened
behind the scenes. Right click anywhere on the website in the browser and click
View Source. You should see something similar to this.
<!DOCTYPE html>
<html>
<head>
    <meta charset="utf-8" />
    <meta name="viewport" content="width=device-width" />
    <title>Index</title>
    <link href="/Content/site.css" rel="stylesheet"/>

    <script src="/Scripts/modernizr-2.5.3.js"></script>

</head>
<body>


<h2>Hello World!</h2>


    <script src="/Scripts/jquery-1.7.1.js"></script>


</body>
</html>
This is a
well formed HTML page with head and body nodes. If you go back to Index.cshtml
you will notice we only specified
<h2>Hello World!</h2>
But the web
server returned a complete page with our Hello World entry. To find out what happened
behind the scenes go to Solution Explorer and open _ViewStart.cshtml present in
the views folder. You should see something like this.
@{
    Layout = "~/Views/Shared/_Layout.cshtml";
}
Okay nothing
much here so let us further explore Views/Shared/_Layout.cshrml file. In Solution
Explorer go to views folder and expand Shared subfolder. Double click the _Layout.cshrml
file. You should see something similar to this.
<!DOCTYPE html>
<html>
<head>
    <meta charset="utf-8" />
    <meta name="viewport" content="width=device-width" />
    <title>@ViewBag.Title</title>
    @Styles.Render("~/Content/css")
    @Scripts.Render("~/bundles/modernizr")
</head>
<body>
    @RenderBody()

    @Scripts.Render("~/bundles/jquery")
    @RenderSection("scripts", required: false)
</body>
</html>
There you go
we have a template for a well formed HTML page. The magic phrase here is @RenderBody().
This is the place where the view returned from your Home controller’s Index action
gets merged.
Points of Interest
In the
desktop applications world all this was the equivalent of creating a MainForm (WinForms)
or MainWindow (WPF) and putting in a label that said Hello World!
In the next
part we will start manipulating this project further to take it
from Hello World to something more useful. I have omitted a lot of information
to keep the tutorial as simple and easy to understand as possible.
History
First published March 2014
Nothing to brag about, just another passionate software developer.
Work to make a living, don't live to work!


 General
  News
News  Suggestion
  Question
  Bug
Bug  Answer
  Joke
Joke  Praise
  Rant
Rant  Admin
Admin 


