Table of Contents
Introduction
This article intends to contribute to the Beginner's Guide to HTML5 & CSS3 series (Canvas Part) with the following specifics:
- Concepts of HTML5 Canvas are integrated into a fundamental sample: a sprite (image) striding along a rainbow (gradient) path towards the goal (text).
- Motivation will be accelerated: a relaxed theme is used -- AOE (Age Of Empires), a famous historical simulation game published by Microsoft.
- Advanced/Ambitious readers will be shown how to extend a 2D sprite to 2.5D, as it is shown in the origin game, in several steps.
- Beginners may continue with a simple practice, with its answer embedded in the downloadable sample source.
In fact, I have taken a 2-hour lecture to HTML5 beginners with this sample. Now entering 2014 in which HTML 5.0 will achieve its Recommendation status (mainly constrains browser vendors), I wish this tutorial can be helpful to you as well when surfing the promising web technology.
Single-image Animation: Canvas Coordinates, Images, Timer Loops
Context, Coordinates, Images Rendering
Rendering an image to a HTML5 <canvas> element can be accomplished in merely 5 lines:

- L1: "
canvas" in grey comes from the id of our core element, HTML5 <canvas>, which is declared in our HTML code like this:
<canvas id="canvas" width="640" height="320" onclick="getCoords(event);">
    <em>Your browser has no HTML5 canvas control support!</em>
</canvas>
Notice the
getCoords(event) event handler, we will use it to accept click/touch event happened on the canvas, and interpret it to control the mini knight.
L2: retrieves 2D graphic context of the canvas. Actually, all graphic operations will be called through the context instead of through the canvas element.NOTE: Multiple canvases (with their 1-to-1 related contexts) can be employed in a web application.
L3-L4: create an Image object and sets its path to the Source Image file. Alternatively, you can also use getElementById(id) to refer to a pre-declared HTML <img> element.Btw, "Paladin" is the title given to the most experienced knight units in the AOE game :).
L5: The mapping (rendering) from Source Image to Destination Canvas is just straightforward.Coordinate system of a
canvas is also started from the upper-left corner as coordinate (0,0), and ended in the bottom-right corner with coordinate (
canvas.width-1,canvas.height-1). This coordinate system is used in image rendering as well as other graphic operations.
2 Timer Loops
Now let us add some stuff that is out of the scope of HTML5 but will make the Paladin "alive".
In short, 2 timer loops will be employed: one for data calculating/updating, another for graphic rendering.
Data updating loop:
var timer_update = window.setInterval("update()", 1000/FrameRate);
function update() {
}
1000/FrameRate is the time interval of data updating (in milliseconds). Since for simplicity, sprite only moves straight from source to destination, calculation of the next (
xSprite, ySprite) will be extremely simple.
Graphic rendering loop:
window.requestAnimFrame = (function(){
return window.requestAnimationFrame ||
window.webkitRequestAnimationFrame ||
window.mozRequestAnimationFrame ||
window.oRequestAnimationFrame ||
window.msRequestAnimationFrame ||
function( callback ){
window.setTimeout(callback, 1000/FrameRateMax);
};
})();
...
requestAnimFrame(render);
...
function render() {
context.clearRect(0, 0, canvasWidth, canvasHeight);
context.drawImage(spriteImage, 0, 0, spriteWidth, spriteHeight,
xSprite-spriteWidth/2, ySprite-spriteHeight/2, spriteWidth, spriteHeight);
requestAnimFrame(render);
}
window.requestAnimFrame is the current de facto standard for script-based animation which is supported by most browsers (and "battery-friendly" as well).
In our rendering routine (render()), as you can see, image rendering Canvas API is called, with a newest (xSprite, ySprite) coordinate on each timer pulse. Don't forget to remove the old sprite before redrawing (for simplicity, the whole canvas is cleared here).
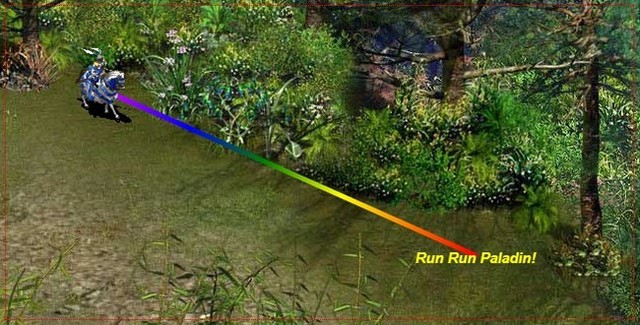
Motion Path: Canvas Paths, Gradients, Text
As shown in the figure above, a timer loop-based animation has been implemented till now. The Paladin may complain about that we only spend a single piece of picture on him, which makes him looks like he is frozen. We will gracefully stem his anger in the next section. Before that, let's quicken our pace and clarify other useful Canvas topics.
Gradients, Stroke Style, Paths
How to implement the rainbow path paved on the grassland? It's made from a color Gradient defined as below:
var gradient = context.createLinearGradient(xSrc,ySrc,xDest,yDest);
gradient.addColorStop("0", "magenta");
gradient.addColorStop(".25", "blue");
gradient.addColorStop(".45", "green");
gradient.addColorStop(".65", "yellow");
gradient.addColorStop("1.0", "red");
A linear gradient is created beginning from (xSrc,ySrc) to (xDest,yDest). And gradient.addColorStop() method specifies in which position which color should appear. For example, (".25", "blue") means blue color should appear at the position 25% away from the (xSrc,ySrc), while the middle of color stops will be automatically calculated.
The gradient will then be applied to the Stroke Style of the canvas:
context.strokeStyle = gradient;
Stroke(Line) is required by Path drawing. The commented code shows how to apply a gradient to Fill Style which is used to fill a drawing, on the other hand.
context.lineWidth = 5;
context.lineCap = "round";
context.beginPath();
context.moveTo(xSrc, ySrc);
context.lineTo(xDest, yDest);
context.stroke();
The above code illustrates the general routine of drawing
Canvas Path. Be aware that
beginPath() must be called firstly to reset a new starting point, and
closePath() should only be called if you want to draw a line back to the starting point.
Font, Text, Text Width
var text = "Run Run " + spriteName + "!";
var text_width = context.measureText(text).width;
context.fillStyle = "#ffff00";
var font_size = 15;
context.font = "italic bold "+font_size+"px Arial";
context.fillText(text, xDest - text_width/2, yDest + font_size/2);
Text is not hard to display too. The only trick is measuring the width of the text by using context.measureText(), so as to calculate the correct start point of the painting. As a result, the text will be centered on the destination of our Paladin.
(Advanced)2.5D Sprite Animation!: Atlas
"2.5D" means a simulation of the true 3D rotation, translation and scaling.
I really hope you can enjoy the fun of controlling our 2D Canvas Paladin in a more realistic way. It's not difficult especially with the source template I provided. Of course, readers who want to focus on fundamental studies may go directly to the next section.
1.Atlas: animation images spliced
8 directions of a sprite (one direction per line) multiplies about 10 frames for each direction (5 frames per action, 2 kinds of action: stand and move), altogether 80 images will be plotted for a single sprite. In fact, for amateur artists new to 3D modeling, this will be the hardest part of work when extending the sample. Free sample models of 3DMax, Maya, or game map editors will be helpful.
For cutting down the HTTP requests made to a server, images are usually spliced in web development.
2.atlas.xml: animation data, metrics of each named frames
<texture name="Paladin" file="Paladin.png"
maxFrameWidth="92" maxFrameHeight="98" offsetX="4" offsetY="0">
    <frame name="stand01" x="0" y="0" width="92"
    height="98" offsetX="0" offsetY="0"/>
    <frame name="stand02" x="92" y="0" width="92"
    height="98" offsetX="0" offsetY="0"/>
    <frame name="stand03" x="184" y="0" width="92"
    height="98" offsetX="0" offsetY="0"/>
    ......
    <frame name="move01" x="460" y="0" width="82"
    height="98" offsetX="10" offsetY="0"/>
    <frame name="move02" x="542" y="0" width="82"
    height="98" offsetX="10" offsetY="0"/>
    <frame name="move03" x="624" y="0" width="82"
    height="98" offsetX="10" offsetY="0"/>
    ......
</texture>
How to plot a particular frame onto the canvas then? Just read the metric from the xml data, and call the context.drawImage(image,sx,sy,sw,sh,dx,dy,dw,dh) method.
Remember that for each kind of sprite, we use the same size (maxFrameWidth,maxFrameHeight) to plot it. To save size, however, some frames may be smaller than the others. In such case, (offsetX, offsetY) will be used to specify from which relative position the smaller frames should be painted.
3.Ajax/XMLHttpRequest, OO design: load atlas image, load & parse atlas data, each frame learns to draw itself
The complete version of my sample connects everything together sequentially as follows:
atlasImage = new Image();
atlasImage.src = spriteName + ".png";
atlasImage.onload = function()
{
var loadPath = "atlas.xml";
var client = new XMLHttpRequest();
client.onreadystatechange = atlasHandler;
client.open("GET", loadPath, false);
client.send();
}
Atlas image will be loaded just by applying its path to an Image object. After loading the image (atlasImage.onload event), atlas XML data will be loaded by using an Ajax/XMLHttpRequest callback method. Atlas XML data will be parsed in the callback handler atlasHandler() using DOM APIs like getElementsByTagName(), which will be omitted here.
The parsing result will be an <var>atlasMap</var> mapping from frame names to corresponding AtlasFrame classes which looks like below:
function AtlasFrame()
{
this.m_x;
this.m_y;
this.m_width;
this.m_height;
this.m_offsetX;
this.m_offsetY;
this.m_name;
this.load = function(elem) {
}
this.render = function(x, y) {
context.drawImage(atlasImage, this.m_x, this.m_y + currDirection * atlasTexture.m_maxFrameHeight,
this.m_width, this.m_height,
this.m_offsetX+x-atlasTexture.m_maxFrameWidth/2, this.m_offsetY+y-atlasTexture.m_maxFrameHeight/2,
this.m_width, this.m_height);
}
};
Different routes lead to the same, we meet the context.drawImage() again in AtlasFrame.render(). This time, each animation frame is responsible for its own rendering (on the Canvas). So as a collection of these frames, Animation class can easily render itself on each graphic rendering timer pulse.
With the above knowledge, furthermore, by searching "Instruction##" in my sample source (635 lines in total), you can easily find out the 8 places you may update for putting your own favourite sprites and stories onto the web!
(Basic)Panel: Practice Time
Subject of the practice:
The mini panel consists of almost all mentioned Canvas skills, and the answers can be found in my complete version of source.
Hint: The 2 miniatures, however, are not really Canvas Images. Don't waste time on them :) Sample only shows how to overlap ordinary HTML elements onto a HTML5 Canvas.
Easter eggs: 1.You can switch on/off the rainbow path tracking by clicking on this panel 2.Try clicking the swordman miniature.
Conclusion
Topics covered in my 2-hour HTML5 lecture (in company) also include Offline WebApp (by setting .appcache file) and embedding the sample to an Android Native App (using WebKit). Interested readers may extend those functionalities following the parenthesized keywords.
Finally, besides simulating 2.5D sprites, you may also render real 3D graphics by using WebGL on HTML5 <canvas> elements.
Wait, can I try it online?
Sure, I placed the 2.5D version online (user/password=test/test). The basic version, however, can directly run on any mainstream browsers by dragging the unzipped basic.html into them. If you have any comments, suggestions or improvements, please feel free to post it here!~
Useful Links
History
Tiancheng Hu is a senior tech consultant working at an ISV company (major products including scanner-based ECM, Asset Management), and holds Bachelor(SJTU@China) and Master(KIT@Japan) degrees in Computer Science. He showed favorites at Enterprise/Personal Knowledge Management and Efficiency Enhancement stuff (like MindMap/GTD/FastReading), and luckily had made prototype/proposal on an Enterprise Blog webapp(June,2000) and a portable PKM app(May,2010), before the public appearance of Blog or EverNote (in Chinese market).
When he is not working at designing/prototyping/consulting, he enjoys Chinese traditional spiritual practice/zen as well as fantasy novels/strategy games/scribble.


 General
  News
News  Suggestion
  Question
  Bug
Bug  Answer
  Joke
Joke  Praise
  Rant
Rant  Admin
Admin 


 )
)