"Web API", as the name
suggests, is an API and an API should not be coupled with any specific kind of
application. An API is supposed to provide services without being coupled with its
consumer application. There is a common misconception that for developing Web
APIs, we have to go by ASP.NET MVC application. In this article, we will
develop an independent API which is not coupled with a ASP.NET MVC application
type.
What is
Web API?
Web API is a framework for
building HTTP services. Those developed services could be consumed by broad
range of clients, including browsers and mobile devices.
Web API
and ASP.NET MVC
Web API is a feature of
ASP.NET MVC 4. This included with MVC 4 because of their similarities. That
doesn’t mean you always have to create ASP.NET MVC application for developing
Web API. You can use Web API in any number of applications.
Developing
Web API without MVC
As the philosophy of the
service development is concerned, it’s all about exposing few service methods.
We would not be bothered about the application type. MVC application is for a
particular purpose where we have a consumer end as well. We should develop our
services independent of its consumer. In this example, we will develop a Web
API through a Console application.
Developing
Web API in Console application
When developing Web API
outside MVC, you need to refer Web API assemblies to your project. The NuGet
Package Manager is the easiest way to add the Web API assemblies to a
non-ASP.NET project.
Installing Web API NuGet
Package
- From the Tools menu, select Library
Package Manager.
- Select Manage NuGet Packages for Solution.
- In the Manage NuGet Packages dialog,
select Online.
- In the search box, type
"Microsoft.AspNet.WebApi.SelfHost".
- Select the ASP.NET Web API Self Host package and
click Install.
Once installation is done,
you are all set to develop your Web API outside MVC.
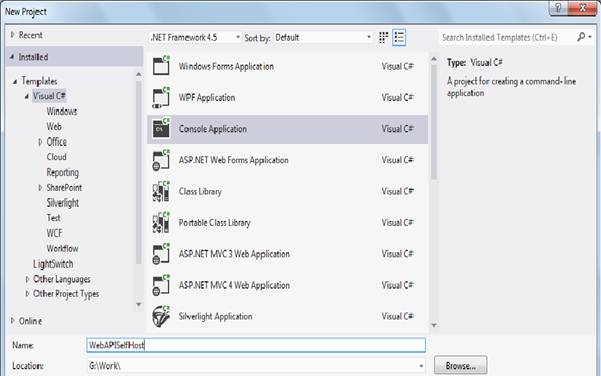
Start Visual Studio and
select New Project from the Start page. Or, from the File menu, select New and
then Project. On the Templates pane, under Visual C#,
select Console Application. Enter a name for the project and click OK.
Add a file Product.cs for
to create a business model class. We will expose this business object through
our Web API.

Adding the "Product" Controller
Now, we need to add our Web
API. Technically, the Web API method is nothing but a Web API controller
class. In order to add the controller right click on the project and select
Add New Item. In the Templates pane, select Installed Templates and expand the Visual C# node. Under Visual C#,
select Web. Select Web
API Controller Class. Enter a
name for the class and click OK.
Once you added the
controller, we will find the class with auto-generated code:
namespace WebAPISelfHost
{
public class ProductController : ApiController
{
public IEnumerable<string> Get()
{
return new string[] { "value1", "value2" };
}
public string Get(int id)
{
return "value";
}
public void Post([FromBody]string value)
{
}
public void Put(int id, [FromBody]string value)
{
}
public void Delete(int id)
{
}
}
}
In the above code the
controller class has been derived for from the ApiController class. This the key class for Web API. If we want to expose a
controller through API, we have to derive the controller from the abstract
class ApiController. Also, there are four
auto-generated method stubs. Those are the stub methods related to four REST
verbs GET, POST,PUT and DELETE. Since the Web API is REST based, the framework provides
the structure for REST based Web services.
In our example, we will
develop a simple service for getting product details. So, remove the
auto-generated code and implement a Web API GetProductList:
namespace WebAPISelfHost
{
public class ProductsController:ApiController
{
public List<Product> GetProductList()
{
List<Product> productLst = new List<Product>{
new Product{ProductID="P01",ProductName="Pen",Quantity=10,Price=12},
new Product{ProductID="P02",ProductName="Copy",Quantity=12,Price=20},
new Product{ProductID="P03",ProductName="Pencil",Quantity=15,Price=22},
new Product{ProductID="P04",ProductName="Eraser",Quantity=20,Price=27}
};
return productLst;
}
}
}
In our API, we are simply
returning a list of products. Compile the code and build the project. Now, our
Web API is ready. We need to host the developed Web API.
Self-Hosting
Web API
You can self-host a web API
in your own host process. Here, we will Self-Host our developed Web API in the
console application itself. Refer the System.Web.Http.SelfHost.dll in the project. This library provides classes for the HTTP
self-hosted service.
Open the file Program.cs
and add the following namespaces
using System.Web.Http;
using System.Web.Http.SelfHost;
Now, add the following code
for Self-Hosting:
static void Main(string[] args)
{
            var config = new HttpSelfHostConfiguration("http://localhost:8080");
            config.Routes.MapHttpRoute(
                "API Default", "api/{controller}/{id}",
                new { id = RouteParameter.Optional });

            using (HttpSelfHostServer server = new HttpSelfHostServer(config))
            {
                server.OpenAsync().Wait();
                Console.WriteLine("Press Enter to quit.");
                Console.ReadLine();
            }
}
In the above code, we have
created a instance of HttpSelfHostConfiguration. The overloaded
constructor of the class expects a Uri to listen to a particular HTTP address.
In the MapHttpRoute method we are defining the routing pattern of our
API.
Finally, we are using the
configuration in the HttpSelfHostServer. Our Web API is hosted on
the basis of our defined configuration.
Compile and run the project.
Now our Web API is up and ready to serve.
Note: This application listens to http://localhost:8080/. By
default, listening at a particular HTTP address requires administrator
privileges. When you run the application, therefore, you might get an error:
"HTTP could not register URL http://+:8080/".To avoid this error, run
Visual Studio with elevated administrator permissions.
Consuming
the Web API
Now it’s time to consume the
Web API. Let's write a simple console application that calls the web API. Add a
new console application project to the solution.
As our API is returning a
list of "product" types, we need to add the stub product class for identifying
the returned type in our client code. Add the file Product.cs in the
Client application.
Open the file Program.cs
file. Add the following namespace:
using System.Net;
using System.Net.Http;
using System.Runtime.Serialization.Json;
using System.Net.Http.Formatting;
using System.Net.Http.Headers;
using EventStore.Serialization;
Create an instance of a HttpClient class and set the base address with the listener URI of the Web
API.
HttpClient client = new HttpClient ();
             client.BaseAddress = new Uri ("http://localhost:8080/");
Add the accept header. Here
we are using a feature of HTTP as well as Web API called "Content
Negotiation". According to this feature a Client can negotiate with the
server regarding the format of the data it returned. Here, we negotiating with
the server in JSON format.
client.DefaultRequestHeaders.Accept.Add(
new MediaTypeWithQualityHeaderValue("application/json"));
Use the HttpClient.GetAsync method to send a GET request
to the Web API. Provide the routing pattern.
HttpResponseMessage response = client.GetAsync ("api/products").Result;
Use the ReadAsAsync method to serialize the
response. ReadAsAsync method returns a Task that will yield an
object of the specified type.
The GetAsync and ReadAsAsync methods
are both asynchronous. They return Task objects that represent the
asynchronous operation. Getting the Result property blocks the thread
until the operation completes.
if (response.IsSuccessStatusCode)
{
var products = response.Content.ReadAsAsync<IEnumerable<Product>>().Result;
Finally, print the data retrieved from the Web API:
    foreach (var p in products)
    {
        Console.WriteLine("{0}\t{1};\t{2}", p.ProductID, p.ProductName, p.Quantity);
        Console.ReadLine();
    }
}
else
{
    Console.WriteLine("{0} ({1})", (int)response.StatusCode, response.ReasonPhrase);
}
Build and run the application
(Server application should be up).
You should get the following
output:
Reference:
http://www.asp.net/web-api/overview/hosting-aspnet-web-api/self-host-a-web-api
This member has not yet provided a Biography. Assume it's interesting and varied, and probably something to do with programming.


 General
  News
News  Suggestion
  Question
  Bug
Bug  Answer
  Joke
Joke  Praise
  Rant
Rant  Admin
Admin 


