Intel® Developer Zone offers tools and how-to information for cross-platform app development, platform and technology information, code samples, and peer expertise to help developers innovate and succeed. Join our communities for the Internet of Things, Android, Intel® RealSense™ Technology and Windows to download tools, access dev kits, share ideas with like-minded developers, and participate in hackathon’s, contests, roadshows, and local events.
Related articles:
Developer's Guide for Intel® Processor Graphics for 4th Generation Intel® Core™ Processors
Touch and Sensors
How to Create a Usable Touch UI
How to Adjust Controls for Touch
Introduction
Developers everywhere want to develop games. And why not? Games are among the best sellers in computer history, and the fortunes involved in the game business keep attracting developers to it. As a developer, I’d certainly like to be the one who develops the next Angry Birds* or Halo*.
In practice, however, game development is one of the most difficult areas of software development. You have to remember those trigonometry, geometry, and physics classes that you thought you’d never use. Besides that, your game must combine sound, video, and a story in a way that the user will want to play it more and more. And all that is before you write a single line of code!
To make things easier, frameworks are available for developing games using not only C and C++ but even C# or JavaScript* (yes, you can develop three-dimensional games for your browser using HTML5 and JavaScript).
One of these frameworks is Microsoft XNA*, which builds on Microsoft DirectX* technology, allowing you to create games for Xbox 360*, Windows*, and Windows Phone*. Microsoft has phased out XNA, but meanwhile, the open source community has introduced a new player: MonoGame*.
What Is MonoGame?
MonoGame is an open source implementation of the XNA application programming interface (API). It implements the XNA API not only for Windows but also for Mac* OS X*, Apple iOS*, Google Android*, Linux*, and Windows Phone. That means you can develop a game for all those platforms with only a few minor changes. That’s a wonderful feature: you can create games using C# that can be ported easily to all major desktop, tablet, and smartphone platforms. It’s a great start for those who want to conquer the world with their games.
Installing MonoGame on Windows
You don’t even need Windows to develop with MonoGame. You can use MonoDevelop* (an open source cross-platform integrated development environment [IDE] for Microsoft .NET languages) or Xamarin Studio*, a cross-platform IDE developed by Xamarin. With these IDEs, you can develop using C# on Linux or Mac.
If you are a Microsoft .NET developer and you use Microsoft Visual Studio* on a daily basis, as I do, you can install MonoGame in Visual Studio and use it to create your games. At the time of this writing, the latest stable version of MonoGame is version 3.2 This version runs in Visual Studio 2012 and 2013 and allows you to create a DirectX desktop game, which you will need if you want to support touch in the game.
The installation of MonoGame comes with many new templates in Visual Studio that you can choose to create your games, as shown in Figure 1.
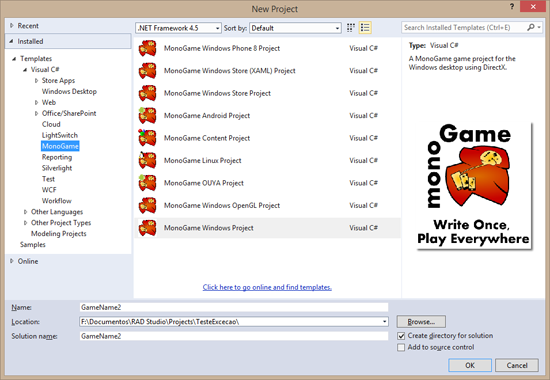
Figure 1. New MonoGame* templates
Now, to create your first game, click MonoGame Windows Project and then select a name. Visual Studio creates a new project with all the files and references needed. If you run this project, you’ll get something like Figure 2.

Figure 2. Game created in a MonoGame* template
Dull, isn’t it? Just a blue screen, but this is the start for any game you build. Press Esc, and the window closes.
You can start writing your game with the project you have now, but there is a catch. You won’t be able to add any assets (images, sprites, sounds, or fonts) without compiling them to a format compatible with MonoGame. For that, you need one of these options:
- Install XNA Game Studio 4.0
- Install the Windows Phone 8 software development kit (SDK)
- Use an external program like XNA content compiler
XNA Game Studio
XNA Game Studio has everything you need to create XNA games for Windows and Xbox 360. It also has a content compiler that can compile the assets to .xnb files, then compile all the files for your MonoGame project. Currently, you can install the compiler only in Visual Studio 2010. If you don’t want to install Visual Studio 2010 just for that purpose, you can install XNA Game Studio in Visual Studio 2012 (see the link in the “For More Information” section of this article).
Windows Phone 8 SDK
You can’t install XNA Game Studio directly in Visual Studio 2012, but the Windows Phone 8 SDK installs fine in Visual Studio 2012. You can use it to create a project to compile your assets.
XNA Content Compiler
If you don’t want to install an SDK to compile your assets, you can use the XNA content compiler (see the link in “For More Information”), an open source program that can compile your assets to .xnb files that can be used in MonoGame.
Create Your First Game
The previous game that was created with the MonoGame template is the starting point for all games. You will use the same process to create all your games. In Program.cs, you have the Main function. That function initializes and runs the game:
static void Main()
{
    using (var game = new Game1())
        game.Run();
}
Game1.cs is the core of the game. There, you have two methods that are called in a loop 60 times per second: Update and Draw. In Update, you recalculate data for all the elements in the game; in Draw, you draw these elements. Note that this is a tight loop. You have 1/60th of a second, or 16.7 milliseconds, to calculate and draw the data. If you take more than that, the program may skip some Draw cycles, and you will see graphical glitches in your game.
Until recently, the input for games on desktop computers was the keyboard and mouse. Unless the user had purchased extra hardware, like driving wheels or joysticks, you could not assume that there was any other input method. With the new hardware now available, like Ultrabook™ devices, Ultrabook 2 in 1s, and all-in-one PCs, your options have changed. You can use touch input and sensors, giving users a more immersive and realistic game.
For this first game, we will create a penalty shootout soccer game. The user will use touch to “kick” the ball, and the computer goalkeeper will try to catch the ball. The direction and speed of the ball will be determined by the user’s flick. The computer goalkeeper will choose a random side and velocity to catch the ball. Each goal scored results in one point. Otherwise, the goalkeeper gets the point.
Add Content to the Game
The first step in the game is to add content. Start by adding the background field and the ball. To do so, create two .png files: one for the soccer field (Figure 3) and the other for the ball (Figure 4).
Figure 3. The soccer field
Figure 4. The soccer ball
To use these files in the game, you must compile them. If you are using XNA Game Studio or the Windows Phone 8 SDK, you must create an XNA content project. That project doesn’t need to be in the same solution. You’ll use it only to compile the assets. Add the images to this project, and build it. Then, go to the project target directory and copy the resulting .xnb files to your project.
I prefer to use the XNA Content Compiler, which doesn’t require a new project and allows you to compile the assets as needed. Simply open the program, add the files to the list, select the output directory, and click Compile. The .xnb files are ready to be added to the project.
Content Files
When the .xnb files are available, add them to the Content folder of your game. You must set the build action for each file as Content and the Copy to Output Directory to Copy if Newer. If you don’t do that, you will get an error when you try to load the assets.
Create two fields in which to store the textures of the ball and the field:
private Texture2D _backgroundTexture;
private Texture2D _ballTexture;
These fields are loaded in the LoadContent method:
protected override void LoadContent()
{
_spriteBatch = new SpriteBatch(GraphicsDevice);
_backgroundTexture = Content.Load<Texture2D>("SoccerField");
_ballTexture = Content.Load<Texture2D>("SoccerBall");
}
Note that the names of the textures are the same as the files in the Content folder but without the extension.
Next, draw the textures in the Draw method:
protected override void Draw(GameTime gameTime)
{
GraphicsDevice.Clear(Color.Green);
var screenWidth = Window.ClientBounds.Width;
var screenHeight = Window.ClientBounds.Height;
var rectangle = new Rectangle(0, 0, screenWidth, screenHeight);
_spriteBatch.Begin();
_spriteBatch.Draw(_backgroundTexture, rectangle, Color.White);
var initialBallPositionX = screenWidth / 2;
var ínitialBallPositionY = (int)(screenHeight * 0.8);
var ballDimension = (screenWidth > screenHeight) ?
(int)(screenWidth * 0.02) :
(int)(screenHeight * 0.035);
var ballRectangle = new Rectangle(initialBallPositionX, ínitialBallPositionY,
ballDimension, ballDimension);
_spriteBatch.Draw(_ballTexture, ballRectangle, Color.White);
_spriteBatch.End();
base.Draw(gameTime);
}
This method clears the screen with a green color, and then it draws the background and the ball at the penalty mark. The first spriteBatch Draw method draws the background resized to the size of the window—position 0,0; the second method draws the ball at the penalty mark. It is resized to be proportional to the window size. There is no movement here because the positions don’t change. The next step is to move the ball.
Move the Ball
To move the ball, you must recalculate its position for each iteration in the loop and draw it in the new position. Perform the calculation of the new position in the Update method:
protected override void Update(GameTime gameTime)
{
if (GamePad.GetState(PlayerIndex.One).Buttons.Back == ButtonState.Pressed ||
Keyboard.GetState().IsKeyDown(Keys.Escape))
Exit();
_ballPosition -= 3;
_ballRectangle.Y = _ballPosition;
base.Update(gameTime);
}
The ball position is updated in every loop by subtracting three pixels. If you want to make the ball move faster, you must subtract more pixels. The variables _screenWidth, _screenHeight, _backgroundRectangle, _ballRectangle, and _ballPosition are private fields, initialized in the ResetWindowSize method:
private void ResetWindowSize()
{
    _screenWidth = Window.ClientBounds.Width;
    _screenHeight = Window.ClientBounds.Height;
    _backgroundRectangle = new Rectangle(0, 0, _screenWidth, _screenHeight);
    _initialBallPosition = new Vector2(_screenWidth / 2.0f, _screenHeight * 0.8f);
    var ballDimension = (_screenWidth > _screenHeight) ?
        (int)(_screenWidth * 0.02) :
        (int)(_screenHeight * 0.035);
    _ballPosition = (int)_initialBallPosition.Y;
    _ballRectangle = new Rectangle((int)_initialBallPosition.X, (int)_initialBallPosition.Y,
        ballDimension, ballDimension);
}
This method resets all variables that depend on the window size. It is called in the Initialize method:
protected override void Initialize()
{
ResetWindowSize();
Window.ClientSizeChanged += (s, e) => ResetWindowSize();
base.Initialize();
}
This method is called in two different places: at the beginning of the process and every time the window size changes. Initialize handles ClientSizeChanged, so when the window size changes, the variables that depend on the window size are reevaluated and the ball is repositioned to the penalty position.
If you run the program, you will see that the ball moves in a straight line but doesn’t stop when the field ends. You can reposition the ball when it reaches the goal with the following code:
protected override void Update(GameTime gameTime)
{
if (GamePad.GetState(PlayerIndex.One).Buttons.Back == ButtonState.Pressed ||
Keyboard.GetState().IsKeyDown(Keys.Escape))
Exit();
_ballPosition -= 3;
if (_ballPosition < _goalLinePosition)
_ballPosition = (int)_initialBallPosition.Y;
_ballRectangle.Y = _ballPosition;
base.Update(gameTime);
}
The _goalLinePosition variable is another field, initialized in the ResetWindowSize method:
_goalLinePosition = _screenHeight * 0.05;
You must make one other change in the Draw method: remove all the calculation code.
protected override void Draw(GameTime gameTime)
{
GraphicsDevice.Clear(Color.Green);
var rectangle = new Rectangle(0, 0, _screenWidth, _screenHeight);
_spriteBatch.Begin();
_spriteBatch.Draw(_backgroundTexture, rectangle, Color.White);
_spriteBatch.Draw(_ballTexture, _ballRectangle, Color.White);
_spriteBatch.End();
base.Draw(gameTime);
}
The movement is perpendicular to the goal. If you want the ball to move at an angle, create a _ballPositionX field and increment it (to move to the right) or decrement it (to move to the left). A better way is to use a Vector2 for the ball position, like this:
protected override void Update(GameTime gameTime)
{
if (GamePad.GetState(PlayerIndex.One).Buttons.Back == ButtonState.Pressed ||
Keyboard.GetState().IsKeyDown(Keys.Escape))
Exit();
_ballPosition.X -= 0.5f;
_ballPosition.Y -= 3;
if (_ballPosition.Y < _goalLinePosition)
_ballPosition = new Vector2(_initialBallPosition.X,_initialBallPosition.Y);
_ballRectangle.X = (int)_ballPosition.X;
_ballRectangle.Y = (int)_ballPosition.Y;
base.Update(gameTime);
}
If you run the program, it will show the ball moving at an angle (Figure 5). The next step is to make the ball move when the user flicks it.
Figure 5. Game with the ball moving
Touch and Gestures
In this game, the motion of the ball must start with a touch flick. This flick determines the direction and velocity of the ball.
In MonoGame, you can get touch input using the TouchScreen class. You can use the raw input data or the Gestures API. The raw input data is more flexible because you can process all input data the way you want, while the Gestures API transforms this raw data into filtered gestures so that you receive input only for the gestures you want.
Although the Gestures API is easier to use, there are some cases when it can’t be used. For example, if you want to detect a special gesture, like an X shape or multifinger gestures, you will need to use the raw data.
For this game, we only need the flick, and the Gestures API supports that, so we will use it. The first thing to do is indicate which gestures you want by using the TouchPanel class. For example, the code:
TouchPanel.EnabledGestures = GestureType.Flick | GestureType.FreeDrag;
. . . makes MonoGame detect and notify you of flicks and drags only. Then, in the Update method, you can process the gestures as follows:
if (TouchPanel.IsGestureAvailable)
{
GestureSample gesture = TouchPanel.ReadGesture();
if (gesture.GestureType == GestureType.Flick)
{
…
}
}
First, determine whether any gesture is available. If so, you can call ReadGesture to get and process it.
Initiate Movement with Touch
First, enable flick gestures in the game using the Initialize method:
protected override void Initialize()
{
ResetWindowSize();
Window.ClientSizeChanged += (s, e) => ResetWindowSize();
TouchPanel.EnabledGestures = GestureType.Flick;
base.Initialize();
}
Until now, the ball has kept moving while the game was running. Use a private field, _isBallMoving, to tell the game when the ball is moving. In the Update method, when the program detects a flick, you set _isBallMoving to True, and the movement starts. When the ball reaches the goal line, set _isBallMoving to False and reset the ball position:
protected override void Update(GameTime gameTime)
{
if (GamePad.GetState(PlayerIndex.One).Buttons.Back == ButtonState.Pressed ||
Keyboard.GetState().IsKeyDown(Keys.Escape))
Exit();
if (!_isBallMoving && TouchPanel.IsGestureAvailable)
{
GestureSample gesture = TouchPanel.ReadGesture();
if (gesture.GestureType == GestureType.Flick)
{
_isBallMoving = true;
_ballVelocity = gesture.Delta * (float)TargetElapsedTime.TotalSeconds / 5.0f;
}
}
if (_isBallMoving)
{
_ballPosition += _ballVelocity;
if (_ballPosition.Y < _goalLinePosition)
{
_ballPosition = new Vector2(_initialBallPosition.X, _initialBallPosition.Y);
_isBallMoving = false;
while (TouchPanel.IsGestureAvailable)
    TouchPanel.ReadGesture();
}
_ballRectangle.X = (int) _ballPosition.X;
_ballRectangle.Y = (int) _ballPosition.Y;
}
base.Update(gameTime);
}
The ball increment is no longer constant: the program uses the _ballVelocity field to set the ball velocity in the x and y directions. Gesture.Delta returns the variation of movement since the last update. To calculate the velocity of the flick, multiply this vector by the TargetElapsedTime property.
If the ball is moving, the _ballPosition vector is incremented by the velocity (in pixels per frame) until the ball reaches the goal line. The following code:
_isBallMoving = false;
while (TouchPanel.IsGestureAvailable)
TouchPanel.ReadGesture();
. . . does two things: it stops the ball and removes all gestures for the input queue. If you don’t do that, the user can flick while the ball is moving, making it move again after the ball has stopped.
When you run the game, you can flick the ball, and it will move in the direction you flicked with the speed of the flick. There is one catch here, however. The code doesn’t detect where the flick occurred. You can flick anywhere on the screen (not just in the ball), and the ball will start moving. You could use gesture.Position to detect the position of the flick, but that property always returns 0,0, so you shouldn’t use it.
The solution is to use the raw input, get the touch point, and see if it is near the ball. The following code determines whether the touch input hits the ball. If it does, the gesture sets the _isBallHit field:
TouchCollection touches = TouchPanel.GetState();
TouchCollection touches = TouchPanel.GetState();

if (touches.Count > 0 && touches[0].State == TouchLocationState.Pressed)
{
    var touchPoint = new Point((int)touches[0].Position.X, (int)touches[0].Position.Y);
    var hitRectangle = new Rectangle((int)_ballPositionX, (int)_ballPositionY, _ballTexture.Width,
        _ballTexture.Height);
    hitRectangle.Inflate(20,20);
    _isBallHit = hitRectangle.Contains(touchPoint);
}
Then, the movement starts only if the _isBallHit field is True:
if (TouchPanel.IsGestureAvailable && _isBallHit)
If you run the game, you will only be able to move the ball if the flick starts on it. There is still one issue here, though: if you hit the ball too slowly or in any direction where it won’t hit the goal line, the game ends because the ball will never return to the start position. You must set a timeout for the ball movement. When the timeout is reached, the game repositions the ball.
The Update method has one parameter: gameTime. If you store the gameTime value when the movement starts, you can know the actual time the ball is moving and reset the game after the timeout:
if (gesture.GestureType == GestureType.Flick)
{
_isBallMoving = true;
_isBallHit = false;
_startMovement = gameTime.TotalGameTime;
_ballVelocity = gesture.Delta*(float) TargetElapsedTime.TotalSeconds/5.0f;
}
...
var timeInMovement = (gameTime.TotalGameTime - _startMovement).TotalSeconds;
if (_ballPosition.Y <' _goalLinePosition || timeInMovement > 5.0)
{
_ballPosition = new Vector2(_initialBallPosition.X, _initialBallPosition.Y);
_isBallMoving = false;
_isBallHit = false;
while (TouchPanel.IsGestureAvailable)
TouchPanel.ReadGesture();
}
Add a Goalkeeper
The game is now working, but it needs an element of difficulty: you must add a goalkeeper who will keep moving after the user kicks the ball. The goalkeeper is a .png file that the XNA Content Compiler compiles (Figure 6). You must add this compiled file to the Content folder, set its build action to Content, and set Copy to Output Directory to Copy if Newer.
Figure 6. The goalkeeper
The goalkeeper is loaded in the LoadContent method:
protected override void LoadContent()
{
_spriteBatch = new SpriteBatch(GraphicsDevice);
_backgroundTexture = Content.Load<Texture2D>("SoccerField");
_ballTexture = Content.Load<Texture2D>("SoccerBall");
_goalkeeperTexture = Content.Load<Texture2D>("Goalkeeper");
}
Then, you must draw it in the Draw method:
protected override void Draw(GameTime gameTime)
{
GraphicsDevice.Clear(Color.Green);
_spriteBatch.Begin();
_spriteBatch.Draw(_backgroundTexture, _backgroundRectangle, Color.White);
_spriteBatch.Draw(_ballTexture, _ballRectangle, Color.White);
_spriteBatch.Draw(_goalkeeperTexture, _goalkeeperRectangle, Color.White);
_spriteBatch.End();
base.Draw(gameTime);
}
_goalkeeperRectangle has the rectangle of the goalkeeper in the window. It is changed in the Update method:
protected override void Update(GameTime gameTime)
{
    …

   _ballRectangle.X = (int) _ballPosition.X;
   _ballRectangle.Y = (int) _ballPosition.Y;
   _goalkeeperRectangle = new Rectangle(_goalkeeperPositionX, _goalkeeperPositionY,
                    _goalKeeperWidth, _goalKeeperHeight);
   base.Update(gameTime);
}
The _goalkeeperPositionY, _goalKeeperWidth, and _goalKeeperHeight fields are updated in the ResetWindowSize method:
private void ResetWindowSize()
{
    …
    _goalkeeperPositionY = (int) (_screenHeight*0.12);
    _goalKeeperWidth = (int)(_screenWidth * 0.05);
    _goalKeeperHeight = (int)(_screenWidth * 0.005);
}
The initial goalkeeper position is in the center of the screen, at the top near the goal line:
_goalkeeperPositionX = (_screenWidth - _goalKeeperWidth)/2;
The goalkeeper will start moving when the ball does. It will keep moving from one side to the other in a harmonic motion. This sine curve describes its movement:
X = A * sin(at + δ)
where A is the movement amplitude (the goal width), t is the time of the movement, and a and δ are random coefficients (this will make the movement somewhat random so the user can’t predict the speed and side that the goalkeeper will take).
The coefficients are calculated when the user kicks the ball with a flick:
if (gesture.GestureType == GestureType.Flick)
{
    _isBallMoving = true;
    _isBallHit = false;
    _startMovement = gameTime.TotalGameTime;
    _ballVelocity = gesture.Delta * (float)TargetElapsedTime.TotalSeconds / 5.0f;
    var rnd = new Random();
    _aCoef = rnd.NextDouble() * 0.005;
    _deltaCoef = rnd.NextDouble() * Math.PI / 2;
}
The a coefficient is the velocity of the goalkeeper, a number between 0 and 0.005 that represents a velocity between 0 and 0.3 pixels/seconds (maximum of 0.005 pixels in 1/60th of a second). The delta coefficient is a number between 0 and pi/2. When the ball is moving, you update the goalkeeper’s position:
if (_isBallMoving)
{
    _ballPositionX += _ballVelocity.X;
    _ballPositionY += _ballVelocity.Y;
    _goalkeeperPositionX = (int)((_screenWidth * 0.11) *
                      Math.Sin(_aCoef * gameTime.TotalGameTime.TotalMilliseconds +
                      _deltaCoef) + (_screenWidth * 0.75) / 2.0 + _screenWidth * 0.11);
    …
}
The amplitude of the movement is _screenWidth * 0.11 (the size of the goal). Add (_screenWidth * 0.75) / 2.0 + _screenWidth * 0.11 to the result, so that the goalkeeper moves in front of the goal. Now, it’s time to make the goalkeeper catch the ball.
Hit Testing
If you want to know whether the goalkeeper catches the ball, you have to know whether the ball rectangle intersects the goalkeeper’s rectangle. You do this in the Update method, after you calculate the two rectangles:
_ballRectangle.X = (int)_ballPosition.X;
_ballRectangle.Y = (int)_ballPosition.Y;
_goalkeeperRectangle = new Rectangle(_goalkeeperPositionX, _goalkeeperPositionY,
    _goalKeeperWidth, _goalKeeperHeight);
if (_goalkeeperRectangle.Intersects(_ballRectangle))
{
    ResetGame();
}
ResetGame is just a refactoring of the code to reset the game to its initial state:
private void ResetGame()
{
    _ballPosition = new Vector2(_initialBallPosition.X, _initialBallPosition.Y);
    _goalkeeperPositionX = (_screenWidth - _goalKeeperWidth) / 2;
    _isBallMoving = false;
    _isBallHit = false;
    while (TouchPanel.IsGestureAvailable)
        TouchPanel.ReadGesture();
}
With this simple code, the game knows whether the goalkeeper caught the ball. Now, you must know whether the ball hit the goal. You do this when the ball passes the goal line.
var isTimeout = timeInMovement > 5.0;
if (_ballPosition.Y < _goalLinePosition || isTimeout)
{
    bool isGoal = !isTimeout &&
        (_ballPosition.X > _screenWidth * 0.375) &&
        (_ballPosition.X < _screenWidth * 0.623);
    ResetGame();
}
The ball must be completely in the goal, so its position must start after the first goal post (_screenWidth * 0.375) and must end before the second goal post (_screenWidth * 0.625 − _screenWidth * 0.02). Now it’s time to update the game score.
Add Scorekeeping
To add scorekeeping to the game, you must add a new asset: a spritefont with the font used in the game. A spritefont is an .xml file describing the font—the font family, its size and weight, along with some other properties. In the game, you can use a spritefont like this:
<pre class="brush: xml">
<?xml version="1.0" encoding="utf-8"?>
<XnaContent xmlns:Graphics="Microsoft.Xna.Framework.Content.Pipeline.Graphics">
  <Asset Type="Graphics:FontDescription">
    <FontName>Segoe UI</FontName>
    <Size>24</Size>
    <Spacing>0</Spacing>
    <UseKerning>false</UseKerning>
    <Style>Regular</Style>
    <CharacterRegions>
      <CharacterRegion>
        <Start> </Star>
        <End></End>
      </CharacterRegion>
    </CharacterRegions>
  </Asset>
</XnaContent>
You must compile this .xml file with XNA Content Compiler and add the resulting .xnb file to the Content folder of the project; set its build action to Content and the Copy to Output Directory to Copy if Newer. The font is loaded in the LoadContent method:
_soccerFont = Content.Load<SpriteFont>("SoccerFont");
In ResetWindowSize, reset the position of the score:
var scoreSize = _soccerFont.MeasureString(_scoreText);
_scorePosition = (int)((_screenWidth - scoreSize.X) / 2.0);
To keep score, declare two variables: _userScore and _computerScore. The _userScore variable is incremented when a goal occurs, and _computerScore is incremented when the ball goes out, there is a timeout, or the goalkeeper catches the ball:
if (_ballPosition.Y < _goalLinePosition || isTimeout)
{
    bool isGoal = !isTimeout &&
                  (_ballPosition.X > _screenWidth * 0.375) &&
                  (_ballPosition.X < _screenWidth * 0.623);
    if (isGoal)
        _userScore++;
    else
        _computerScore++;
    ResetGame();
}
…
if (_goalkeeperRectangle.Intersects(_ballRectangle))
{
    _computerScore++;
    ResetGame();
}
ResetGame re-creates the score text and sets its position:
private void ResetGame()
{
    _ballPosition = new Vector2(_initialBallPosition.X, _initialBallPosition.Y);
    _goalkeeperPositionX = (_screenWidth - _goalKeeperWidth) / 2;
    _isBallMoving = false;
    _isBallHit = false;
    _scoreText = string.Format("{0} x {1}", _userScore, _computerScore);
    var scoreSize = _soccerFont.MeasureString(_scoreText);
    _scorePosition = (int)((_screenWidth - scoreSize.X) / 2.0);
    while (TouchPanel.IsGestureAvailable)
        TouchPanel.ReadGesture();
}
The _soccerFont.MeasureString measures the string using the selected font, and you will use that measurement to calculate the score position. The score will be drawn in the Draw method:
protected override void Draw(GameTime gameTime)
{
…
_spriteBatch.DrawString(_soccerFont, _scoreText,
new Vector2(_scorePosition, _screenHeight * 0.9f), Color.White);
_spriteBatch.End();
base.Draw(gameTime);
}
Turn On the Stadium Lights
As a final touch, the game turns on the stadium lights when the light level in the room is dim. The new Ultrabook and 2 in 1 devices usually have a light sensor that you can employ to determine how much light is in the room and change the way the background is drawn.
For desktop applications, you can use the Windows API Code Pack for Microsoft .NET Framework, a library from which you access features of the Windows 7 and later operating systems. However, for this game, let’s take another path: the WinRT Sensor APIs. Although written for Windows 8, these APIs are also available for desktop applications and can be used with no change. Using them, you can port your application to Windows 8 without changing a single line of code.
The Intel® Developer Zone (IDZ) has an article on how to use the WinRT APIs in a desktop application (see the “For More Information” section). Based on that information, you must select the project in the Solution Explorer, right-click it, and then click Unload Project. Then, right-click the project again, and click Edit project. In the first PropertyGroup, add a TargetPlatFormVersion tag:
<PropertyGroup>
  <Configuration Condition=" '$(Configuration)' == '' ">Debug</Configuration>
…
  <FileAlignment>512</FileAlignmen>
  <TargetPlatformVersion>8.0</TargetPlatformVersion>
</PropertyGroup>
Right-click the project again, and then click Reload Project. Visual Studio reloads the project. When you add a new reference to the project, you will be able to see the Windows tab in the Reference Manager, as shown in Figure 7.
Figure 7. The Windows* tab in Reference Manager
Add the Windows reference to the project. You will also need to add the System.Runtime.WindowsRuntime.dll reference. If you can’t find it in the list of assemblies, you can browse to the .Net Assemblies folder. On my machine, the path is in C:\Program Files (x86)\Reference Assemblies\Microsoft\Framework\.NETCore\v4.5.
Now, you can write code to detect the light sensor:
LightSensor light = LightSensor.GetDefault();
if (light != null)
{
If there is a light sensor, the GetDefault method returns a not-null variable that you can use to detect light variations. Do that by wiring the ReadingChanged event, like this:
LightSensor light = LightSensor.GetDefault();
if (light != null)
{
    light.ReportInterval = 0;
    light.ReadingChanged += (s,e) => _lightsOn = e.Reading.IlluminanceInLux < 10;
}
If the reading is less than 10, the variable _lightsOn is True, and you can use it to draw the background in a different manner. If you see the Draw method of spriteBatch, you will see that the third parameter is a color. Up to this point, you have only used white. This color is used to tint the bitmap. If you use white, the colors in the bitmap remain unchanged; if you use black, the bitmap will be all black. Any other color tints the bitmap. You can use the color to turn on the lights, using a green color when the lights are off and the white color when they are on. In the Draw method, change the drawing of the background:
_spriteBatch.Draw(_backgroundTexture, rectangle, _lightsOn ? Color.White : Color.Green);
Now, when you run the program, you will see a dark green background when the lights are off and a light green background when the lights are on (Figure 8).
Figure 8. The complete game
You have now a complete game. It’s by no means finished—it still needs a lot of polish (animations when there is a goal, ball bounces when the goalkeeper catches the ball or the ball hits the posts)—but I leave that as homework for you. The final step is to port the game to Windows 8.
Port the Game to Windows 8
Porting a MonoGame game to other platforms is easy. You just need to create a new project in the solution of type MonoGame Windows Store Project, then delete the Game1.cs file and add the four .xnb files in the Content folder of the Windows Desktop app to the Content folder of the new project. You won’t add new copies of the files but instead add links to the original files. In the Solution Explorer, right-click the Content folder, click Add/Existing Files, select the four .xnb files in the Desktop project, click the down arrow next to the Add button, and select Add as link. Visual Studio adds the four links.
Then, add the Game1.cs file from the old project to the new one. Repeat the procedure you used with the .xnb files: right-click the project, click Add/Existing Files, select the Game1.cs file from the other project folder, click the down arrow next to the Add button, and then click Add as link. The last change to make is in Program.cs, where you must change the namespace for the Game1 class because you are using the Game1 class from the desktop project.
That’s it—you have created a game for Windows 8!
Conclusion
Developing games is a difficult task in its own right. You will have to remember your geometry, trigonometry, and physics classes and apply all those concepts to developing the game (wouldn’t it be nice if teachers used games when they taught these subjects?).
MonoGame makes this task a bit easier. You don’t have to deal with DirectX, you can use C# to develop your games, and you have full access to the hardware. Touch, sound, and sensors are available for your games. In addition, you can develop a game and port it with minor changes to Windows 8, Windows Phone, Mac OS X, iOS, or Android. That’s a real bonus when you want to develop multiplatform games.
For More Information
Bruno is a Brazilian MVP and has written five books published by Pearson Education Brazil.
He is the author of many utilities published by PCMag.com (http://www.pcmag.com/downloads)


