Introduction
In this article, we will try to look at the View classes in Backbone.js and see how view classes help us in updating the relevant parts of the application easily.
Background
The biggest problem while writing JavaScript applications is the spaghetti code that one needs to write just for HTML DOM manipulation. Every element on the UI will need some actions to happen when the user interacts with them. Some UI elements would want to automatically update the values based on the new/updated data. Doing all this using plain HTML and JavaScript/jQuery is a big problem (doable but a nightmare) especially from a maintenance perspective.
Backbone.js view greatly helps us when it comes to creating large scale manageable applications. The view classes are more like a glue that holds an HTML template with the model object. Also, this provides the mechanism to handle the events raised from the model and update the UI and handle UI events and act on them (perform some operations on the model). So in a way, we can say that the views are just observers who are listening to the model and UI events which makes them a perfect place to handle all the events and act upon them. Backbone views can be thought of as:
- Observers that keep listening to the DOM events and in case the event fires, taking the appropriate actions.
- Objects backed by models that are responsible for rendering the model data on the screen.
Let us see how we can use backbone.js views to efficiently manage the applications.
Link to complete series:
- BackBone Tutorial – Part 1: Introduction to Backbone.Js[^]
- BackBone Tutorial – Part 2: Understanding the basics of Backbone Models[^]
- BackBone Tutorial – Part 3: More about Backbone Models[^]
- BackBone Tutorial – Part 4: CRUD Operations on BackboneJs Models using HTTP REST Service[^]
- BackBone Tutorial – Part 5: Understanding Backbone.js Collections[^]
- BackBone Tutorial – Part 6: Understanding Backbone.js Views[^]
- BackBone Tutorial – Part 7: Understanding Backbone.js Routes and History[^]
- BackBone Tutorial – Part 8: Understanding Backbone.js Events[^]
Using the Code
Creating a Simple View
Let us start the discussion by looking at how we can create backbone views. Like backbone models and collections, creating a backbone view is also as easy as extending the existing View class of backbone.
var sampleView = Backbone.View.extend({

});
Like models and collections, we can also override the initialize and constructor of the backbone views. Let's try to see how we can override the initialize function.
var sampleView = Backbone.View.extend({
    initialize: function() {
        console.log('sampleView has been created');
    }
});
Instantiating the view is also straight forward. A view can simply be instantiated using the new keyword.
var view1 = new sampleView();
Associating Model with a View
Every view will be backed by a model. This model can be passed to the view in the constructor.
var book1 = new Book({ ID: 1, BookName: "Book 1" });
var m_bookView = new bookView({model: book1});
This model can either be a backbone model or a backbone collection. The view can extract the information from its model and render the HTML accordingly.
Understanding the el Property
Now we are saying that the views are responsible for listening to DOM element's events and also for updating the DOM elements. For this to happen, the view class should be associated/attached to a DOM element. Backbone views are always associated to a DOM element. This associated DOM element can be accessed/manipulated using the el property.
Now, there are 2 ways to create view:
- Creating a
view that will get associated with an existing DOM element. - Creating a
view that will create its own DOM element on the fly.
So let's start by looking at how we can create a view that will get associated with an existing DOM element. The views constructor is capable of accepting a lot of parameters. It can accept models, collections and even the DOM element that this view should associate itself to.
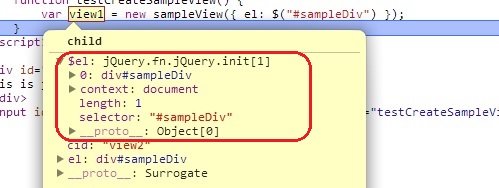
Let's say we want to create a view for an existing DOM element, i.e., a div with id="sampleDiv".
var view1 = new sampleView({ el: $("#sampleDiv") });
When we run the application and try to watch the el property, we can see that the el property contains the div element.
Now let's see how we can create a view that will create a DOM element for it dynamically. The way it works is that we can specify tagName, className, id and attributes in a backbone view. Based on these values, the el will be created by backbone. Let's try to create a simple div with id using this approach.
var sampleView2 = Backbone.View.extend({
    tagname: 'div',
    id: 'sampleDiv'
});
When we create this view, we can see that the view is associated with a div which was created using our specified tagName and id values.
var view2 = new sampleView2();

Now these two approaches provide a lot of flexibility while developing backbone applications. Let us try to look at a simple example to understand the complete picture. Let's say we need to create a list of books. We know the area where these items should be rendered but the actual items will be added at runtime. This can easily be achieved by creating an empty list and using JavaScript to add list items at runtime. Let's see how we can use backbone views to achieve this.
First, let us create the a simple view that will render the book data as a list element. Do do this, we will use the dynamically generated DOM element.
var bookView = Backbone.View.extend({
    tagname: "li",
    model: Book,
    render: function (){
        this.$el.html('<li>' + this.model.get("BookName") + '</li>');
        return this;
    }
});
What this view is doing is that, it is overiding the render function to render the book name in a list element. We have overridden the render function to render the book as a list element.
Now we need a view that will contain this list elements, i.e., the list view. For this, let's create a simple list element on my HTML and then let's use this view class to use that el.
var bookListView = Backbone.View.extend({
model: BooksCollection,
render: function() {
this.$el.html();
var self = this;
for(var i = 0; i < this.model.length; ++i) {
var m_bookView = new bookView({model: this.model.at(i)});
this.$el.append(m_bookView.$el);
m_bookView.render();
}
return this;
},
});
What this view is doing is that, it is accepting a collection of books and in the render function, it is using the bookView to render the books inside the associated el. Now the next thing we need to do is to associate the list created on the HTML page with this view as its el and pass the books collection to this view as model.
var book1 = new Book({ ID: 1, BookName: "Book 1" });
var book2 = new Book({ ID: 2, BookName: "Book 2" });
var book3 = new Book({ ID: 3, BookName: "Book 3" });
var book4 = new Book({ ID: 4, BookName: "Book 4" });
var book5 = new Book({ ID: 5, BookName: "Book 5" });
var bookCollection = new BooksCollection([book1, book2, book3, book4, book5]);
var bookList = null;

$(document).ready(function () {
    bookList = new bookListView({ el: $("#bookList"), model: bookCollection });
    bookList.render();
});
Calling the render function of this view will use our backbone views and render the list of books in an unordered list.
Note: A view's el can be changed anytime by calling the setElement method of the view.
Using Templates
Now in our example, we have overridden the render function of our views and took charge of rendering the HTML in our own code. This is still better than plain JavaScript/jquery based approach because here our JavaScript code is not intermingled with HTML and there is a logical structure to our views.
But the problem is that our view HTML could become very complex and it might not always be possible to spit out that HTML from our render functions. To ease this problem, backbone supports view templates. Any template engine can be used with backbone view. To understand the concept of templates, let us use the simple JavaScript style templates.
Let's say that every book needs to be rendered as a drop down menu. This can be achieved by using bootstrap very easily. But creating all that HTML in the render function might not be a very good idea. So let us create one more set of views that will use the template to render the books in a drop-down.
var bookView2 = Backbone.View.extend({
model: Book,
tagName: 'li',
template: '',
initialize: function() {
this.template = _.template($('#bookItem').html());
},
render: function() {
this.$el.html(this.template(this.model.attributes));
return this;
}
});
var bookListView2 = Backbone.View.extend({
model: BooksCollection,
render: function() {
this.$el.html();
for(var i = 0; i < this.model.length; ++i) {
var m_bookView = new bookView2({model: this.model.at(i)});
this.$el.append(m_bookView.$el);
m_bookView.render();
}
return this;
},
});
And the template is defined in the HTML file itself as:
<script type="text/template" id="bookItem">
    <li role="presentation"><a role="menuitem" tabindex="-1" href="#"> <%= BookName %> </a></li>
   </script>
What will happen here is that the bookView2 will use this template to render the books as list elements. Backbone can work on any view engine. Also, the example taken here was little contrived but very complex templates can also be created and rendered using this approach very easily.
Listening to DOM Events
Now there is one important thing remaining. how can a view object listen to DOM elements and perform needed actions. To understand this, let us add a simple button on our list view and try to listen to its click action.
var bookView2 = Backbone.View.extend({

    model: Book,
    tagName: 'li',
    template: '',

    events: {
        'click': "itemClicked"
    },

    itemClicked: function () {
        alert('clicked: ' + this.model.get('BookName'));
    },

    initialize: function() {
        this.template = _.template($('#bookItem').html());
    },

    render: function() {
        this.$el.html(this.template(this.model.attributes));
        return this;
    }
});
Now whenever a DOM element raises an event, the associated view will look for its handler in the events section. If the handler exists, it calls that handler. This is very useful when we need to listen to DOM events and take some actions. We can use {"event selector": "callback"} format to declare our DOM event handlers. The selector are usual jquery/css selectors.
Listening to Model Changes
In large scale applications, there might be multiple views rendering the same data. What if one view changes the data? Should other views continue to show the stale data? Probably no. Thus, we also need to listen to the model changes too. This can easily be achieved by listening to model changes as:
var bookListView = Backbone.View.extend({
model: BooksCollection,
initialize: function() {
this.listenTo(this.model, "add", this.modelUpdated);
},
modelUpdated: function() {
this.render();
},
});
What we did here is that whenever new books are added to the collection, the associated view will be listening to the add event. On receiving this event, it will simply render the view again. This can be tested by simply adding few more books in the already rendering collection.
function AddMoreBooks() {
    var i = bookCollection.length + 1;
    var newBook = new Book({ID: i, BookName: 'yet another book_' + i});

    bookCollection.add(newBook);
}
On the same lines, we can also listen to change event to listen to model updates.
var bookView = Backbone.View.extend({
tagName: "li",
model: Book,
initialize: function() {
this.listenTo(this.model, "change", this.render);
}
});
To test this, let's just try to update a book that is already being rendered on screen.
book1.set('BookName', book1.get('BookName') + '_updated');
Removing a View from DOM
Removing a view from DOM can be easily achieved by calling the remove function on the view.
bookList.remove();
Point of Interest
In this article, we looked at the backbone views. We looked at how we can use backbone views to implement better structured applications that can easily perform DOM manipulations.
History
- 29th July, 2014: First version


 General
  News
News  Suggestion
  Question
  Bug
Bug  Answer
  Joke
Joke  Praise
  Rant
Rant  Admin
Admin 


