Introduction
Thinking as an Android Developer, I have a project and now it's time for starting real development --How should i begin?-- Probably this is the first question that comes in mind for a beginner developer.
The answer is easy : It's XML Layout for my first Activity or we can call it my first Screen that appears to user, but which Layout should i implement? this depends on what you want to do, so in this article we will discuss all possible Layouts you can use, as well as controls that you would need.
| Android XML Layouts
- Relative Layout
- Linear Layout
- Grid View
- List View
| Android Controls
- Edit Text
- Button / Image Button
- CheckBox
- Radio Button / Radio Group
|
1. Android XML Layout
1.1 Relative Layout
After developing some applications, You will find that Relative Layout is one of the most used layout in your application, that's why I decided to discuss it first.
You can use this layout to position items in a relative position to each others as well as position siblings as we see in this example.
Example 1
We want to display a title in center of the screen and bellow it a Text Editor and right to the Text Editor a Button
1. Open Your Project and Go to activity_main.xml... You should find it as below
<RelativeLayout xmlns:android="http://schemas.android.com/apk/res/android"
    xmlns:tools="http://schemas.android.com/tools"
    android:layout_width="match_parent"
    android:layout_height="match_parent"
    android:paddingBottom="@dimen/activity_vertical_margin"
    android:paddingLeft="@dimen/activity_horizontal_margin"
    android:paddingRight="@dimen/activity_horizontal_margin"
    android:paddingTop="@dimen/activity_vertical_margin"
    tools:context=".MainActivity" >

    <TextView
        android:layout_width="wrap_content"
        android:layout_height="wrap_content"
        android:text="@string/hello_world" />

</RelativeLayout>
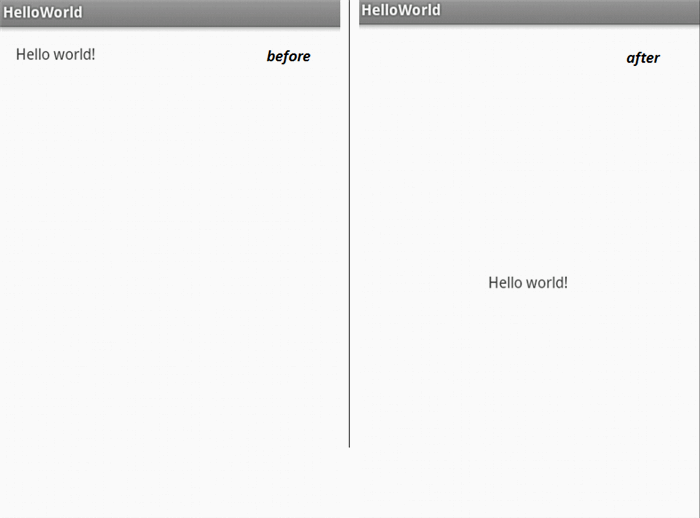
2. It's time for some modifications. Our first modification is to display Hello World in the center of the screen
android:id="@+id/TextView"
android:layout_centerHorizontal="true"
android:layout_centerVertical="true"
<TextView
android:id="@+id/TextView"
android:layout_width="wrap_content"
android:layout_height="wrap_content"
android:layout_centerHorizontal="true"
android:layout_centerVertical="true"
android:text="@string/hello_world" />
3. Now, Let's Add the Edit Text and Button
<EditText
android:id="@+id/EditTextRelativeLayout"
android:layout_width="wrap_content"
android:layout_height="wrap_content"
android:hint="Enter Your Name"
android:layout_below="@+id/TextView">
</EditText>
<Button
android:id="@+id/Button"
android:layout_width="wrap_content"
android:layout_height="wrap_content"
android:text="@string/ButtonSubmit"
android:layout_below="@id/TextView"
android:layout_toRightOf="@id/EditTextRelativeLayout">
</Button>

4. We finished our first layout but there is other parameters rather than "wrap_content" also what if i want to insert both EditText and Button inside another Layout and control it instead of controlling both EditText and Button
- I changed EditText Layout:Width to "Fill_Parent" that stretches the EditText to fit all the width and same for Layout:Height, that made Button disappear because its position is relative to EditText and it's out of the screen which isn't acceptable in our case that's why using wrap_content is better in our example.
<EditText
android:id="@+id/EditTextRelativeLayout"
android:layout_width="fill_parent"
android:layout_height="fill_parent"
android:hint="Enter Your Name"
android:layout_below="@+id/TextView"></EditText>
- As we see both EditText and Button are not centered horizontally. The best way to center both in one step is to place both fields inside another layout and center this layout as the below code
<RelativeLayout xmlns:android="http://schemas.android.com/apk/res/android"
xmlns:tools="http://schemas.android.com/tools"
android:layout_width="match_parent"
android:layout_height="match_parent"
android:paddingBottom="@dimen/activity_vertical_margin"
android:paddingLeft="@dimen/activity_horizontal_margin"
android:paddingRight="@dimen/activity_horizontal_margin"
android:paddingTop="@dimen/activity_vertical_margin"
tools:context=".MainActivity" >
<TextView
android:id="@+id/TextView"
android:layout_width="wrap_content"
android:layout_height="wrap_content"
android:layout_centerHorizontal="true"
android:layout_centerVertical="true"
android:text="@string/hello_world" />
<RelativeLayout
android:id="@+id/CenterLayout"
android:layout_width="wrap_content"
android:layout_height="wrap_content"
android:layout_below="@+id/TextView"
android:layout_centerHorizontal="true" >
<EditText
android:id="@+id/EditTextRelativeLayout"
android:layout_width="wrap_content"
android:layout_height="wrap_content"
android:hint="Enter Your Name" >
</EditText>
<Button
android:id="@+id/Button"
android:layout_width="wrap_content"
android:layout_height="wrap_content"
android:layout_toRightOf="@id/EditTextRelativeLayout"
android:text="@string/ButtonSubmit" >
</Button>
</RelativeLayout>
</RelativeLayout>
#NOTE_1: DO NEVER INSERT CONSTANT VALUE LIKE 26dp INSIDE LAYOUT_WIDTH OR LAYOUT_HEIGHT...ALWAYS REMEMBER THERE ARE DIFFERENT SCREEN SIZES
1.2 Linear Layout
Probably,Your second option will be Linear Layout. Using this one, you only have 2 options to list items below each other (1 item per column) or list your items vertically (1 item per row).
You would need something like this if you are implementing a Movie List as example.
<?xml version="1.0" encoding="utf-8"?>
<LinearLayout xmlns:android="http://schemas.android.com/apk/res/android"
android:layout_width="match_parent"
android:layout_height="match_parent"
android:orientation="vertical" >
<EditText
android:id="@+id/EditTextRelativeLayout_One"
android:layout_width="wrap_content"
android:layout_height="wrap_content"
android:hint="Enter Your Name ( 1 )" >
</EditText>
<EditText
android:id="@+id/EditTextRelativeLayout_Two"
android:layout_width="wrap_content"
android:layout_height="wrap_content"
android:hint="Enter Your Name ( 2 )" >
</EditText>
</LinearLayout>
<?xml version="1.0" encoding="utf-8"?>
<LinearLayout xmlns:android="http://schemas.android.com/apk/res/android"
android:layout_width="match_parent"
android:layout_height="match_parent"
android:orientation="horizontal" >
<EditText
android:id="@+id/EditTextRelativeLayout_One"
android:layout_width="wrap_content"
android:layout_height="wrap_content"
android:hint="Enter Your Name ( 1 )" >
</EditText>
<EditText
android:id="@+id/EditTextRelativeLayout_Two"
android:layout_width="wrap_content"
android:layout_height="wrap_content"
android:hint="Enter Your Name ( 2 )" >
</EditText>
</LinearLayout>
What if i want to add 1 BIG Item that contains both EditText & Button Per Row, this is very simple we can implement Relative Layout inside our Linear Layout as below
<?xml version="1.0" encoding="utf-8"?>
<LinearLayout xmlns:android="http://schemas.android.com/apk/res/android"
android:layout_width="match_parent"
android:layout_height="match_parent"
android:orientation="vertical" >
<RelativeLayout
android:id="@+id/Rel1"
android:layout_width="wrap_content"
android:layout_height="wrap_content" >
<EditText
android:id="@+id/EditTextRelativeLayout_One"
android:layout_width="wrap_content"
android:layout_height="wrap_content"
android:hint="Enter Your Name ( 1 )" >
</EditText>
<Button
android:id="@+id/Button"
android:layout_width="wrap_content"
android:layout_height="wrap_content"
android:layout_toRightOf="@id/EditTextRelativeLayout_One"
android:text="@string/ButtonSubmit" >
</Button>
</RelativeLayout>
<RelativeLayout
android:id="@+id/Rel2"
android:layout_width="wrap_content"
android:layout_height="wrap_content" >
<EditText
android:id="@+id/EditTextRelativeLayout_Two"
android:layout_width="wrap_content"
android:layout_height="wrap_content"
android:hint="Enter Your Name ( 2 )" >
</EditText>
<Button
android:id="@+id/Button2"
android:layout_width="wrap_content"
android:layout_height="wrap_content"
android:layout_toRightOf="@id/EditTextRelativeLayout_Two"
android:text="@string/ButtonSubmit" >
</Button>
</RelativeLayout>
</LinearLayout>
1.3 GridView / ListView
Your third option layout is GridView that displays item in 2 dimensional, and a scrollable grid Or ListView that represents items in 1-D dimension. I'll talk in more details in GridView but everything is the same for ListView.
You can decide number of columns for your grid or fit it automatically depeding on the screen size as follow
<?xml version="1.0" encoding="utf-8"?>
<GridView xmlns:android="http://schemas.android.com/apk/res/android"
android:layout_width="match_parent"
android:layout_height="match_parent"
android:numColumns="3">
</GridView>
<?xml version="1.0" encoding="utf-8"?>
<GridView xmlns:android="http://schemas.android.com/apk/res/android"
android:layout_width="match_parent"
android:layout_height="match_parent"
android:numColumns="auto_fit">
</GridView>
Now, how can i add items to my grid? You can't insert it from layout as before, your application will crash. You have to add Grid Items through code.
1.Create Item Layout that will be filled inside your grid
<?xml version="1.0" encoding="utf-8"?>
<LinearLayout xmlns:android="http://schemas.android.com/apk/res/android"
    android:layout_width="match_parent"
    android:layout_height="match_parent"
    android:orientation="vertical" >

<EditText
    android:id="@+id/txtGrid"
    android:layout_width="wrap_content"
    android:layout_height="wrap_content"/>

</LinearLayout>
2. Access Grid from codeand set its adapter class that helps to bind data to grid
GridView gridview = (GridView) findViewById(R.id.myGrid);
gridview.setAdapter(new GridAdatper(this.getApplicationContext()));
3.Right-Click on GridAdatper and Create a class as well as adding your constructor that accepts application context
Context _C;
public GridAdatper(Context applicationContext) {
_C = applicationContext;
}
4. Bind Data through your Adapter inside getView function
public View getView(int arg0, View arg1, ViewGroup arg2) {
EditText editText;
View grid_item = null;
LayoutInflater inflater = (LayoutInflater) _C
.getSystemService(Context.LAYOUT_INFLATER_SERVICE);
if (arg1 == null) {
grid_item = new View(_C);
grid_item = inflater.inflate(R.layout.grid_item, null);
editText = (EditText)grid_item.findViewById(R.id.txtGrid);
editText.setHint(InputData[arg0]);
} else {
grid_item = (View) arg1;
}
return grid_item;
}
2. Android Controls
I will talk mainly about some parameters that fits specially with each control, and how to access this control into your code
2.1 EditText
EditText Control is your way to read input from user
<EditText
android:id="@+id/EditTextRelativeLayout"
android:layout_width="wrap_content"
android:layout_height="wrap_content"
android:password="true"
android:maxLength="100"
android:hint="Edit Text"
android:textColorHint="@android:color/holo_blue_dark">
</EditText>
How can i access this control and change some parameters in code?
EditText txt_Edit1 = (EditText) findViewById(R.id.EditTextRelativeLayout);
txt_Edit1.setHint("");
txt_Edit1.setHintTextColor(color.black);
txt_Edit1.setTextColor(color.holo_green_light);
2.2 Button / Image Button
One of the most important controlis Button / Image Button that represents an action to receive user action
<Button
android:id="@+id/Button"
android:layout_width="wrap_content"
android:layout_height="wrap_content"
android:text="@string/ButtonSubmit" >
</Button>
<ImageButton
android:id="@+id/ImageButton"
android:layout_width="wrap_content"
android:layout_height="wrap_content"
android:src="@drawable/ic_launcher" />
Or you can access from code as below
Button btn = (Button) findViewById(R.id.Button);
btn.setText("Click Here");

ImageButton img_btn = (ImageButton) findViewById(R.id.ImageButton);
img_btn.setImageResource(R.drawable.ic_launcher);
2.3 CheckBox
CheckBox are useful in case of multiple options, and it doesn't have alot of options,only set checked to true/false
<CheckBox
android:id="@+id/CheckBox"
android:layout_width="wrap_content"
android:layout_height="wrap_content"
android:checked="true"/>
CheckBox chk =(CheckBox)findViewById(R.id.CheckBox);
chk.setChecked(true);
2.4 Radio Button / Radio Group
You can set a Radio Group which is a collection of Radio Buttons as example bellow
<RadioGroup
android:id="@+id/RGroup"
android:layout_width="wrap_content"
android:layout_height="wrap_content"
android:dividerPadding="1dp" >
<RadioButton
android:id="@+id/RGroup1"
android:layout_width="wrap_content"
android:layout_height="wrap_content"
android:checked="false" />
<RadioButton
android:id="@+id/RGroup2"
android:layout_width="wrap_content"
android:layout_height="wrap_content"
android:checked="true" />
</RadioGroup>
Summary
90% of your android applications will need the discussed Layouts and Controls. Hopefully, we discussed how to add a control and access it from your code , as well as choosing the best layout that fits your needs.
This member has not yet provided a Biography. Assume it's interesting and varied, and probably something to do with programming.


 General
  News
News  Suggestion
  Question
  Bug
Bug  Answer
  Joke
Joke  Praise
  Rant
Rant  Admin
Admin 


