Introduction
Hi there!
Welcome to the second part of my article series. Unless you have already done so, I suggest reading the first part for starters, as this second part will rely quite heavily on the fact that you already have the necessary tools and technologies installed.
In this part of the series, we will delve on the following issues. For some of you readers, it might feel strange that the writing of pure .NET applications doesn't come until now, but like the first part stated, this series is meant for those developers who already have a grasp on how Windows applications were written before the Whidbey compiler generation.
Our topics for tonight's discussion (yes, this article was written during the night) are as follows:
- Leaving the Platform SDK out - Writing "pure" .NET applications using C++/CLI.
- Writing more complex GUI with Windows Forms - The MDI example.
Without further delay, let's get started!
Ditching the Platform SDK
A few people who have read my first article sent in e-mails asking how they should proceed if they didn't want to use the Platform SDK. Like most of you already know, the VC++ Express contains a set of wizards, from which you can even find a Windows Forms application wizard. But, like you have already noted, I don't like using those wizards. Yes, they generate efficient skeletons, but the whole concept of learning how C++/CLI works requires that we sometimes write our applications from ground up.
So, go ahead, fire up your VC++ and create a new project. Its type should be .NET and the template Empty Project sounds suitable. For the name, give in Hello_CLI_3. The wizard will generate the folders for the solution and then you're dropped into the Solution Explorer view.
Settings for a "pure" .NET application
Now, as we are in the process of writing a pure .NET application, there are certain project settings that need to be altered in order for the builds to get targeted correctly. Here is a list of the settings, their locations, and the values they should be set to: (to access project properties, right-click on the project name, and choose Properties.)
- Linker -> System, SubSystem: Windows.
- Linker -> Advanced, Entry Point: Main.
Back in the Solution Explorer, it's time to add support for the .NET Framework. This time, we will do it completely manually, so right-click on the project name and choose .NET References. Locate a button called Add New Reference and click on it. From the list that is presented, add the System.dll and System.Windows.Forms.dll into your project, then click on OK, and close the Properties window.
The actual code
Now, it's time to add actual code into our project. Add a new source file, and name it Main.cpp. Into this file, paste the following code fragment:
using namespace System;
int Main(void)
{
System::Windows::Forms::MessageBox::Show( L"Welcome to C++/CLI", "TestApp",
System::Windows::Forms::MessageBoxButtons::OK );
return 0;
}
Go ahead, compile and execute this program. You can see it starts up, pops a message box, and closes down. There it is, our very own, pure .NET application, alive and kicking. Like you can see, I prefer to use the full namespace of every class I use. This helps me learn where and how which object resides. Naturally, you could, at the start of the file, place the following line:
using namespace System::Windows::Forms;
The result of this would be that you wouldn't need to include this namespace in the code anymore. You could just call MessageBox::Show(), and specify MessageBoxButtons::OK as the parameter.
Remember how we defined the entry point of the application in the linker settings? Now, you can see the effect. If we did not define this entry point, the linker would look for the WinMain entry point again. Using this approach, the .NET Framework is used to initialize the application and the thread, then call our entry-point function to allow the execution to begin.
Writing a more complex GUI - The MDI example
On our next section, we will dive into the process of writing a bit more complicated user interface. Our interface will present us with a MDI Frame form, a toolbar, and a single child form.
To get started, again create a new blank .NET project, naming it Hello_CLI_4. And following the familiar steps from above, setup the settings for the linker. Then add .NET References, this time only System.dll is needed. Add a new source file, and write the Main function, making it only return, and nothing else.
Designing the parent form
Now, it's time to introduce the Forms. Add a new UI -> Windows Form item into the project. Name this form as Form_P. After a few minutes of thinking, you are presented with the Form Designer. Now, go to Solution Explorer and delete the Form_P.cpp file. This one is not needed for our purposes.
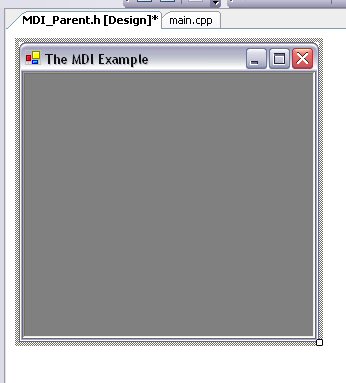
Back in the Form Designer, right-click on the Form and choose Properties. From the Properties window, scroll to Appearance -> Text and change this property to The MDI Example. Next, scroll again to find Window Style -> IsMDIContainer and set this one to True. You can instantly see how our Form starts to look different. For a reference, here's a picture of what the form should look like when these settings are done.
Strips, the source of control
In the .NET Framework environment, the concept of bars seems to be misplaced somewhere, and is replaced by the concept of Strips. A menu bar is represented by a MenuStrip component. A toolbar is called a ToolStrip, and a status bar is a StatusStrip. Also, the behavior of all these has changed a lot.
Let's start by adding a MenuStrip. Drag it on the form. You can easily add and remove menu topics by clicking on the Type Here section and writing a menu topic. For this example application, create a File menu and a Help menu. Under the first one, add an item called Exit, and under the second one, an item called About MDI Example. If, at some point, the program will auto-generate code fragments and drop you into the Form_P.h's code view, then don't panic. Just delete the auto-generated code section and return to the Designer view. The safest way is to use the right-click to select an item.
When done, you should be left out with something like the following image represents:

Now is the time to name these items. As I have a solid background on Windows programming, I've grown quite fond with using the ID designations. So, click on the MenuStrip at the gradient section, and spot a small right-pointing arrow at its right end. Click on this arrow, and a quick-select Actions menu is popped open. From here, select Edit Items.
You are now taken to the Items Collection Editor window, from where you can quickly change the properties of each of the menu items. First, choose the File menu topic, browse to its Design -> Name section, and rename it to ID_FILE_MENU. Similarly, rename the Help menu topic to ID_HELP_MENU.
To access the individual menu items' properties, click on the desired menu topic, and scroll to Data -> DropDownItems and click on the More button (the one with three dots on it). You will be taken into a similar Items Collection Editor window, but this time focusing on the individual menu items. To navigate backwards, click on OK. Using this knowledge, go and change the IDs of the menu items to ID_FILE_EXIT and ID_HELP_ABOUT, respectively. Also, if you wish, then on both of the menu items, you can scroll to Behavior -> ToolTipText and enter a descriptive tooltip for both of them.
When finished, return to the Form Designer and click on the right-pointing arrow again to close the Actions menu.
Adding a StatusStrip
Adding a StatusStrip is quite a breeze. Just drag & drop it on the form. Type into the Type Here section and add a new Panel named Ready.... Right-click on this Panel and edit its properties again. To setup this Panel to display text only, and look correct, you should modify its properties according to this list:
- Design ->
Name, ID_STATUS_TEXT.
- Appearance ->
Display Style, Text.
- Appearance ->
TextAlign, MiddleLeft.
- Behavior ->
AutoSize, False.
- Layout -> Size ->
Width, 200.
Now, our parent form is completed, and you should be resulted with something like the following image represents:
Coding the functionality
Now, it's time to start working on what all stuff the form can do. The easiest way to manipulate the events is to use the Properties window. On the top of this window, you can always see the name/ID of the object currently being edited. Going through all these in an orderly fashion, add handlers to the following events for the menu items (not menu topics).
Click - Named like OnClicked_XXX.
MouseEnter - OnEnter_XXX.
MouseLeave - OnLeave_XXX.
First, let's tackle the Click events. For the Exit menu item, we will again exit the Form by calling:
private: System::Void OnClicked_Exit(System::Object^ sender,
System::EventArgs^ e)
{
Application::Exit();
}
The About menu item will display a message box showing a nifty error code:
private: System::Void OnClicked_About(System::Object^
sender, System::EventArgs^ e)
{
MessageBox::Show( L"About-box for this application", L"About The MDI Example",
MessageBoxButtons::OK );
}
The MouseEnter and MouseLeave events are used to modify the text displayed by the status strip. The idea is that when mouse enters the item, the tooltip of the menu item is displayed on the status panel. To support this functionality, the code fragment for the MouseEnter events should be as follows:
private: System::Void OnEnter_Exit(System::Object^
                   sender, System::EventArgs^ e)
{
    this->ID_STATUS_TEXT->Text = this->ID_FILE_EXIT->ToolTipText;
}
And for the MouseLeave, it should be:
private: System::Void OnLeave_Exit(System::Object^
                   sender, System::EventArgs^ e)
{
    this->ID_STATUS_TEXT->Text = L"Ready...";
}
Remember that for the Help item, the text is different. You can use the ID you gave it to access its ToolTipText property.
Wiring it up
Our last step is to add the necessary code calls to make our form live and breathe. Save all changes and close the Form Designer and the form header file. Go back to the Solution Explorer and the source file you added. Include the header file for the form, and inside the Main function, add the familiar two calls. The resulting file should look something like this:
#include "Form_P.h"
using namespace System;
using namespace System::Windows::Forms;
int Main(void)
{
Application::EnableVisualStyles();
Application::Run( gcnew Hello_CLI_4::Form_P() );
return 0;
}
Now, go and execute the application. Use the menu items, see how the status text changes when you enter/exit the menu item areas.
Conclusion
Phew! That was a serious amount of coding, good to know that all of you were patient enough to follow me through it all. I hope this article was helpful to you on your way to get everything started.
In the next article of the series, we'll dive even more deeper into the world of MDI Forms, adding a ToolStrip. As a sugar in the bottom, we'll also take a look of how easy the COM usage has become in the new language syntax.


 General
  News
News  Suggestion
  Question
  Bug
Bug  Answer
  Joke
Joke  Praise
  Rant
Rant  Admin
Admin 


