Introduction
In this tutorial, I would like to demonstrate a method I found useful when developing an application such as a graphics app.
It was known that the application would have so many controls for the user to interact with in order to get the desired result on the subject they are making.
These controls could, for example, be spinners that make colors change, edit boxes that change text strings, buttons that process something and so on.
Why?
Sometimes it is best to put the controls that can be grouped together into one single place so the user could have them nearby when needed.
For a very simple example, I would like to talk about Text. So many times, we need to change the string, the color and the back color of the text displayed on the view. This is also the subject demonstrated in the accompanied demo project.
How?
Start step: Creating the controls using the Create(...) or CreateEx(...) functions.
Creating the controls at runtime is the easiest and most fun filled part of the development with MFC. The most usual function that we use in order to create any of the Windows controls at runtime is the Create(...) function, unless we want to have some more extended styles, then we could use the CreateEx(...) function.
These functions take different parameters depending on the control in question and what style to use and if that control is going to appear on the screen or not.
For example, the following two code fragments would create an Edit Box control with the styles we set using the parameters passed to each function at runtime. Please note that the created edit control will not appear on the screen because we are not using the WS_VISIBLE style bit. We are doing this deliberately to be able to demonstrate the Show and Hide features of this article. :-)
Example 1. The Create(...) Function
If the m_wndEditBox is an object of the CEdit class, this will create an edit box with flat and single black line border effect like this:
m_wndEditBox.Create(ES_AUTOHSCROLL |
ES_MULTILINE |
ES_LEFT |
ES_NOHIDESEL |
WS_CHILD |
WS_HSCROLL |
WS_VSCROLL,
WS_BORDER |
edtRect,
this,
ID_EDIT);
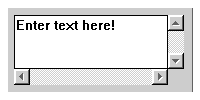
Screen shot of the same Edit Box created without a 3D look, a Flat look.
Example 2. The CreateEx(...) Function
While this one is used with CreateEx(...) that makes a 3D border effect around the control:
m_edtEdit.CreateEx(WS_EX_CLIENTEDGE,
_T("EDIT"),
NULL,
ES_AUTOHSCROLL |
ES_MULTILINE |
ES_LEFT |
ES_NOHIDESEL |
WS_CHILD |
WS_HSCROLL |
WS_VSCROLL,
edtRect,
this,
ID_EDIT);
Neat effect, isn't it?

Screen shot of the above Edit Box created with a 3D look.
The two functions are prototyped as follows:
BOOL Create(DWORD dwStyle, const RECT &rect, CWnd *pParentWnd, UINT nID);

BOOL CreateEx(DWORD dwExStyle, LPCTSTR lpszClassName,
    LPCTSTR lpszWindowName, DWORD dwStyle,
    const RECT &rect, CWnd *pParentWnd, UINT nID, LPVOID lpParam = NULL);
Next step: Sizing and Positioning the controls.
If the rcClickMe is an object of a CRect class and m_btnClickMe is an object of a CButton class, then by using the SetRect(...), we can set both the position and the size of any control in question as shown under, with code and the screen shot:
CRect rcClickMe;
SetRect(&rcClickMe, 50,290,220,310);
m_btnClickMe.Create("Click Me!",
WS_CHILD |
BS_PUSHBUTTON,
rcClickMe,
this,
ID_CLICKME);
Screen shot of the above button with caption "Click Me!", showing its size and position.
Notice how the demo app looks when expanded, all the controls are visible with SW_SHOW macro.
Screen shot of the demo app when collapsed.
Notice how all the controls are hidden with not using the WS_VISIBLE when we first created, and then later on by using the SW_HIDE macro to hide them.
Final step: Showing and Hiding the created and positioned controls using the function ShowWindow(...) and UpdateWindow(...).
Important Note: We must NOT have WS_VISIBLE included in the control's style when it is first created!
m_edtEdit.ShowWindow(SW_SHOW);
UpdateWindow();
m_edtEdit.ShowWindow(SW_HIDE);
UpdateWindow();
About the Demo App:
Functions and what they do:
OnPushButtonClicked () - This function is the president and responsible for expanding and then showing the controls or collapsing and hiding them in the so called RollOut Window.
ShowChildren(BOOL bShow) - This one is the actual border line police and responsible for physically showing and hiding the children of the RollOut Window. It accepts a boolean value to determine whether to Show or Hide the children by the user.
OnCreate (LPCREATESTRUCT lpcs)- This is the WM_CREATE handler that comes with MFC already. This is where we must create the desired controls.
Features:
- You can click the Expander/Collapser button to toggle the children and the window size and visibility.
- You can change the text inside the Edit box to see the text inside the Static change.
- You can click the Click Me! button to see the effect. Watch the edit box and the static texts changed.
- Click on any of the Radio buttons to see the static text color change.
- Click on the Check box to toggle the static back color to yellow or grey.
That's all friends. Have a nice time and keep learning what ever you can learn! :-)
Questions, comments and suggestions are all most welcome. Post here or my email as you wish.


 General
  News
News  Suggestion
  Question
  Bug
Bug  Answer
  Joke
Joke  Praise
  Rant
Rant  Admin
Admin 


