Introduction
It seems common sense that when building a Numeric Edit (Text) Box, one should validate each character by the time it is typed and reject whatever is not a digit. Well, maybe accept a minus for the first char. Maybe just one dot as the decimal point? What about commas as separators for thousands?
In this article, I'm going to present another approach: just let the monkey type whatever and do the validation in the end. This way, not only the control would accept decimals, thousands separators, or scientific exponent notation, but will also allow and validate pasted values in the box. In the end, I'll show you an interesting and unexpected way to extend the usage of this control. And I hope you will get enough knowledge to solve the proposed exercises by yourself.
Create the project
First, create a blank solution. Give it a name like NumBox. Add a new project for hosting and testing the new control. Select the template Windows Application and give it a name like TestNumBox. Rename the form from Form1 to - let's say - MainForm. To do that, change the name of the project item in Solution Explorer, then enter the code, and change everywhere Form1 to MainForm. (There were just three places to change.)
Now, add the project to represent our new control. Select the template Windows Control Library and give it the name NumEditBox.
This project will be special - we want to reuse it in various other projects. This is why we should pay attention to place it in a suitable namespace. Right-click on the project node NumEditBox in Solution Explorer, and then from the pop up menu, select Properties.
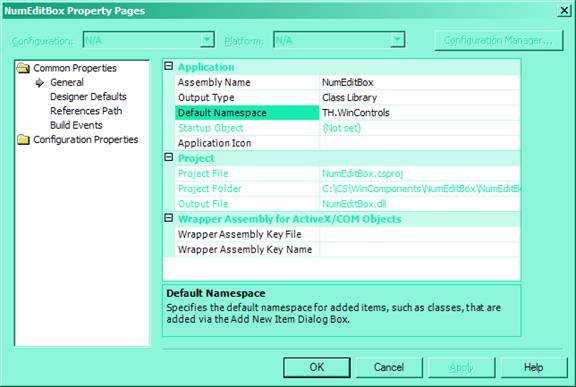
Change the 'Default Namespace' to - let's say - TH.WinControls (where TH are my initials, but could be as well yours, or your company name.) As the hint in the bottom of the form tells, this won't help here; is just for classes/items that will add in the future, but it looks unlikely at this moment that there will be other classes; anyway...
To make sure that we work in this namespace, copy it, then click the NumEditBox.cs node in Solution Explorer, press [F7] to go to code, and paste it over the namespace name - whatever was there. Also being there, remember to change the inheriting control System.Windows.Forms.UserControl to just TextBox; the using System.Windows.Forms; directive is already there, so we can ignore the whole prefix.
Quite annoying that, when coming back to the NumEditBox.cs item from Solution Explorer, Visual Studio presents us an useless designer page. Fortunately, we can correct this behavior by adding the attribute [DesignerCategory ("Code")] in front of the class declaration.
At this moment, the file should start like that:
using System.ComponentModel;
using System.Windows.Forms;
namespace TH.WinControls
{
[DesignerCategory ("Code")]
public class NumEditBox : TextBox
{
Let aside the comments for now: let's see what we can do from this control, and we'll describe it in the end.
Put it on the Toolbox
Before adding features, let's put it on the toolbox and on the main form of the test program. However, before doing that, let's prepare a bitmap to represent the new control on the toolbox. Add a new item to the project that will be a bitmap. Name this bitmap with the same name as the control - NumEditBox.bmp.

It does not mater much if you've selected from Local Project Items or Resources, but the next step is essential to save you hours of frustrations and unsuccessful trial and error, until you will decide to delete this file and start again.
So, as soon as you press the Open button, a new tab is created and you are invited to edit the bitmap. However, before doing any change to the content or size of this blank bitmap, go back (double-click any other item in the project) and click again the NumEditBox.bmp item. Look in the 'Properties' box:
Change the Build Action from Content to Embedded Resource. Now, you may go and edit the content of the bitmap! Click in the edit area. Look at the 'Properties' box:
Select 16 Color palette, then set 16 for the Height and Width. Now, fill the bitmap with a neutral color which will substitute with the background of the toolbox. Note that you should use nowhere this color in the bitmap; also the lower-left corner of the bitmap should have this color for the substitution to work.
Now, draw a nice picture, something like: .
To put the new control on the toolbox, go in the designer of MainForm, open My User Controls in Toolbox, and right-click. From the popup menu, choose Add/Remove Items. In the Customize Toolbox dialog, on the .NET Framework Components, press the Browse button, navigate to the ...Bin/Debug folder, and [Open] the NumEditBox.dll file. Click [OK] and the new control with its small bitmap should make its appearance in Toolbox.
Should you change the appearance of the bitmap, you have to delete and add again the control in Toolbox; but only then!
Experiment a while
Put some NumEditBoxes on MainForm; two will suffice! Add also a button. Nothing will happen running the program now, but we may go in the Events section of the Properties of the numEditBox1 and figure out which would be the best event to use when validating the text of the control. It turns out there is a Validating event - how convenient!
Double-click the edit zone of the Validating event and create a handler for this event in the code of MainForm. Note, this is not part of the control yet, but it lets us experiment with this event. For example, to find out when it fires, we may enter the code:
private void numEditBox1_Validating(object sender,
         System.ComponentModel.CancelEventArgs e) {
    MessageBox.Show("Validating");
}
This way, we find out that it fires when exiting numEditBox1 (going to numEditBox2 - but not other way, since we did not add this handler on both controls) and when the focus were in this control and we press either the button or the [x] button of the window. However, it does not fire when going to another application, but it still fires if we try to return directly in the other box. All this is good; we can proceed to do some real validation now.
We can access the text of the box like:
private void numEditBox1_Validating(object sender,
         System.ComponentModel.CancelEventArgs e) {
    string s = numEditBox1.Text;
But better, to make it more general - for example, to be able to copy it or just to use it on the other box, do:
private void numEditBox1_Validating(object sender,
         System.ComponentModel.CancelEventArgs e) {
    string s = ((NumEditBox)sender).Text;
To be able to do that, don't forget to add the line:
using TH.WinControls;
Else the compiler would not know who NumEditBox was. (Alternatively, you can prefix NumEditBox with its namespace.)
Now consider the code:
private void numEditBox1_Validating(object sender,
System.ComponentModel.CancelEventArgs e) {
string s = ((NumEditBox)sender).Text;
int l = s.Length;
while (s.Length>0) {
try {
int v = int.Parse(s,
System.Globalization.NumberStyles.Number |
System.Globalization.NumberStyles.AllowExponent);
break;
} catch {
s = s.Substring(0,s.Length-1);
}
if (s.Length!=l) {
((NumEditBox)sender).SelectionStart=s.Length;
((NumEditBox)sender).SelectionLength=l-s.Length;
e.Cancel=true;
}
}
}
We try to parse the input value reducing char by char from the end of the string s until we don't get an exception or the string s nullifies. Once this is done, we compare the original length l with the remaining length of s. If it does not match, we highlight the part of the original text which creates troubles to the parser and cancel the tentative of leaving the control.
You may find the commented line useful when experimenting.
What you may find with this experiment:
- One could paste a string in the box, and the validation still works.
- Grace to the
System.Globalization.NumberStyles.Number style attribute one may enter integer numbers with thousands separator (though it does not matter where they are placed - and this is good, because the parser won't force you to rearrange these commas when deleting the last digits from a number).
- Grace to the
System.Globalization.NumberStyles.AllowExponent attribute, one can even enter values like 1000E-03 (which is 1 - integer) but not 1000E-04 (which is 0.1 - not an integer.) In the last case, the digit 4 returns highlighted: then you may simply overtype 3, 2 or 1 to correct the error.
Add some properties
Before integrating this code in the control, let's consider some new properties.
Firstly, we may want to validate integers or floats by choice. For that, we need an enum type to indicate what we want. Add this code in the end of the NumEditBox.cs file:
}
public enum ValidateType {
Integer,
Float
}
}
Now, use this type to define what to validate:
private ValidateType _ToValidate;
[Category("Appearance"),
DefaultValue(ValidateType.Integer)]
public ValidateType ToValidate {
  get { return _ToValidate; }
  set { _ToValidate = value; }
}
The new ToValidate property will come in the Properties window in the Appearance category in the same way as Text. And, as Text is there, it's time to add a new property representing the numeric value of the text of the box:
private float _Value;
[Category("Appearance"),
DefaultValue(0) ,
Description("Convert it to integer when necesary.")]
public float Value {
  get { return _Value; }
  set {
    _Value = value;
    if (ToValidate==ValidateType.Integer)
      Text = System.Convert.ToInt32(_Value).ToString();
    else
      Text = _Value.ToString();
  }
}
Note here that whatever is the value of the ToValidate property, the Value is always a float since the float can also hold an integer but not the other way. The user of the package will have to remember to convert this to integer when necessary. In the same time, we try the idea of changing the Text property when setting the Value.
Not a very good idea!
With these new properties, we can modify the test handler like this:
((NumEditBox)sender).Value =
  (((NumEditBox)sender).ToValidate==ValidateType.Integer) ?
  int.Parse(s, System.Globalization.NumberStyles.Number |
               System.Globalization.NumberStyles.AllowExponent) :
  float.Parse(s, System.Globalization.NumberStyles.Number |
                 System.Globalization.NumberStyles.AllowExponent);
  break;
Change the ToValidate property of the numEditBox1 to float and play a bit with it. What we learn is that the value 1000e-04 validates, but the text in the box becomes 0.1, which is not very nice if we wanted to reedit the original string. Also, instead of having the error highlighted, the text 123a456 autocorrects to 123, and does not allow erasing only the desired character (a). We have to accept that changing the Text property when setting the Value was not a good idea. So, correct it back to:
public float Value {
  get { return _Value; }
  set { _Value = value; }
}
Integrate
We have a pretty good idea now about how the validate should work. It is time for moving our code inside the control - for integrating.
To begin with, let's have a gimp to the Windows Form Designer generated code region of MainForm.cs, click on the small [+] icon near the caption of this region, and find the related code:
this.numEditBox1.Validating += new
    System.ComponentModel.CancelEventHandler(this.numEditBox1_Validating);
Move this code in the constructor of the NumEditBox. Additionally, make this constructor to execute the inherited constructor from the base control. Then get rid of the controls variable and the InitializeComponent and override Dispose methods. All these were defined in the base TextBox control - we don't need to mess with again. Move also the numEditBox1_Validating method and modify accordingly:
using System.Globalization;
public NumEditBox():base() {
base.Validating += new
System.ComponentModel.CancelEventHandler(this.numValidating);
}
#region events
private void numValidating(object sender,
System.ComponentModel.CancelEventArgs e) {
string s = Text;
int l = s.Length;
NumberStyles NumStyles = NumberStyles.Number | NumberStyles.AllowExponent;
while (s.Length>0) {
try {
_Value = (ToValidate==ValidateType.Integer) ?
int.Parse(s, NumStyles) : float.Parse(s, NumStyles);
break;
} catch {
s = s.Substring(0,s.Length-1);
}
if (s.Length!=l) {
SelectionStart=s.Length;
SelectionLength=l-s.Length;
e.Cancel=true;
}
}
}
#endregion
Disable the corresponding code from MainForm and run the project. What you should notice is that now we have numeric validation on both numEditBox controls!
Note that in order to reduce both the code and the number of or operations, I have defined the NumStyles outside the while loop. We may consider now defining a property for the control which will allow changing the behavior of the validation from outside:
private NumberStyles _NumStyles= NumberStyles.Number |
                           NumberStyles.AllowExponent;
[Category("Appearance"),
DefaultValue(NumberStyles.Number | NumberStyles.AllowExponent),
Description("Customize the validation number style.")]
public NumberStyles NumStyles {
  get { return _NumStyles; }
  set { _NumStyles = value; }
}
New Validating Event
The only problem left is that our Validating event slot is consumed internally. OK: it is a delegate type, this is why it is added with the += operator. This means that we can add another handler outside in MainForm. For example, consider that we want to pre-fill the box with an invitation phrase as "Enter Int" and allow the focus to leave the box when this text was not altered. Just add in MainForm, the handler:
private void numEditBox2_Validating(object sender,
               System.ComponentModel.CancelEventArgs e) {
  e.Cancel = ((NumEditBox)sender).Text!="Enter Int";
}
(Not) surprisingly it works very well: try to exit the box - it works; add or delete some chars from this phrase - you may not exit the box anymore and the entire text gets highlighted; delete it and enter a valid number - you may exit the box - it validates internally!
However - consider a more sophisticated task. For example, if the user has typed "Pi" or "e" or "C" (golden section), we want Text to stay that way, but Value to reflect the corresponding float number. If any other text was entered, the internal validation continues and validates the string as before.
private void numEditBox2_Validating(object sender,
        System.ComponentModel.CancelEventArgs e) {
    if (((NumEditBox)sender).Text=="Pi") {
      ((NumEditBox)sender).Value = (float)System.Math.PI; return;
    }
    if (((NumEditBox)sender).Text=="e" ) {
      ((NumEditBox)sender).Value = (float)System.Math.E ; return;
    }
    if (((NumEditBox)sender).Text=="C" ) {
      ((NumEditBox)sender).Value = (float)((1.0+System.Math.Sqrt(5.0))/2.0);
      return;
    }
    e.Cancel = ((NumEditBox)sender).Text!="Enter Int";
}
To make it work, we have to reintroduce the Validating event and to add the following piece of code in the definition of NumEditBox control:
#region events
public new event CancelEventHandler Validating;
private void numValidating(object sender,
System.ComponentModel.CancelEventArgs e) {
if (Validating!=null) {
Validating(sender,e);
if (!e.Cancel) return;
e.Cancel=false;
}
string s = Text;
The Validating event was not marked as virtual in the base class so we cannot override it, but we always can reintroduce it as a new event using the new qualifier.
If the internal handler senses some code on the new added event, this code is executed. Then, if the external validation was successful in this code, the internal validation stops (returns); else the e.Cancel flag resets and the internal validation continues like before.
Conclusion
We have developed from scratch a new control. I have done this as I was writing the article, without knowing in the beginning all details of the implementation, and if I was able to, you can too!
This NumEditBox is more powerful than other implementations that test the key input stroke by stroke. It allows not only pasting a full value, but also blind typing and correcting in the end. The control may accept integer or float values by choice and can recognize various formats. The original event was not consumed internally; it can be still used 'outside the box' to extend the functionality in various ways. (This bolded text may become now the summary of the control in the source code.)
Extend the exercise
Validating constants could also be embedded in the control. Inherit from a combo box and add a collection property to store key-value items for constants to validate.
Since the validation was done after typing the full value, this technique is suitable for building a similar WebControl. While not the best choice, it becomes however acceptable to use a post-back event for validating with code-behind run on the server. The author leaves the task of building such a web control to you.
Horia Tudosie is Master of Sciences from the Polytechnic University of Bucharest - Computer Sciences.
Horia came in Canada in 1994 and have work in US 4 years since 2003.
He was working with various peculiar languages as Delphi and Forth, but mainly with C++, C#, WPF, and JavaScript. He mainly develops applications and Extensions for GIS.


 General
  News
News  Suggestion
  Question
  Bug
Bug  Answer
  Joke
Joke  Praise
  Rant
Rant  Admin
Admin 


