Introduction
Recently, while writing an e-commerce web application, I needed to transform the product’s images in some “professional” way, so I decided to add to each product image a well known glass effect table. Since I’m broke, I can’t afford having an artist to modify each image, so I decided to write some simple algorithm to do it automatically using GDI+.
This article is more like a code snippet, for you who want do the same in your applications or websites. It’s simple, yet useful!
Using the code
To transform the image, simply use the static method of the helper, like this:
Image newImage = ImageEffectsHelper.DrawReflection(pOriginal.Image, Color.White, 90);
The parameters of this method are quite self-explanatory, but still, here they are:
Image – It’s the original image you want to make the reflection of.BackgroundColor – The background color of the image, used to paint the reflection by using a gradient brush.Reflectivity – From 0 to 255, it’s the reflectivity of the image (gradient brush alpha).
Example
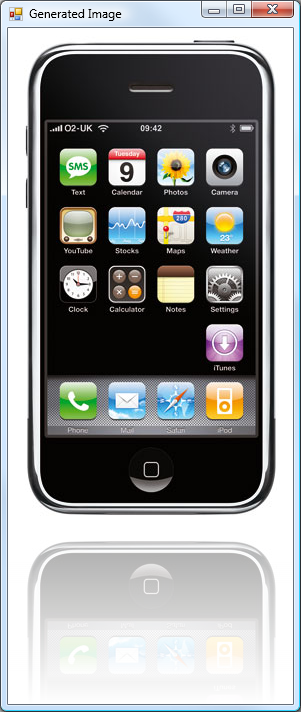
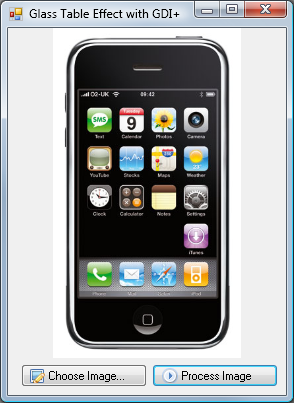
I prepared a small example project, containing two Windows forms, so you will be able to select the image you want to process and preview the processed image.
Algorithm
Now, the algorithm itself; it calculates the height of the new image based on the desired Reflectivity. After that, it creates a new graphics buffer, draws the original image on it, and on a second graphics buffer, it draws the reflected image, then flips it. At the end, it simply merges both the images and uses a gradient brush (with the given alpha and BackgroundColor) on it. Here’s the code:
public static Image DrawReflection(Image _Image, Color _BackgroundColor, int _Reflectivity)
{
int height = (int)(_Image.Height + (_Image.Height * ((float)_Reflectivity / 255)));
Bitmap newImage = new Bitmap(_Image.Width, height, PixelFormat.Format24bppRgb);
newImage.SetResolution(_Image.HorizontalResolution, _Image.VerticalResolution);
using (Graphics graphics = Graphics.FromImage(newImage))
{
graphics.Clear(_BackgroundColor);
graphics.DrawImage(_Image, new Point(0, 0));
graphics.InterpolationMode = InterpolationMode.HighQualityBicubic;
Rectangle destinationRectangle = new Rectangle(0, _Image.Size.Height,
_Image.Size.Width, _Image.Size.Height);
int reflectionHeight = (_Image.Height * _Reflectivity) / 255;
Image reflectedImage = new Bitmap(_Image.Width, reflectionHeight);
using (Graphics gReflection = Graphics.FromImage(reflectedImage))
{
gReflection.DrawImage(_Image,
new Rectangle(0, 0, reflectedImage.Width, reflectedImage.Height),
0, _Image.Height - reflectedImage.Height, reflectedImage.Width,
reflectedImage.Height, GraphicsUnit.Pixel);
}
reflectedImage.RotateFlip(RotateFlipType.RotateNoneFlipY);
Rectangle imageRectangle =
new Rectangle(destinationRectangle.X, destinationRectangle.Y,
destinationRectangle.Width,
(destinationRectangle.Height * _Reflectivity) / 255);
graphics.DrawImage(reflectedImage, imageRectangle);
LinearGradientBrush brush = new LinearGradientBrush(imageRectangle,
Color.FromArgb(255 - _Reflectivity, _BackgroundColor),
_BackgroundColor, 90, false);
graphics.FillRectangle(brush, imageRectangle);
}
return newImage;
}
Points of interest
The algorithm presented in this article is quite simple. If you're searching for something more advanced (yet less automatic), try this one:
History
- 28/02/08 – Initial release.

