Introduction
This article describes how to create a self-contained Windows Installer file (using Visual Studio .NET) which installs a Pocket PC / Windows Mobile application. It details how to make CE App Manager install the correct CAB file, and how to make this all automatic from one MSI (installation) file.
I'm assuming the app is a .NET app; the auxiliary components created are .NET components.
While attempting this for the first time, I found there were plenty of articles and info on how to do the specifics - like what every single CabWizard option is - but not much information on how to tie it all together. There is an article on the MSDN entitled Developing and Deploying Pocket PC Setup Applications which gives a complete walkthrough from start to finish, but it misses out a few specific points which had me scratching my head for hours. I've written this guide almost as a companion to the above article in the hope that other people might not get so stuck.
Overview
Pocket PC applications are installed on to devices using CAB files. To do this, you can either copy the CAB file directly to the device and then run it, or you can use CE App Manager (CeAppMgr.exe) on the PC to install the CAB file.
However, because many users will not know how to do this, and because a different CAB is needed for each different processor type, this method is fiddly at best.
The goal is to have a normal setup style program which runs, copies correct files to correct places, contacts CE App Manager and gets it to install the correct CAB file on the device, and ideally is all contained in one single installation file which can be built from within VS.NET automatically.
Road Map
Assuming you have a VS.NET solution with your PPC/WM project in it, the process to create your MSI file goes like this:
- Step 1: Copy the BuildCab.bat and INF file created by VS.NET to a new directory so we can edit without our changes being overwritten.
- Step 2: Add a Custom Installer project to your solution - this project will build a DLL assembly that will contain hooks into some Windows Installer events so that we can perform actions after the installation has finished.
- Step 3: Add a Setup Project to your solution - this is a Windows Installer project which takes the output from your PPC app, references the Custom Installer DLL and installs the app.
- Step 4: Create a MyProject.ini file which is used by CE App Manager (CeAppMgr.exe) to install your application. This is added to the application's project and is referenced from the setup/installer project within your solution.
- Step 5: Making it nice.
Preparation
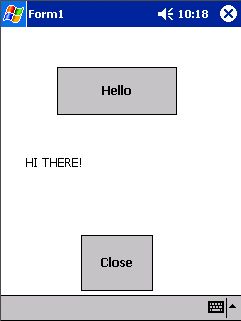
To demo the procedure, I've got a simple Smart Device solution in VS.NET with a very simple app in it, pictured below, which displays two buttons and prints "HI" when you click on one, and exits on the other.
Step 1 - Copying the BuildCab.bat and Corresponding INF File
On the Build menu within Visual Studio .NET, there is an option "Build Cab File". Run this, and VS.NET will produce the CAB files, a corresponding INF file to tell CE App Manager all about the CABs, and a batch file (BuildCab.bat) to rebuild the above.
We need to edit these files, but we need them somewhere where VS.NET won't overwrite them every time we rebuild, so the first step is to create a directory under the app's project tree where we can store our copies. So in my example, I've got a MyProject directory which contains directories such as bin, cab, obj, etc. Create a directory in there called BuildCabs (it doesn't matter what it's called really), and copy the BuildCab.bat file, and the INF file into it. (The INF file will be called ProjectName_PPC.inf, so in the example it's MyProject_PPC.inf).
Now open the INF file. There are lots of options you can add here, and there are detailed "How To"s on all the syntax, different options and everything - check them for advanced options. All we really need to change is the Provider string, replacing it with the company name, and the AppName replacing it with the name of the application. You can change the InstallDir too if required, but leave the %CE1%\ in there so that CE App Manager can install it to the Storage Card if the user chooses.
So the top few lines of the MyProject_PPC.inf file (now copied and saved in our BuildCabs directory) looks like this (note that all the other stuff is still there, these are just the modified lines):
[Version]
Signature="$Windows NT$"
Provider="Lionkey"
CESignature="$Windows CE$"

[CEStrings]
AppName="My Test Project"
InstallDir=%CE1%\%AppName%
..
..
..
Now open our BuildCab.bat file. All this does is run CabWiz on the appropriate INF file, so all that needs changing is the first argument to point to our modified INF file stored in the BuildCabs directory. We will then run our BuildCab.bat file "manually" (that is, automatically, but not automagically by VS.NET) from an altered Pre-Build event, because obviously VS.NET won't know anything about running our copy automatically. That's done in the next section.
Step 2 - Creating a Custom Installer
The next stage is to add a custom installer project to the solution. The easiest way to do this is to add a new blank project to your solution. Call it CustomInstaller.
First, right click and choose Properties, and set the OutputType to Class Library.
Now, right click on the empty project in your solution and choose "Add New Item...". Choose an item of type Installer Class, call it CustomerInstaller.cs and click OK. (I'm assuming you're using C# as your language). Now, add some references to this new project, you need to add System.Data, System.Windows.Forms and System.XML.
Also, add the following <codem lang="cs">using</code /> statements at the top of CustomInstaller.cs file:</p>
<pre lang="cs">using System.IO;
using System.Diagnostics;
using Microsoft.Win32;
using System.Reflection;
using System.Windows.Forms;</pre>
<p>Your Solution Explorer view will look something like this:</p>
<p><img height="280" src="/KB/install/PackagingAndDeployingPPC/packaging_solExplorer_01.jpg" width="244" border="1" /></p>
<p>Next, you need to add methods to the <code>CustomInstaller class which is to run on the AfterInstall and AfterUninstall events of the Installer class. To do this, enter the constructor CustomInstaller(), and enter:
this.AfterInstall += new InstallEventHandler(Installer_AfterInstall);

this.AfterUninstall += new InstallEventHandler(Installer_AfterUninstall);
Don't copy and paste though! Because, as you type this in, when you get to the "=", VS.NET will prompt you with the name of the suggested event handler and will have "TAB to insert", which inserts everything after the "=". It will then say "TAB to generate handler in class".
Doing this, you'll then have stubs for the handlers. You now need to add the code for RunAppManager found in the article Developing and Deploying Pocket PC Setup Applications - I don't want to reproduce it without permission, so I won't include it. Basically, just get the code from the article and paste it into the class.
Next, add the following code to the CustomInstaller_AfterInstall:
string arg = Path.Combine(
            Path.GetDirectoryName(Assembly.GetExecutingAssembly().Location),
            "MyProject.ini");

RunAppManager(arg);
and the following code to the CustomInstaller_AfterUninstall:
RunAppManager(null);
The MyProject.ini file is the file created in Step 4. This INI file is where we tell CeAppMgr.exe about our app. Note that in the original article, this is called setup.ini. I found it useful however, to call it something that describes the project it's installing. It makes it easier because the Windows Installer project will create a setup.ini of its own, and it's easy to get them mixed up.
The one final thing to do in this stage is to setup a Pre-Build Event. We need to rebuild the CAB files when we rebuild the solution, but we don't want VS.NET to do it because we want to use the INF file that we've modified - hence the moved BuildCab.bat file. So, a convenient place to put it is here as a Pre-Build event. Right click on the CustomInstaller project again, click Properties, select Build Events and then enter the path to the BuildCab.bat in the Pre-Build Event Command Line. The easiest thing is to make this relative. This is shown below:

Step 3 - Adding the Setup Project to the Solution
Next, right click on the solution in Solution Explorer and choose Add -> New Project. Call it ProjectNameInstaller - so in the example, I've called it MyProjectInstaller.
First, add the CAB files to the Installer project. This is done by right clicking on the projects name, then Add >> File.... Navigate to where the CAB files are located, which will be something like MyProject/cab/Release. Add all of the CAB files listed there.
So far, what would happen if you ran the installer would be that the CAB files would be copied to the user's PC and put in \Program Files\Application Folder (Application Folder being MyProject, in my example). But that's all.
Next, we add references to the Custom Actions we want to happen - these are handled by our CustomInstaller class. So the first job is to add the CustomInstaller.dll file created by our CustomInstaller project (its main output) to the installer project.
Right click on the Windows Installer project, select Add >> File... and then navigate to the CustomInstaller.dll file which will be in the output directory of your CustomInstaller project. Note, of course, that you will have to have built the CustomInstaller project at least once for the DLL to exist at this point.
Now, to setup the installer to use the Custom Actions contained in our DLL, right click on the installer projects' name. Click View >> Custom Actions. You'll see a screen in the main panel listing custom actions such as Install, Commit, etc.
Right click on Install and choose "Add Custom Action". Pick "Application Folder" - this is the destination folder on the users machine where all files and stuff we add to the installer are copied to - and choose "CustomInstaller.dll".
You should now see something similar to:
The only required step left now is to create the MyProject.ini file and add it to the installer project. And that's step four!
Step 4 - Create the INI file for CeAppMgr.exe
To get CE App Manager to install applications, you have to specify an INI file when you run it. Although the original article references a setup.ini file, which is a nice standard name, I've found it less confusing to use a specific project name because the Windows Installer project itself likes to create its own setup.ini file, and it is easy to get mixed up and have Windows Installer setup files going into your app, etc.
Note: I've found that CE App Manager is quite picky about these files, an extra space or blank line in the wrong place and it will tell you you've got an invalid INI file. If it is, doubt check the MSDN for the specs.
So now, right click on the main project's name, click Add >> New Item... and then choose Text File in the type. Call it ProjectName.ini or similar, I've called it MyProject.ini. Note, this INI file doesn't have to be included in the VS.NET project. Doing so however, means it's there for easy access so editing it easily. Enter the following in the new file:
[CEAppManager]
Version = 1.0
Component = MyProject

[MyProject]
Description  = A Test Project.
CabFiles = MyProject_PPC.ARM.CAB,MyProject_PPC.ARMV4.CAB,
MyProject_PPC.MIPS.CAB,MyProject_PPC.SH3.CAB,
   MyProject_PPC.WCE420X86.CAB,MyProject_PPC.X86.CAB
Obviously, adjusting the details for your project. Save this file.
Note 1: There can be NO NEW LINES between the [MyProject] section definition and the Description = key line. Any new lines and CE App Manager will report your INI file as being invalid. It's easy to miss this because there are lots of comments in many of the examples, which give the impression that new lines can be all over the place or just used to make these files easier to read, but if there are new lines between section definitions and keys, the file will be invalid.
NOTE 2: There must be NO SPACES between each of the CAB files listed. Any spaces will be considered part of the filename and thus the CAB file will be invalid.
NOTE 3: You can test this file by running CeAppMgr.exe (usually in c:\program files\microsoft activesync\) with this file as the first parameter - Note however, that if, when run like this, CeAppMgr.exe can't find the CAB files (because they are specified without full paths), that the INI file will be reported as invalid - even if it's not. So if you test your file like this, make sure you run CeAppMgr.exe from the directory where the CAB files are located.
NOTE 4: Some examples show these CeAppMgr.exe INI files as having comments starting with the ; character, trailing lines of the actual INI file (i.e. not just on blank lines of their own). I've found that doing this will cause CeAppMgr.exe to report an invalid INI file. I don't know what the designed functionality is, or whether it is a bug, but a couple of the INI files listed in examples just won't work. (At least with my version of CeAppMgr.exe !!)
NOTE 5: I've found that for some reason, if the X86 CAB file is put at the start of the CAB file list, as in most examples, it can cause problems installing the app on some devices. What happens is that you get a message on the device saying "<Application Name> failed to install. Please run setup again.". I don't know why this is, but I've got better results by putting it at the end of the list.
Next, add this file to the Installer project, choosing to locate the file in the Application Folder. (This is where everything we use goes). This means, during installation on the user's machine, it will get copied to that folder on the user's machine, thus making it available for CeAppMgr.exe to use.
Now you're all done. You should be able to build the whole solution. You'll be left with an MSI file in the InstallerProject\Release directory. You'll also have setup.ini and setup.exe files, but you can just distribute the MSI file on its own.
Step 5 - Making It Nice
Following the procedure above should produce a working MSI file. There are a couple of things you can do to make it a little more friendly. This is basic stuff and is covered in all the help files.
If you click on the installer project so it's the active object, you can use the Properties tool window to set various options such as Author, Manafacturer, SupportURL, Title etc. These are the things that are used through out the Windows Installer project, and are visible when you right click on the MSI file in Windows Explorer and view the MSI's properties.
You can also use the very first entry in this Property Page AddRemoveProgramsIcon, it's easy to miss because the "Icon" part of the name is usually hidden as it's so long - but this is how you can create a custom icon which will be displayed in the "Add / Remove Programs" list in Control Panel.
Also, if you right click on the installer project, choose View >> User Interface, and then you choose one of the UI elements, such as "Welcome" or "Installation Folder", these items have a BannerBitmap property settable from their property page.
You can use this image to alter the header/banner image of the installation window. The image must be 500x70 pixels in size. Also, you can only rely on the last 80 pixels width of the image as being text free (so from 420-500) if you need to put a logo in there.
Wrapping Up
Hopefully, the above fills in some holes left in the procedure by various other info sources. I know a few of these annoyances - especially the CeAppMgr.exe INI file configuration - had me confused for quite a while.
If there are any errors in the article, or if you have any feedback at all, please feel free to email me at: si <at> kittle.co.uk


 General
  News
News  Suggestion
  Question
  Bug
Bug  Answer
  Joke
Joke  Praise
  Rant
Rant  Admin
Admin 


