Introduction
Hi all Win32 Coders, and happy new year to you all! This article is for those who did not find, any useful code examples and information regarding tree control (TreeView). This time I was wanted to add a simple tree control into my application, and whaa!! NO SOURCE CODE!!... <== ?? "hey, what do you mean by that?". Well, to rephrase: go to your all time fancy programming website like: Code Project, try to find a single article which explains how to add a simple tree control and its data... you guessed...there are none!! Ahh this really helps us, no? ...As you can see, this is what makes me so mad about programmers, they add only part of the code and the code itself mainly doesn't really fit to our suit because they didn't even bother of explaining the basics.. Well, here I am , will teach/show you how FINALLY we can do some real coding. I want to say a really huge thanx for Icezelion, his Win32ASM site is really cool, and helpful of course, his examples really showed me how to add tree control into Visual C++.
So let's start,
#include <commctrl.h>
Add it into your C/CPP file so we can use its functions/#defines. We add a TreeControl to our dialog (you can also create it via the CreateWindowEx API!). Once we named it, (IDC_TREE1). To start, we will add properties to our TreeControl which will define the way the tree is shown in visual terms.
Properties
   -- Resource --        -- CreateWindow/EX --
        |                          |
1. Has Buttons          - TVS_HASBUTTONS
; we can see the lines [-]/[+] of the tree.
2. Has Lines            - TVS_HASLINES
; we see the ---- of the tree.
3. Lines at Root        - TVS_LINESATROOT
; root can have lines attaching them.
4. Disable Drag&Drop    - TVS_DISABLEDRAGDROP
; no need drag & drop now [unless u need it]
5. Track Select - TVS_TRACKSELECT
; nice blue effect when mouse is over
6. Single Expand        - TVS_SINGLEEXPAND
; expand tree at one time
7. Full Row Select      - TVS_FULLROWSELECT
; select the whole row [text..etc]
8. Border               - WS_BORDER
; heh..border
9. Scroll
; scrollbars...
We now have our TreeControl placed in our dialog. Try to compile. All fine, trying to run the exe...whoopps!!! not loading?!?.. Well since I am using Win2000, it doesn't work, haven't checked it under Win98.. But anyway, it doesn't run because our control isn't initialized... lets initialize it:
case WM_INITDIALOG:
{
InitCommonControls();
.....
.....
}
to make sure of using this function (above) we need to add a lib file called:
comctl32.lib
we add this lib file in the project settings -> link tab -> object/library modules. Try to compile, and run... It should work now!!.. If not...hmm..then try to look at MSDN..!
-- Tree Pictures --
Ahh, this is a very neat and nice looking, look at the WorkSpace tab, it has a tree view with nice folders attached to it right? The picture has 2 states:
- closed folder
- opened folder
This is what we want when out tree is expanded/closed. a nice folder pic ;-) For this we use a bitmap with a drawing of the 2 states. At the source code you can have a look on how it looks like. For adding the pictures, we need to know how it will work. Basically it is very easy, we draw the states of the folder near each other, and this will be an array :-) neat eh? For converting the picture into an array to be used, we use 3 functions:
ImageList_Create();
ImageList_Add();
LoadBitmap();
Quick look at Win32.hlp/MSDN will give us all the necessary info we need to use.
Starting with the first function, we first need to know that it is returning a handle, the return value is of the type HIMAGELIST struct.
HIMAGELIST hImageList;
Now we can use our first function like this:
hImageList=ImageList_Create(16,16,ILC_COLOR16,2,10);
Ok, so we created an image list of 2 pics with size of 16x16 pixels and in a quality of 16 bit and returned the handle to the new image list!. Now we actually need to load the image [BMP] to the resource.
Loading BMP into resource:
- From the main menu bar -> Insert
- Choose Resource. (or just Ctrl+R)
- Select Bitmap and press Import
- Choose the BMP and click ok
- Rename it to your fit.
Wasn't a problem. Now we need to load it via code: for every bitmap (BMP) loading, we need a handle, a struct which can identify/recognize the bitmap's file header, for that we use the HBITMAP struct. And the loading is done like this:
HBITMAP hBitMap;
hBitMap=LoadBitmap(hInst,MAKEINTRESOURCE(IDB_TREE));
Note: the MAKEINTRESOURCE will make sure to convert the picture to resource type. Once loaded (check return value, if NULL, it has failed!) we now can add the picture to our image list using the last function:
ImageList_Add(hImageList,hBitMap,NULL);
We can safely delete the bitmap handle, since it is an object and it takes memory space:
DeleteObject(hBitMap);
And the last thing we have to do is to send it all to the tree control via the SendMessage() or the SendDlgItemMessage(). I usually use the second, but there is no difference at all except the first one is shorter :-)
SendDlgItemMessage(hWnd,IDC_TREE1,TVM_SETIMAGELIST,0,(LPARAM)hImageList);
All the theoretical info has been said, now its more code demonstrations with side remarks :)
--- The TV_INSERTSTRUCT Struct ---
This struct will help us insert parent/child items into the tree control. Treating tree controls is the same as list control, just with diff members. Let us make a new handler:
TV_INSERTSTRUCT tvinsert;
Now we need to initialize this struct:
HTREEITEM Parent;
HTREEITEM Before;
HTREEITEM Root;
tvinsert.hParent=NULL;
tvinsert.hInsertAfter=TVI_ROOT;
tvinsert.item.mask=TVIF_TEXT|TVIF_IMAGE|TVIF_SELECTEDIMAGE;
tvinsert.item.pszText="Parent";
tvinsert.item.iImage=0;
tvinsert.item.iSelectedImage=1;
Parent=(HTREEITEM)SendDlgItemMessage(hWnd,IDC_TREE1,
TVM_INSERTITEM,0,(LPARAM)&tvinsert);
Note the global vars, we declared 3 variables with the type of HTREEITEM. In order to use items, we must have the last/first inserted items, so those will be our root level handlers. Ok, the initialization part is really straight forward, but interesting parts are:
tvinsert.hParent=NULL;
Parent=(HTREEITEM)SendDlgItemMessage(hWnd,IDC_TREE1,
TVM_INSERTITEM,0,(LPARAM)&tvinsert);
In the last code, we sent the struct address to the tree control via the TVM_INSERTITEM message, to insert a new item to the tree control, and the Parent=(HTREEITEM), is the return type of the Parent handle. This means that now that we have the parent of the first root, we can make a child item! To add a child item, it is really the same idea but with few new code:
tvinsert.hParent=Parent;
tvinsert.hInsertAfter=TVI_LAST;
tvinsert.item.pszText="Child 1";
Parent=(HTREEITEM)SendDlgItemMessage(hWnd,IDC_TREE1,
TVM_INSERTITEM,0,(LPARAM)&tvinsert);
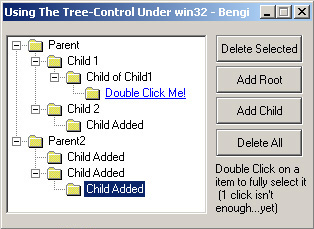
Now, since it is hierarchy, I have used 2 more HTREEITEM variables named: Root/Before. This will help us really good, because if we want to add a new child under the root, or under the last root level...etc, it really suits us ;-) (but not a must thing to do). Now all we need to do is to design a nice hierarchy (manually...so far), and since I did, I will show it for you guys:
case WM_INITDIALOG:
{
InitCommonControls();
hTree=GetDlgItem(hWnd,IDC_TREE1);
hImageList=ImageList_Create(16,16,ILC_COLOR16,2,10);
hBitMap=LoadBitmap(hInst,MAKEINTRESOURCE(IDB_TREE));
ImageList_Add(hImageList,hBitMap,NULL);
DeleteObject(hBitMap);
SendDlgItemMessage(hWnd,IDC_TREE1,
TVM_SETIMAGELIST,0,(LPARAM)hImageList);
tvinsert.hParent=NULL;
tvinsert.hInsertAfter=TVI_ROOT;
tvinsert.item.mask=TVIF_TEXT|TVIF_IMAGE|TVIF_SELECTEDIMAGE;
tvinsert.item.pszText="Parent";
tvinsert.item.iImage=0;
tvinsert.item.iSelectedImage=1;
Parent=(HTREEITEM)SendDlgItemMessage(hWnd,
Root=Parent;
Before=Parent;
tvinsert.hParent=Parent;
tvinsert.hInsertAfter=TVI_LAST;
tvinsert.item.pszText="Child 1";
Parent=(HTREEITEM)SendDlgItemMessage(hWnd,
IDC_TREE1,TVM_INSERTITEM,0,(LPARAM)&tvinsert);
tvinsert.hParent=Parent;
tvinsert.item.pszText="Child of Child1";
Parent=(HTREEITEM)SendDlgItemMessage(hWnd,
IDC_TREE1,TVM_INSERTITEM,0,(LPARAM)&tvinsert);
tvinsert.hParent=Parent;
tvinsert.hInsertAfter=TVI_LAST;
tvinsert.item.pszText="Double Click Me!";
tvinsert.item.mask=TVIF_TEXT;
SendDlgItemMessage(hWnd,IDC_TREE1,
TVM_INSERTITEM,0,(LPARAM)&tvinsert);
tvinsert.hParent=Before;
tvinsert.hInsertAfter=TVI_LAST;
tvinsert.item.pszText="Child 2";
Parent=(HTREEITEM)SendDlgItemMessage(hWnd,
IDC_TREE1,TVM_INSERTITEM,0,(LPARAM)&tvinsert);
tvinsert.hParent=NULL;
tvinsert.hInsertAfter=TVI_LAST;
tvinsert.item.pszText="Parent2";
Parent=(HTREEITEM)SendDlgItemMessage(hWnd,
IDC_TREE1,TVM_INSERTITEM,0,(LPARAM)&tvinsert);
}
break;
feww!! that was but :)). Well...since we pasted this one, we now will have more fun..
--- Clicking on items : Control messages ---
Same as the list view control (you can read my tutorial) the item messaging is the same!! It is done via the WM_NOTIFY message that Windows is sending when a control (depend which), is being notified. As usual, I will show the basic code form for the WM_NOTIFY:
case WM_NOTIFY:
{
switch(LOWORD(wParam))
{
case IDC_TREE1:
if(((LPNMHDR)lParam)->code == <NM_xxxxx>)
{
}
}
}
break;
This is the basic skeleton for using the WM_NOTIFY on controls that are using, this Windows message. Underneath we have the switch case , wParam holds our ID
case IDC_TREE1: - this ensures we are using the right control ID for our messages. The ((LPNMHDR)lParam)->code == NM_xxxxx is the type of event that has been processed while we have been doing something on the control.
Examples:
Double click on item, single click, left click and many more..
As you can see the NM_xxxxx stands for "Notification Message", there are quite a few that we can use:
...
...
NM_CLICK   ; user has clicked the left mouse button within the control
NM_DBLCLK  ; user has Double clicked the left mouse button within the control
NM_RCLICK  ; user has clicked the right mouse button within the control
NM_RDBLCLK ; user has Double clicked the left mouse button within the control
TVN_BEGINLABELEDIT ; also sent as notification
TVN_BEGINLABELEDIT ; "                 "
...
...
To click on an item we have few messages: using the TVM_GETNEXTITEM same as in list control. However in tree control the return value is NOT the index of the item :), but the HANDLE to the item! Example on getting the selected item:
Selected=(HTREEITEM)SendDlgItemMessage(hWnd,IDC_TREE1,
       TVM_GETNEXTITEM,TVGN_CARET,(LPARAM)Selected);
if(Selected==NULL)
{
   MessageBox(hWnd,"No Items in TreeView",
           "Error",MB_OK|MB_ICONINFORMATION);
   break;
}
Check the new message: TVGN_CARET, there is a description of each kind of this messages:
TVGN_CARET ; Retrieves the currently selected item.
TVGN_CHILD ; Retrieves the first child item
              of the item specified by the hitem parameter
TVGN_DROPHILITE ; Retrieves the item that
              is the target of a drag-and-drop operation.
TVGN_FIRSTVISIBLE ; Retrieves the first visible item.
TVGN_NEXT  ; Retrieves the next sibling item.
TVGN_NEXTVISIBLE ; Retrieves the next visible
              item that follows the specified item.
TVGN_PARENT  ; Retrieves the parent of the specified item.
TVGN_PREVIOUS  ; Retrieves the previous sibling item.
TVGN_PREVIOUSVISIBLE ; Retrieves the first visible
              item that precedes the specified item.
TVGN_ROOT  ; Retrieves the topmost or very first item
              of the tree-view control.
For more detailed information, read MSDN/win32.hlp. We need to use the TVGN_CARET as a selected item. Note: Selected is a HTREEITEM type, because we retrieve a handle, and not an index. The next thing to use is a new struct called TV_ITEM.
The TV_ITEM structure specifies or receives attributes of a tree-view item.
Yup, now that we have the handle of the item we have selected, we can fill this struct, with the item's info, and use it for our own purpose!
char Text[255]="";
memset(&tvi,0,sizeof(tvi));
...
...
...
TreeView_EnsureVisible(hWnd,Selected);
SendDlgItemMessage(hWnd,IDC_TREE1,
TVM_SELECTITEM,TVGN_CARET,(LPARAM)Selected);
flagSelected=true;
tvi.mask=TVIF_TEXT;
tvi.pszText=Text;
tvi.cchTextMax=256;
tvi.hItem=Selected;
SendDlgItemMessage(hWnd,IDC_TREE1,TVM_GETITEM,
TVGN_CARET,(LPARAM)&tvi);
Double click on an item to retrieve its data
case WM_NOTIFY:
{
switch(LOWORD(wParam))
{
case IDC_TREE1:
if(((LPNMHDR)lParam)->code == NM_DBLCLK)
{
char Text[255]="";
memset(&tvi,0,sizeof(tvi));
Selected=(HTREEITEM)SendDlgItemMessage(hWnd,
IDC_TREE1,TVM_GETNEXTITEM,TVGN_CARET,(LPARAM)Selected);
if(Selected==NULL)
{
MessageBox(hWnd,"No Items in TreeView",
"Error",MB_OK|MB_ICONINFORMATION);
break;
}
TreeView_EnsureVisible(hWnd,Selected);
SendDlgItemMessage(hWnd,IDC_TREE1,
TVM_SELECTITEM,TVGN_CARET,(LPARAM)Selected);
flagSelected=true;
tvi.mask=TVIF_TEXT;
tvi.pszText=Text;
tvi.cchTextMax=256;
tvi.hItem=Selected;
if(SendDlgItemMessage(hWnd,IDC_TREE1,
TVM_GETITEM,TVGN_CARET,(LPARAM)&tvi))
{
if(tvi.cChildren==0 && strcmp(tvi.pszText,"Double Click Me!")==0)
{
MessageBox(hWnd,"Press OK to delete me!",
"Example",MB_OK|MB_ICONINFORMATION);
SendDlgItemMessage(hWnd,IDC_TREE1,
TVM_DELETEITEM,TVGN_CARET,(LPARAM)tvi.hItem);
flagSelected=false;
break;
}
}
}
}
}
break;
Note: tvi.cChildren means: flag that indicates whether the item has associated child items
--- Deleting an item --
This is fairly easy. From the above code, we can see that we have a flag called flagSelected, it tells us when a user has doubled clicked an item or not (true/false). From this, we also have the item handler, because we have set the "Selected" variable as global member ;=), so the deleting is fairly easy :>
case IDC_DELETE:
{
if(flagSelected==true)
{
if(tvi.cChildren==0)
SendDlgItemMessage(hWnd,IDC_TREE1,
TVM_DELETEITEM,TVGN_CARET,(LPARAM)tvi.hItem);
flagSelected=false;
}
else
{
MessageBox(hWnd,"Double Click Item to Delete",
"Message",MB_OK|MB_ICONINFORMATION);
}
}
break;
Deleting ALL items in the tree control:
case IDC_DELALL:
{
int TreeCount=TreeView_GetCount(GetDlgItem(hWnd,IDC_TREE1));
for(int i=0;i<=TreeCount;i++)
TreeView_DeleteAllItems(GetDlgItem(hWnd,IDC_TREE1));
}
break;
Adding a new root to our tree view:
case IDC_ADDROOT:
{
tvinsert.hParent=NULL;
tvinsert.hInsertAfter=TVI_ROOT;
tvinsert.item.pszText="Parent Added";
Parent=(HTREEITEM)SendDlgItemMessage(hWnd,IDC_TREE1,
TVM_INSERTITEM,0,(LPARAM)&tvinsert);
UpdateWindow(hWnd);
}
break;
Adding a new child to a selected root:
case IDC_CHILD:
{
 tvinsert.hParent=Selected;
 tvinsert.hInsertAfter=TVI_LAST;
 tvinsert.item.pszText="Child Added";
 Parent=(HTREEITEM)SendDlgItemMessage(hWnd,IDC_TREE1,
             TVM_INSERTITEM,0,(LPARAM)&tvinsert);
 TreeView_SelectDropTarget(GetDlgItem(hWnd,IDC_TREE1),Parent);
}
break;
Note: the TreeView_SelectDropTarget macro selects the specified tree-view item, scrolls the item into view, or redraws the item. If we don't specify this macro, after adding a new child we won't be able to see it, until our mouse is over its root.
--- Drag And Drop effect ---
Ok, I have noticed I missed something :-) So there we go, a nice drag & drop effect to use in our tree control example. We begin with trapping the TVN_BEGINDRAG notification! Note: make sure that the "Disable Drag And Drop" property is NOT set!! Also note that we are using new global variables, which are:
HWND hTree;
TVHITTESTINFO tvht;
HTREEITEM hitTarget;
POINTS Pos;
bool Dragging;
And at the WM_INITDIALOG, add: hTree=GetDlgItem(hWnd,IDC_TREE1);. That way we will have our hWnd global to use, thus you don't have to!! Now we are ready to begin the notify trap:
case WM_NOTIFY:
{
switch(LOWORD(wParam))
{
case IDC_TREE1:
if(((LPNMHDR)lParam)->code == TVN_BEGINDRAG)
{
HIMAGELIST hImg;
LPNMTREEVIEW lpnmtv = (LPNMTREEVIEW) lParam;
hImg=TreeView_CreateDragImage(hTree, lpnmtv->itemNew.hItem);
ImageList_BeginDrag(hImg, 0, 0, 0);
ImageList_DragEnter(hTree,
lpnmtv->ptDrag.x,lpnmtv->ptDrag.y);
ShowCursor(FALSE);
SetCapture(hWnd);
Dragging = TRUE;
}
}
}
break;
When we finished trapping and everything is set, we need to handle the mouse move message: WM_MOUSEMOVE
case WM_MOUSEMOVE:
{
if (Dragging)
{
Pos = MAKEPOINTS(lParam);
ImageList_DragMove(Pos.x-32, Pos.y-25);
ImageList_DragShowNolock(FALSE);
tvht.pt.x = Pos.x-20;
tvht.pt.y = Pos.y-20;
if(hitTarget=(HTREEITEM)SendMessage(hTree,
TVM_HITTEST,NULL,(LPARAM)&tvht))
SendMessage(hTree,TVM_SELECTITEM,
TVGN_DROPHILITE,(LPARAM)hitTarget);
ImageList_DragShowNolock(TRUE);
}
}
break;
As well we need to handle the final message of drag finishing. The message we use is the WM_LBUTTONUP. This will tell when the user finished his dragging mode.
case WM_LBUTTONUP:
{
  if (Dragging)
  {
    ImageList_DragLeave(hTree);
    ImageList_EndDrag();
    Selected=(HTREEITEM)SendDlgItemMessage(hWnd,IDC_TREE1,
              TVM_GETNEXTITEM,TVGN_DROPHILITE,0);
    SendDlgItemMessage(hWnd,IDC_TREE1,
              TVM_SELECTITEM,TVGN_CARET,(LPARAM)Selected);
    SendDlgItemMessage(hWnd,IDC_TREE1,
              TVM_SELECTITEM,TVGN_DROPHILITE,0);
    ReleaseCapture();
    ShowCursor(TRUE);
    Dragging = FALSE;
  }
}
break;
That's it :-), nice drag and drop effect!
--- Label editing ---
Ok, this time we add a code to enable us to edit the tree item's text on the fly =), it isn't hard, and basically the same as we have done with the ListView control. Add a global variable called HWND hEdit; and we trap these notification messages:
case WM_NOTIFY:
{
  switch(LOWORD(wParam))
  {
     case IDC_TREE1:
     if(((LPNMHDR)lParam)->code == TVN_BEGINLABELEDIT)
     {
       hEdit=TreeView_GetEditControl(hTree);
     }

     if(((LPNMHDR)lParam)->code == TVN_ENDLABELEDIT)
     {
      char Text[256]="";
      tvi.hItem=Selected;
      SendDlgItemMessage(hWnd,IDC_TREE1,TVM_GETITEM,0,(WPARAM)&tvi);
      GetWindowText(hEdit, Text, sizeof(Text));
      tvi.pszText=Text;
      SendDlgItemMessage(hWnd,IDC_TREE1,TVM_SETITEM,0,(WPARAM)&tvi);
     }
  }
}
break;
That's it, easy and quickly done! No need of over bloated code to edit labels.
--- F.A.Q ---
- A. How do I use big pics in my tree control (32x32)?
- Q. Doing 32x32 size picture is really easy. If you meant that you wanted to use BIG pictures in your tree control, do the following:
- /* change old code to this */
hImageList=ImageList_Create(32,32,ILC_COLOR32,2,10);
- Open up Photoshop, load List.bmp into it.
- In menu bar-> image-> image size..
- Chain height to 32 (width is auto changed)
- Save the file.
- Recompile code
Now you have 32x32 size tree control pictures!
- Q. Why can't I see different pic when I select my item ??
- A. Make sure you have your mask set as:
tvinsert.item.mask=TVIF_TEXT|TVIF_IMAGE|TVIF_SELECTEDIMAGE;
- Q. How can I select items with right-click of the mouse without the highlight back to the last selected?
- A. There it is:
if(((LPNMHDR)lParam)->code == NM_RCLICK)
{
Selected=(HTREEITEM)SendDlgItemMessage (hWnd,
IDC_TREE1,TVM_GETNEXTITEM,TVGN_DROPHILITE,0);
if(Selected==NULL)
{
MessageBox(hWnd,"No Items in TreeView",
"Error",MB_OK|MB_ICONINFORMATION);
break;
}
SendDlgItemMessage(hWnd,IDC_TREE1,
TVM_SELECTITEM,TVGN_CARET,(LPARAM)Selected);
}
--Grand final --
We came into the end of this article, I hope everyone enjoyed this as much as it took me time to find and add a proper code ;-). Know one thing? Once you have API power, you don't need MFC that much. But I can't let you think otherwise, classes are powerful after all...


 General
  News
News  Suggestion
  Question
  Bug
Bug  Answer
  Joke
Joke  Praise
  Rant
Rant  Admin
Admin 


