Introduction
With a Setup project created using Visual Studio .NET 2003 it is easy to add a Desktop shortcut to your application. But creating a shortcut based on a condition is not supported. Also, adding a shortcut in the Quick Launch bar is not supported. This article shows you how you can allow the user to choose whether to add these shortcuts.
While developing this solution, I also needed to overcome a limitation with the System.Environment.GetFolderPath method and the System.Environment.SpecialFolder enumeration. These only provide the location of the current user's Desktop, not the location of the All Users' Desktop, required for an "Everyone" install.
Background
Recently I was asked to modify the installer for an application so that the user could choose whether to add a shortcut on their Desktop. I thought this would be easy, but soon found out it was harder than I thought. I had added a Checkboxes dialog to my installer with an option to create the Desktop shortcut. Then I had set the Condition property of the User's Desktop folder to the appropriate checkbox (there is no Condition property for the actual shortcut in this folder). But this did not work. The Visual Studio .NET IDE gives you the impression that you can have conditions on folders where files are deployed, but that is misleading. There are no Windows Installer conditions like that. So while the IDE allows the conditions to be defined, nothing is done with them. After I initially posted this article, djm181 posted a comment titled "It doesn't have to be so complex", where he claimed these conditions do work. However, after investigating this further it turned out what he was doing only gave the appearance of working due to the order in which the two shortcuts with the same name were being created by the installer.
A bit of searching showed that many others have found this technique does not work and asked for a solution. Most answers were to use Orca to edit the MSI. While that works, I preferred a solution that was included every time I rebuilt the solution in Visual Studio.
The solution provided here uses an Installer class that is added to the application being deployed. The code in the Installer class uses the Windows Script Host to create the shortcuts.
Using the code
The source code for this article provides a simple Win Forms application that includes an Installer class to create the shortcuts, and a Setup project that includes a dialog to ask the user if they want to create the shortcuts. Follow the steps below to add this capability to your own project. Start with the project for the application you will be deploying open in Visual Studio. The steps are broken into two main sections:
Reference to Windows Script Host
The Windows Script Host is a COM component, so you need to add a reference to it in the project for the main assembly of your application. To do this within the Visual Studio .NET IDE, do the following: within the Solution Explorer, right-click on the References section of your project and select "Add Reference", select the "COM" tab, find and select "Windows Script Host Object Model" in the ListBox, click "Select", and then click "OK". This will add a reference to IWshRuntimeLibrary. You can find out more about the Windows Script Host here.
Add the ShortcutsInstaller class
Add a new class to the project for the main assembly of your application. Name the class "ShortcutsInstaller". All the code for this class is provided in the demo project so I will only review the main points here.
You need to add references to several namespaces that we will be using in this class. Include the following references in your code:
using System.Collections;
using System.ComponentModel;
using System.Configuration.Install;
using System.IO;
using System.Reflection;
using System.Windows.Forms;
using IWshRuntimeLibrary;
The System.Configuration.Install namespace requires a reference to the System.Configuration.Install.dll assembly. To add this reference within the Visual Studio .NET IDE, do the following: within the Solution Explorer, right-click on the References section of your project and select "Add Reference", find and select "System.Configuration.Install.dll" in the ListBox, click "Select", and then click "OK".
The ShortcutsInstaller class must inherit from the base class System.Configuration.Install.Installer and include the RunInstaller attribute:
[RunInstaller(true)]
public class ShortcutsInstaller : Installer
{
   ...
}
Override the Install method
When you implement your own Installer class, you can override one or more of the Install, Commit, Rollback and Uninstall methods of the base Installer class. These methods correspond to the different phases of the installation process. We will override some of these methods. To override the base class Install method, add a new method to your class as follows:
public override void Install(IDictionary savedState)
{
   base.Install(savedState);
      ...
}
The first line of this method must be a call to the base class method we are overriding: base.Install(savedState).
Parameters for the Installer class
Our installer class needs a way of finding out what choices the user has made for the current installation. Our installer requires three pieces of information:
- Did the user choose to install for "Everyone" or "Just me".
- Did the user choose to create the Desktop shortcut.
- Did the user choose to create the Quick Launch shortcut.
In order to provide our installer class with these pieces of information, .NET provides for parameters to be passed to the installer. We will see how to pass these parameters to our installer class later when we look at the Setup project. The parameters are made available to the installer through the Context property of the base Installer class. This gives us access to a StringDictionary object that contains the parameters. We can check to make sure a parameter has been provided to our installer class using the ContainsKey method:
const string ALLUSERS_PARAM = "ALLUSERS";
if (!Context.Parameters.ContainsKey(ALLUSERS_PARAM))
  throw new Exception(string.Format(
    "The {0} parameter has not been provided for the {1} class.",
    ALLUSERS_PARAM, this.GetType()));
The default installation folder dialog provided for a Visual Studio .NET Setup project includes radio buttons for the user to choose whether to install the application for everyone who uses the computer or just himself. The parameter value for the "Everyone" option will be "1", and for the "Just me" option it will be an empty string.
For the checkboxes that we will add to the Setup project to allow the user to choose to install the shortcuts, the parameter value will be "1" if the checkbox is checked, and an empty string if the checkbox is unchecked.
The code to check the values of the parameters will look like this:
bool allusers =
   Context.Parameters[ALLUSERS_PARAM] != string.Empty;
bool installDesktopShortcut =
   Context.Parameters[DESKTOP_SHORTCUT_PARAM] != string.Empty;
bool installQuickLaunchShortcut =
   Context.Parameters[QUICKLAUNCH_SHORTCUT_PARAM] != string.Empty;
Location of the desktop folder
If the user has chosen to add the desktop shortcut, we need to determine the location of the desktop folder where we will create the shortcut. If the user has chosen to install for "Everyone" the location is the "All Users" desktop. For a "Just me" installation it is the location of the current user's desktop.
The .NET Framework provides a way for us to get the location of the current user's desktop, using the System.Environment.GetFolderPath method:
desktopFolder =
  Environment.GetFolderPath(Environment.SpecialFolder.DesktopDirectory);
However, the System.Environment.SpecialFolder enumeration does not include a member for the All Users Desktop folder. To find the location of the All Users Desktop folder we need to use the Windows Script Host:
object allUsersDesktop = "AllUsersDesktop";
WshShell shell = new WshShellClass();
desktopFolder =
   shell.SpecialFolders.Item(ref allUsersDesktop).ToString();
Notice the use of the ref object parameter passed to the SpecialFolders.Item method. This is the way it must be called using COM Interop. If we were just writing VBScript it would be as simple as:
set shell = WScript.CreateObject("WScript.Shell")
desktopFolder = shell.SpecialFolders("AllUsersDesktop")
However, to access the SpecialFolders collection through COM Interop requires passing the Item property of an object by reference as the index to the collection. With COM Interop the folder is returned as an object so we need to use the ToString method on the returned value.
In the demo project I have put the code to get the "AllUsersDesktop" folder in a try-catch block as this folder is not supported on some older versions of Windows. If the "AllUsersDesktop" folder is not supported then the shortcut will be created on the current user's Desktop.
Location of the Quick Launch folder
If the user has chosen to add the Quick Launch shortcut, we need to determine the location of the folder where we will create the shortcut. The functionality of the Quick Launch bar is part of Internet Explorer and the location of the folder for the Quick Launch shortcuts is part of Internet Explorer's application data. There is no "All Users" Quick Launch folder, so the Quick Launch shortcut is always added to the current user's Quick Launch folder, even if the user chooses to install for "Everyone".
The System.Environment.GetFolderPath method we used to find the current user's Desktop can also give us the location of the current users "Application Data" folder. We need to hardcode the location within the Application Data folder for the Quick Launch folder. In the demo project I have made the location of the Quick Launch folder a property of the ShortcutsInstaller class so that I do not need to repeat the location code in more than one place. The code for the location of the Quick Launch folder is:
private string QuickLaunchFolder
{
  get
  {
    return
      Environment.GetFolderPath(
         Environment.SpecialFolder.ApplicationData)
         + "\\Microsoft\\Internet Explorer\\Quick Launch";
  }
}
Creating a shortcut
In the demo project I have a separate CreateShortcut method in the ShortcutsInstaller class to create a shortcut. This method is called from the overridden Install method for both the Desktop and Quick Launch shortcuts. The CreateShortcut method takes four parameters used for the shortcut:
- The folder where the shortcut will be created.
- The name of the shortcut - this is the caption that is displayed for the shortcut.
- The target of the shortcut - this is the application executable that is launched by the shortcut.
- A description for the shortcut - this is displayed in the tooltip when the mouse hovers over the shortcut.
The CreateShortcut method uses the Windows Script Host to create the shortcut. The actual shortcut is a special type of file with a .lnk extension (Windows always hides this extension when you view the file in Explorer). The name of the shortcut is used as the file name. Here is the code for the CreateShortcut method:
private void CreateShortcut(string folder,
     string name, string target, string description)
{
   string shortcutFullName =
            Path.Combine(folder, name + ".lnk");

   try
   {
      WshShell shell = new WshShellClass();
      IWshShortcut link =
        (IWshShortcut)shell.CreateShortcut(shortcutFullName);
      link.TargetPath = target;
      link.Description = description;
      link.Save();
   }
   catch (Exception ex)
   {
     MessageBox.Show(
       string.Format(
         "The shortcut \"{0}\" could not be created.\n\n{1}",
         shortcutFullName, ex.ToString()), "Create Shortcut",
         MessageBoxButtons.OK, MessageBoxIcon.Information);
   }
}
If the shortcut cannot be created for any reason, the try-catch block means that a message will be displayed to the user, but the installation will not fail.
Deleting the shortcuts
Any shortcuts created when your application is installed should be removed when the application is uninstalled. To do this you need to override the Uninstall method of the base Installer class:
public override void Uninstall(IDictionary savedState)
{
   base.Uninstall(savedState);
      ...
}
In the demo project I have separate DeleteShortcut and DeleteShortcuts methods in the ShortcutsInstaller class. The DeleteShortcuts method is called from the overridden Uninstall method (we will use this method again when we discuss the Rollback method). The DeleteShortcuts method then calls the DeleteShortcut method twice: once for the Desktop shortcut and once for the Quick Launch shortcut. We do not care whether the user chose to create the shortcuts when the application was installed. If they exist, we simply delete the shortcuts from the All Users Desktop, the current user's Desktop and the Quick Launch folder. Here is the code for the DeleteShortcut method:
private void DeleteShortcut(string folder, string name)
{
   string shortcutFullName = Path.Combine(folder, name + ".lnk");
   FileInfo shortcut = new FileInfo(shortcutFullName);
   if (shortcut.Exists)
   {
      try
      {
        shortcut.Delete();
      }
      catch (Exception ex)
      {
         MessageBox.Show(
            string.Format(
              "The shortcut \"{0}\" could not be deleted.\n\n{1}",
              shortcutFullName, ex.ToString()), "Delete Shortcut",
              MessageBoxButtons.OK, MessageBoxIcon.Information);
      }
   }
}
We use the FileInfo class to see if the shortcut exists, and delete the file if it does. If the file cannot be deleted for any reason a message is displayed to the user.
Rollback
The shortcuts need to be deleted if the install fails for any reason and they have already been created. In the event of a problem that prevents the install from completing, the Rollback method of the ShortcutsInstaller class will be called. We need to override the Rollback method of the base Installer class and call the DeleteShortcuts method.
Assembly attributes
I have made use of the values of Assembly attributes (set in the AssemblyInfo.cs file) for the application being installed. Assembly attributes are used to set the name and description of the shortcuts. If the AssemblyTitle attribute has been set, this is used for the name of the shortcut. If the AssemblyTitle attribute has not been set, then the file name of the application is used. If the AssemblyDescription attribute has been set, this is used for the description of the shortcut. If the AssemblyDescription attribute has not been set, then the description of the shortcut is set to "Launch xxx", where xxx is the name of the shortcut. I have added properties to the ShortcutsInstaller class that use reflection to obtain the Assembly attributes. The code to get the AssemblyTitle attribute is:
object titleAttribute =
  myAssembly.GetCustomAttributes(typeof(AssemblyTitleAttribute),
                                                       false)[0];
_name = ((AssemblyTitleAttribute)titleAttribute).Title;
Another option you could use for the name and description values of the shortcuts would be to pass these values from the "ProductName" and "Description" properties of the Setup project.
Creating the Setup project
If you already have a Setup project as part of the solution for your application then you can skip this section. To add a Setup project to your solution within the Visual Studio .NET IDE, do the following:
In the Solution Explorer, right-click on the Solution and select "Add", then select "New Project". This displays the "Add New Project" dialog box. In the "Project Types" select "Setup and Deployment Projects", in the "Templates" select "Setup Project", provide a suitable "Name" and "Location", and then click "OK".
In the Solution Explorer, right-click on the new Setup project and select "View" and then select "File System". This displays the File System Editor, where you can specify the files that will be installed and their locations on the target computer. The File System Editor is divided into two parts: a navigation pane on the left and a detail pane on the right. The navigation pane contains a hierarchical list of folders that represent the file system on a target computer. The folder names correspond to standard Windows folders; for example, the "Application Folder" corresponds to a folder beneath the "Program Files" folder where the application will be installed. When a folder is selected in the navigation pane, any files and shortcuts that will be installed in that folder are displayed in the detail pane.
Right-click on the "Application Folder" and select "Add" and then select "Project Output". This displays the "Add Project Output Group" dialog box. The Project drop-down ListBox contains the other projects in your solution. Select the project that contains the ShortcutsInstaller class. The ListBox below the Project contains a list of project outputs that can be deployed. Select "Primary output" in this list, then click "OK". You may get a message box with a message about dependencies for "wshom.ocx". If you do, just click "OK" - I will discuss "wshom.ocx" below. Three files will be added to the detail pane of the File System Editor:
- The Primary output of your application - this is the EXE built by the application project.
- Interop.IWshRuntimeLibrary.dll - this is the COM Interop assembly that Visual Studio .NET created for the Windows Script Host. This file must be deployed to the same folder as your EXE.
- wshom.ocx - this is the Windows Script Host ActiveX control - see below.
You will probably want to add a shortcut to your application so that it can be accessed from the "Start" menu. To do this within the Visual Studio .NET IDE, do the following. In the detail pane of the File System Editor, right-click the "Primary output..." and select "Create shortcut to Primary output...". This will add the shortcut to the "Application Folder". Rename the shortcut to the title of your application. You can then cut-and-paste or drag-and-drop the shortcut to the "User's Programs Menu" in the navigation pane.
When you add an assembly to be deployed by a Setup project, Visual Studio .NET attempts to determine all the other components that the assembly is dependent upon. This will include all the assemblies you have added as References to in your project. Each dependent assembly will have its dependencies checked and so on. This includes any COM components you have referenced. Any dependencies that are not part of the standard .NET Framework assemblies will be added to the Application Folder for your Setup project. That is why Interop.IWshRuntimeLibrary.dll and wshom.ocx have been added to your Setup project.
While Interop.IWshRuntimeLibrary.dll, must be deployed, it is not usually necessary to deploy wshom.ocx as it is part of the standard Windows installation. In fact, when Visual Studio .NET adds wshom.ocx to your project, it does it in a way that it will only be copied to the target computer, but not actually used. If you view the Properties window for this file, you will see that the Register property is set to "vsdrfDoNotRegister". This means that if wshom.ocx does not already exist as a properly registered COM component on the target computer your Desktop and Quick Launch shortcuts will not be created. If the computers you will be installing to do not have wshom.ocx already registered you will need to change the Register property to "vsdrpCOM". You will probably also want to change the target folder to be the Windows System folder.
In the demo project I have avoided deploying the wshom.ocx file altogether. To prevent this file from being copied to the target computer, change the Exclude property for the file to "True".
Remove any existing desktop shortcut
If you already have a desktop shortcut to your application defined in the File System editor of your Setup project, then you need to remove this shortcut. Instead of this shortcut, the shortcut will be added by the ShortcutsInstaller class.
Add a checkboxes dialog
You need to add a dialog to the Setup project that includes checkboxes for the user to choose whether to create the Desktop and Quick Launch shortcuts. To do this within the Visual Studio .NET IDE, do the following:
Within the Solution Explorer, right-click on the Setup project and select "View" and then select "User Interface". This displays the User Interface Editor, where you can specify and edit dialog boxes that are displayed during installation. There are a number of dialogs already included by default. The User Interface Editor contains a single pane with a hierarchical list of user interface dialog boxes. The list is divided into two sections for standard versus administrative installations, and each section contains "Start", "Progress", and "End" nodes to represent the stages of installation. I will only describe what is needed to add a dialog box for a standard install (under the "Install" node).
Right-click on the Start node and select "Add Dialog", select one of the "Checkboxes" items and click "OK" - I will assume you select "Checkboxes (A)". The "Checkboxes (A)" dialog is added after the "Confirm Installation" dialog. You need to move it up so that it comes after the "Installation Folder" dialog and before the "Confirm Installation" dialog. You can right-click the "Checkboxes (A)" dialog and select "Move Up", or use drag-and-drop to move the dialog.
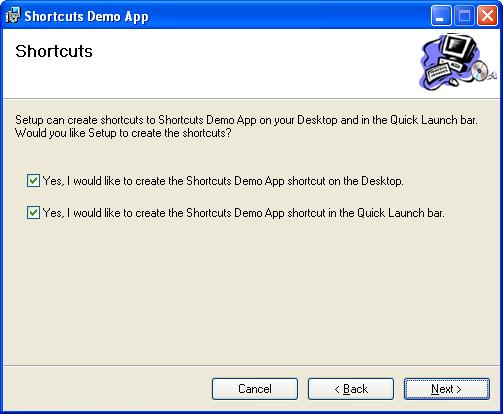
With the "Checkboxes (A)" dialog selected, view the "Properties" window by pressing the "F4" key. Change the "Banner Text" property to "Shortcuts" and change the "Body Text" property to "Setup can create shortcuts to [ProductName] on your Desktop and in the Quick Launch bar. Would you like Setup to create the shortcuts?". Do not change "[ProductName]" - Visual Studio will automatically replace this with the value of the "ProductName" property of your Setup project - just make sure you set this property!
Change the "Checkbox1Label" property to "Yes, I would like to create the [ProductName] shortcut on the Desktop". Change the "Checkbox1Property" property to "DESKTOP_SHORTCUT" and change the "CheckBox1Value" property to "Checked".
Make similar changes for the CheckBox2 properties, but use the values "Yes, I would like to create the [ProductName] shortcut in the Quick Launch bar." and "QUICKLAUNCH_SHORTCUT".
Change the "Checkbox3Visible" and "Checkbox4Visible" properties to "False" as these will not be used.
Custom actions
To have your Setup project invoke the Installer methods in your application project, you need to define "Custom Actions" for your Setup project. To do this within the Visual Studio .NET IDE, do the following:
Within the Solution Explorer, right-click on the Setup project and select "View" and then select "Custom Actions". This displays the Custom Actions Editor, where you can specify additional actions to be performed on a target computer during installation. The Custom Actions Editor contains a single pane with a hierarchical list of custom actions. The list is divided into four sections representing the phases of installation: Install, Commit, Rollback and Uninstall. These correspond with the Install, Commit, Rollback and Uninstall methods of the base Installer class. In the ShortcutsInstaller class we provided override methods for the Install, Rollback and Uninstall methods, so we need to add Custom Actions that will invoke these methods.
The custom actions can be added one at a time to each of the individual nodes, but there is an easy way to add several at a time. Right-click the "Custom Action" root node in the Custom Actions Editor and select "Add Custom Action". The "Select Item in Project" dialog box is displayed. Select the "Application Folder" in the list and click "OK". Select "Primary output..." for the project that contains the ShortcutsInstaller class and click "OK". A "Primary output..." entry will be added to each of the Install, Commit, Rollback and Uninstall nodes. We only have overrides for the Install, Rollback and Uninstall methods, so we need to remove the "Primary output..." entry from the Commit node. Right-click this entry and select "Delete".
We need to pass some parameters to the Install method of the ShortcutsInstaller class. These parameters will inform the Install method of the choices made by the user for the shortcuts to be created. With the "Primary output..." entry under the "Install" node selected, view the "Properties" window by pressing the "F4" key. Change the "CustomActionData" property to "/ALLUSERS=[ALLUSERS] /DESKTOP_SHORTCUT=[DESKTOP_SHORTCUT] /QUICKLAUNCH_SHORTCUT=[QUICKLAUNCH_SHORTCUT]". (Note: do not change the "Arguments" property.) The CustomActionData value will provide three parameters to the ShortcutsInstaller class:
/ALLUSERS=[ALLUSERS] - The left hand side of this parameter ("/ALLUSERS") corresponds to the name of the parameter that the Install method of the ShortcutsInstaller is expecting. The right hand side of this parameter ("[ALLUSERS]") corresponds to the name of the variable the Setup project uses for the users choice of whether the install is for "Everyone" or "Just me". There is no requirement that the text "ALLUSERS" on the left is the same as the text on the right. The text on the left can be anything you like, as long as it is the same as your installer class is expecting. /DESKTOP_SHORTCUT=[DESKTOP_SHORTCUT] - The left hand side of this parameter ("/DESKTOP_SHORTCUT") corresponds to the name of the parameter that the Install method of the ShortcutsInstaller is expecting. The right hand side of this parameter ("[DESKTOP_SHORTCUT]") corresponds to the value we gave the "Checkbox1Property" property in the User Interface Editor. Again, there is no requirement that the text "DESKTOP_SHORTCUT" on the left is the same as the text on the right. The text on the left can be anything you like, as long as it is the same as your installer class is expecting. /QUICKLAUNCH_SHORTCUT=[QUICKLAUNCH_SHORTCUT] - Similar to the DESKTOP_SHORTCUT parameter, this is for the "Checkbox2Property" property in the User Interface Editor.
Build and test the solution
You are now ready to test out your installer. When you add a Setup project to a Solution in Visual Studio .NET, by default it is not included in a build of the Solution. To build the entire Solution including the Setup project, you can right-click the Setup project in the Solution Explorer and select "Build". Ensure the Output states that no projects failed or were skipped.
To test the installer, right-click the Setup project in the Solution Explorer and select "Install". You can install and uninstall several times to test out various combinations of whether or not shortcuts are created and whether it is an install for "Everyone" or "Just me". Ensure the shortcuts are removed when the application is uninstalled.
Summary
If optional creation of shortcuts on the Desktop or Quick Launch bar is something you want to add to your own Setup projects, then I hope this article may save you some time.
This member has not yet provided a Biography. Assume it's interesting and varied, and probably something to do with programming.


 General
  News
News  Suggestion
  Question
  Bug
Bug  Answer
  Joke
Joke  Praise
  Rant
Rant  Admin
Admin 


![Rose | [Rose]](https://codeproject.freetls.fastly.net/script/Forums/Images/rose.gif) Your posting is very useful and is there anyway to have popup menu on right click of the quick launch icon. If yes guide me thru coding
Your posting is very useful and is there anyway to have popup menu on right click of the quick launch icon. If yes guide me thru coding Hi all,