Introduction
.Net 3.0 is bringing with it a lot of great new toys for programmers to play with. Finally, 3D applications will be available to every programmer. Vista moves graphics processing off to the video cards we most likely already bought for games. This gives us the freedom to do things which were much more computationally expensive before without worrying about killing performance.
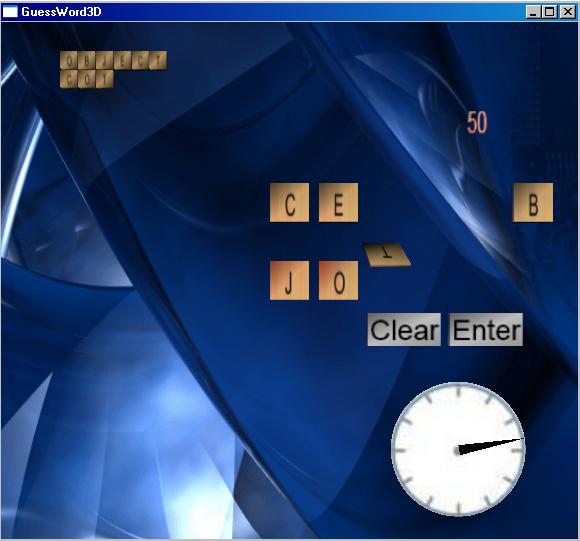
This game began life as a mere proof-of-concept to see if my DmRules[^] library could actually be used in a real application. The original interface was a very simple one done in Windows forms that was enough to display what I needed it to display. That interface was enough to show that the DmRules library works. But, the game will get little to no attention unless there's something flashy on top. So, I decided to do some 3D stuff using WPF. As you can see from the "programmer art" above, I'm not an artist. Try playing the game though, because the 3D is fun to watch. You will need to have .Net 3.0 installed in order to run it.
The background was shamelessly stolen borrowed from Deviant Art: http://www.deviantart.com/deviation/2882587/[^]
Rules of the Game
The game is pretty simple. If any of you use Yahoo Games, there's a game there called Text Twist that I like to play. The game described here uses rules that are pretty similar to that one. Basically, you start off with a six-letter word that is scrambled. Ultimately, you have to guess that word. You can also score points for finding other words that are longer than two letters as long as they use the letters in the original word.
There are many ways that you can write the rules for this game. Each person will have a set of rules that they like or don't like. For instance, a person may decide that if you manage to find 10 words that are not the original word, then you should still win the round. Others will want to weigh the scoring more heavily on how many letters are in the guess. Scoring, game rules, word lists, time limits... all of these things can be controlled using rules. Which is why I picked this game as an example for using DmRules.
The DmRules library allows you to write rules in the App.config file. The rules are done per class type. This influenced how I designed the classes in the game. Rules are applied to two things: a guess made by the user (SingleGuess) and the current game (Game).
SingleGuess class
A guess is the sequence of letters that the user selected. There are two things that I wanted to determine from a guess: is the guess correct and if the guess is correct, how many points is it worth?
To resolve whether or not the guess is correct, I have written a number of rules. Each of these rules is written out in the App.config as shown below. As you can see, you code the expressions into the actual XML. This makes it very easy to change the rules later on without having to recompile.
- If the guess has less than three letters, then it is not correct.
<DmRule cond="this._GuessText.Length < 3" name="More than 2 letters"
haltAfterThen="true" priority="1000">
<ThenStmts>
<DmCdStmt xsi:type="Assignment" left="this._IsCorrect"
right="false" />
<DmCdStmt xsi:type="Assignment" left="this._ErrorText"
right=""Word must have at least 3 letters"" />
</ThenStmts>
</DmRule>
- If the guess uses letters that are not in the list of scrambled letters, then it is not correct.
<DmRule cond="!this._Game.HasLetters(this._GuessText)"
name="Has correct letters" haltAfterThen="true" priority="990">
<ThenStmts>
<DmCdStmt xsi:type="Assignment" left="this._IsCorrect"
right="false" />
<DmCdStmt xsi:type="Assignment" left="this._ErrorText"
right=""Letters not in scrambled word"" />
</ThenStmts>
</DmRule>
- If this guess has already been made, then it is not correct.
<DmRule cond="this._Game.GuessesMade.Contains(this._GuessText)"
name="Already guessed" haltAfterThen="true" priority="980">
<ThenStmts>
<DmCdStmt xsi:type="Assignment" left="this._IsCorrect"
right="false" />
<DmCdStmt xsi:type="Assignment" left="this._ErrorText"
right=""You've already guessed that word"" />
</ThenStmts>
</DmRule>
- If the guessed word is in the dictionary, then it is correct. Otherwise, the guess is not correct.
<DmRule cond="DictUtil.IsWordInList(this._GuessText)"
name="Is in dictionary"
haltAfterElse="true" priority="970">
<ThenStmts>
<DmCdStmt xsi:type="Assignment" left="this._IsCorrect"
right="true" />
</ThenStmts>
<ElseStmts>
<DmCdStmt xsi:type="Assignment" left="this._IsCorrect"
right="false" />
<DmCdStmt xsi:type="Assignment" left="this._ErrorText"
right=""Word is not in dictionary"" />
</ElseStmts>
</DmRule>
You may have noticed the priority attribute on the rules. This had to be added to DmRules because the Workflow Foundation's rules system does not guarantee that the rules will be executed in any particular order unless a priority is explicitly specified. The higher the number, the earlier the rule will get executed. Priorities can also be negative.
Also, there are the attributes haltAfterThen and haltAfterElse. Sometimes, depending on how a particular rule evaluates, you want to stop running rules either because it would be inefficient to run any other rules or because those other rules could modify state in a way you don't want them to. Given the priority of the rules shown above, once the guess is determined to be incorrect, the rules should stop running. Workflow Foundation actually has a rule statement with a halt command that can be inserted anywhere in a list of rules. It doesn't make any sense to me though why you would want to stick a halt into the middle because there are no loops or conditions allowed in a rule statement. So, I decided to just use the attribute and add the halt statement onto the end of the list of rules.
There are more rules to the SingleGuess class. These rules have to do with how a correct guess is scored. The score is based on how many letters are in the word and if the guess matches the original word. To move on to the next game, I decided that if you correctly guessed a six-letter word, then you've passed that level. This can be easily changed as you can see:
<DmRule cond="this._GuessText == this._Game.OriginalWord"
name="Guessed original word">
<ThenStmts>
<DmCdStmt xsi:type="ExprStmt" expr="this._Game.Complete()"/>
<DmCdStmt xsi:type="Assignment" left="this._Score" right="40"/>
</ThenStmts>
<ElseStmts/>
</DmRule>
<DmRule
cond="this._GuessText != this._Game.OriginalWord &&
this._GuessText.Length == 6"
name="Guessed six-letter word">
<ThenStmts>
<DmCdStmt xsi:type="ExprStmt" expr="this._Game.Complete()"/>
<DmCdStmt xsi:type="Assignment" left="this._Score" right="25"/>
</ThenStmts>
<ElseStmts/>
</DmRule>
<DmRule cond="this._GuessText.Length == 3" name="Score 3-letter">
<ThenStmts>
<DmCdStmt xsi:type="Assignment" left="this._Score" right="10"/>
</ThenStmts>
<ElseStmts/>
</DmRule>
<DmRule cond="this._GuessText.Length == 4" name="Score 4-letter">
<ThenStmts>
<DmCdStmt xsi:type="Assignment" left="this._Score" right="15"/>
</ThenStmts>
<ElseStmts/>
</DmRule>
<DmRule cond="this._GuessText.Length == 5" name="Score 5-letter">
<ThenStmts>
<DmCdStmt xsi:type="Assignment" left="this._Score" right="20"/>
</ThenStmts>
<ElseStmts/>
</DmRule>
Game class
The game class is ultimately responsible for determining if the user should move on to the next level or if they've failed. I've decided to make the game based on time. I have a word list for the first three levels that has easier words to guess. After that, I just pick a random 6-letter word out of the dictionary. Guessing these words can get pretty hard especially since I haven't heard of half of them. You can decide to change the rules however you see fit. Add more levels of word lists, change the amount of time allowed, allow the user to pass to the next level under varying circumstances, etc.
The rules that I have come up with are listed below:
- If the original word is an empty string (which I use to signify that the current level has finished) and the number of games (levels) played is less than three, then pick a new word, clear the list of guesses that were made, set the time to 30 seconds, and set the level to not be complete.
<DmRule
cond="this._OriginalWord == "" &&
this._GamesPlayed < 3"
name="Unassigned original word, level one" priority="1000">
<ThenStmts>
<DmCdStmt xsi:type="Assignment" left="this._OriginalWord"
right="DictUtil.FindGuessWord(6, Level.One)"/>
<DmCdStmt xsi:type="ExprStmt" expr="this.Scramble()"/>
<DmCdStmt xsi:type="ExprStmt" expr="this._GuessesMade.Clear()"/>
<DmCdStmt xsi:type="Assignment" left="this._TimeLeft"
right="TimeSpan.FromSeconds(30)"/>
<DmCdStmt xsi:type="Assignment" left="this._IsComplete"
right="false"/>
</ThenStmts>
<ElseStmts />
</DmRule>
- If the original word is an empty string and the number of games played is greater than or equal to three, then pick a random word from the dictionary, clear the list of guesses that were made, set the time to 30 seconds, and set the level to not be complete.
<DmRule cond="this._OriginalWord == "" &&
this._GamesPlayed >= 3"
name="Unassigned original word, above level one" priority="990">
<ThenStmts>
<DmCdStmt xsi:type="Assignment" left="this._OriginalWord"
right="DictUtil.FindGuessWord(6, Level.Zero)"/>
<DmCdStmt xsi:type="ExprStmt" expr="this.Scramble()"/>
<DmCdStmt xsi:type="ExprStmt" expr="this._GuessesMade.Clear()"/>
<DmCdStmt xsi:type="Assignment" left="this._TimeLeft"
right="TimeSpan.FromSeconds(30)"/>
<DmCdStmt xsi:type="Assignment" left="this._IsComplete"
right="false"/>
</ThenStmts>
<ElseStmts />
</DmRule>
- If time has run out and the game is complete, then signal that the user has succeeded in completing the round.
<DmRule
cond="this._TimeLeft.TotalSeconds == 0 && this._IsComplete"
name="Time ran out, game complete" priority="800">
<ThenStmts>
<DmCdStmt xsi:type="ExprStmt" expr="this.Success()"/>
</ThenStmts>
<ElseStmts />
</DmRule>
- If the time has run out and the game is not complete, then signal that the user has failed the round.
<DmRule cond="this._TimeLeft.TotalSeconds == 0 && !this._IsComplete"
name="Time ran out, game not complete" priority="790">
<ThenStmts>
<DmCdStmt xsi:type="ExprStmt" expr="this.Failure()"/>
</ThenStmts>
<ElseStmts />
</DmRule>
The Success() and Failure() methods end up simply firing an event from the Game class. The UI has to subscribe to that event to respond to it.
The Original Windows Forms Interface

If you thought the 3D one was ugly, get a look at this interface. Well, at least it does serve the purpose. What we see here is a list of the words that were already guessed, a score, the scrambled word, the time remaining in the round, an indicator to let us know if we've passed the round, a TextBox to type in a guess, a button to change the scrambling of the word, and a button to submit the scrambled word.
This interface is also included in the source code. It's always good to have a sort of litmus test to run your stuff against. When the time runs out, a message box comes up and says that you can click to go to the next round or tells you the scrambled word and lets you start a new game. Granted, this could be a lot more user friendly, but I'm lazy and don't feel like going through all that effort.
3D Graphics in WPF
The image at the top of the page should give you a sense of what the 3D interface looks like. There's a spot with the scrambled letters and you can click on those letters to select them. The selected letter flips over to its spot in the word the user is constructing. There is also a button to clear the current guess and a button to enter the guess. When the guess is tried or cleared, the letters flip back to their positions in the scrambled word. There is also a clock to indicate the time left, a list of the already guessed words, and an indication of the user's score.
In the sections below, I will cover some of the more interesting points about my implementation. Being a 3D environment and without having any primitives to work with (thank you Microsoft), things work a bit differently.
Creating the Letters
Each letter is essentially a squashed cube. I made it to look like a Scrabble letter. I just grabbed a random wood texture and painted letters on it using a utility program. That program is called CreateTextures and is also included with the source code. It basically opens the root texture and paints a letter onto it. You have to imagine the letter being wrapped around the cube. So, here's what the texture looks like for the letter "P":
One P is upside-down, the other is backwards. The easiest way to think of the whole thing is to imagine the texture image as being a piece of gift-wrapping paper. Imagine you're wrapping a book. Set the top of the book down in between the two P's so that the book is standing up. Then take the wrapping paper and fold it up around the book.
Now, my wrapping paper actually should be flipped over, but there's no need to confuse the issue. Wrapping a texture around a 3D object is very simple. Just as simple as designing the object itself. You just have to think about the object in 3D coordinates, which can sometimes be a little difficult.
I create the letters using a LetterFactory class. In XAML, you would define the points, triangle indices, normals, and texture coordinates for your mesh. If you look at any of Microsoft's examples for doing 3D programming, they usually create the meshes in XAML. But, I like to keep things in the code. Reading a 3D mesh is hard enough without trying to read it when it's all stuffed into one XML attribute. Anyways, if you're interested in looking at how the meshes are created, it's all in the code.
Determining if the User Clicked on a Letter
After creating a letter, I now need to know when the user clicks on it. This was an essential step I had to take before doing anything else. It didn't take long to find an example on MSDN of how to do this. WPF does make it incredibly easy to figure out which mesh the user clicked on. First, add this to your form's constructor:
this.myViewport.MouseLeftButtonDown += new MouseButtonEventHandler(HitTest);
Where myViewport is the 3D view port in your window. Here's the code for the HitTest method:
public void HitTest(object sender,
                    System.Windows.Input.MouseButtonEventArgs args)
{
   Point mouseposition = args.GetPosition(myViewport);
   PointHitTestParameters pointparams =
                                  new PointHitTestParameters(mouseposition);
   VisualTreeHelper.HitTest(myViewport, null, HTResult, pointparams);
}
The HitTest method uses a delegate to handle the actual results. The HTResult method works like so:
public HitTestResultBehavior HTResult(
                                System.Windows.Media.HitTestResult rawresult)
{
   RayHitTestResult rayResult = rawresult as RayHitTestResult;
   if (rayResult != null) {
      RayMeshGeometry3DHitTestResult rayMeshResult = rayResult as
         RayMeshGeometry3DHitTestResult;
      if (rayMeshResult != null) {
         GeometryModel3D hitgeo = rayMeshResult.ModelHit as GeometryModel3D;
         ...
      }
   }
   return HitTestResultBehavior.Continue;
}
The variable hitgeo is the model that was hit. This is very easy to work with. Just by using this code, you can find which mesh the user clicked on without worrying about translating coordinates between 3D-space and 2D-space and without doing any vector math. WPF has already taken care of that for you. In fact, the HitTestResult that you see in the code above can be used for things besides user interaction. It can be used for collision detection or determining a user's line of sight.
Animating a Letter
Animation is another cool feature of the Windows Presentation Foundation. You can perform simple animations very easily. But you first have to be aware of some fundamental 3D concepts. Transformations are the name of the game in 3D programming. Rotation, translation, projection, and scaling are all transformations. We don't use any scaling in this application and WPF takes care of the projection side of things. So, we are basically concerned with rotations and translations. Using these, we can animate our letters to flip from one position to the next.
The basic requirement I had was to detect when the user clicked on a letter in the scrambled word. When this happened, I wanted to move the letter to the word that the user is constructing. To take advantage of the 3D, I wanted to have the letter flip a full 360 degrees along the way. You'll see how remarkably easy it is to accomplish this.
There are actually 3 transformations we're performing: a rotation of 360 degrees, a translation along the Y-axis, and a translation along the X-axis. The easiest one is the translation along the Y-axis since that value is pretty much static.
TranslateTransform3D tt3d = new TranslateTransform3D(new Vector3D(0, 0, 0));
DoubleAnimation da = new DoubleAnimation(-4,
                                    new Duration(TimeSpan.FromSeconds(1)));
tt3d.BeginAnimation(TranslateTransform3D.OffsetYProperty, da);
We create a translation with a zero vector. The animation will change the translation over time so we don't need to set the vector to anything other than zero. The actual animation takes a value and a TimeSpan. In this case, I want to move -4 units in one second. The BeginAnimation call indicates along which axis I want to move those -4 units. This is the Y-axis. What this will do is move the letter down 4 units and this will take one second.
The next transformation is a translation along the X-axis. This translation can change depending on where the letter is coming from in the scrambled word and where it's going to in the guess word.
double oldX = double.Parse(str[1]);
double newX = (_CurrGuess.Length + 1) * -2.5;
TranslateTransform3D tt3d2 = new TranslateTransform3D(new Vector3D(0, 0, 0));
da = new DoubleAnimation(newX - oldX, new Duration(TimeSpan.FromSeconds(1)));
tt3d2.BeginAnimation(TranslateTransform3D.OffsetXProperty, da);
Pretty similar execution here. Just getting how many units to move and on what axis. So, let's move on to the more interesting transformation, the rotation:
RotateTransform3D myRotateTransform = new RotateTransform3D(
   new AxisAngleRotation3D(new Vector3D(1, 0, 0), 1));
DoubleAnimation myAnimation = new DoubleAnimation();
myAnimation.From = 0;
myAnimation.To = 360;
myAnimation.Duration = new Duration(TimeSpan.FromMilliseconds(1000));
myAnimation.RepeatBehavior = new RepeatBehavior(1);
myRotateTransform.Rotation.BeginAnimation(AxisAngleRotation3D.AngleProperty,
   myAnimation);
We create the rotation on an axis. The vector indicates that it's on the X axis. To imagine this, I think of a bracelet that has letters on it. You drill a hole in through the sides of the letter and run a string through it. You can then flip the letter around the string. The second argument to the AxisAngleRotation3D constructor is a degree measurement, which is 1. It is easiest to imagine the animation proceeding one degree at a time. I set up the animation to go from frame 0 (as in 0 degrees) to frame 360 (as in 360 degrees). I also want that to all take place within one second.
Now my last step is to put those transformations onto the hitgeo object:
(hitgeo.Transform as Transform3DGroup).Children.Insert(1, myRotateTransform);
(hitgeo.Transform as Transform3DGroup).Children.Add(tt3d);
(hitgeo.Transform as Transform3DGroup).Children.Add(tt3d2);
This code looks a little odd, but in order to do multiple transformations, you have to assign the letter's Transform property to a Transform3DGroup, which is just a group of transformations. I do this when the letter is created. I want to preserve the original transformations that were done to the letter and add on new ones.
Tranformations have to be performed in a particular order. For instance, we want to rotate before we translate. To imagine this, think of the Earth out in space. The earth has a rotation on its axis that takes 24 hours. The moon rotates around the earth. The difference between the rotations is that the moon is first translated to a position out away from the Earth and is then rotated. The rotation still occurs around Earth's axis, which means the moon rotates around the Earth.
Anyways, the end result is that the rotation has to be inserted into a particular order in the group of transformations. The translations can just be added onto the end. Finally, we get a letter that flips into position:
Making 3D Buttons
Buttons are a very fundamental piece of any interface. In our 3D environment, we just don't have them. So, I decided to make buttons myself. My premise was that I need something that I can "press" by clicking on it with the mouse. It's easy to perform translation animations, so we can use that to perform the actual push.
One of the first considerations I had though was how will the user know that a button has been pushed? There has to be a point of reference. In a Windows UI, the button looks like it was pressed in because the shading changes. If I had a light source in the 3D environment from the upper left, maybe I could achieve the same effect. But that would also require I do some changes to the mesh to make the button appear depressed. It also would mean that I need a surface for the button to be a part of. I wanted an easier solution.
The solution that I came up with was to make another squashed cube. On one side, I would paint the text for the button. When clicked, the button will push in and then return to its original position. As a point of reference, I created a large gray polygon to serve as a background. The button lays on top of the background polygon. When it pushes in, it actually is pushing through that polygon. I imagine that WPF uses a Z-buffer by default because the end result is that the button appears to push down into the polygon.
But then the question is, how do I get the text on the button? The concept is to get an image, draw the text onto the image, and wrap that image on the button as a texture. So, first, I create a block of text:
FormattedText ft = new FormattedText(text,
   new CultureInfo("en-us"),
   FlowDirection.LeftToRight,
   new Typeface(new FontFamily("Arial"), FontStyles.Normal,
      FontWeights.Normal, new FontStretch()),
   24D,
   Brushes.Black);
The text variable holds the text I want to write. I chose Arial, 24pt font, painted in black. This basically writes out a block of text and sizes that block to however much is needed to hold the text. I can use that size to determine how I want to scale the size of my button. You'll see something in the ButtonFactory code that looks like this:
buttonModel.Geometry = CreateButtonMesh((ft.Width + 4) / (ft.Height));
When I create the mesh, I change the width of it to match the ratio of width to height in the text. This keeps the letters from looking stretched. The next thing we want to do is create a DrawingVisual object since that can be used for a texture. We'll draw a light gray rectangle for the background color of the button and then draw the text.
DrawingVisual drawingVisual = new DrawingVisual();
DrawingContext drawingContext = drawingVisual.RenderOpen();
drawingContext.DrawRectangle(Brushes.LightGray, new Pen(Brushes.LightGray, 1),
   new Rect(0, 0, ft.Width + 4, ft.Height * 4));
drawingContext.DrawText(ft, new Point(2, ft.Height * 1.5));
drawingContext.Close();
Now we simply have to put the visual into an image and apply that image as a material to our mesh.
RenderTargetBitmap bmp = new RenderTargetBitmap((int)ft.Width + 4,
   (int)(ft.Height * 4), 0, 0, PixelFormats.Pbgra32);
bmp.Render(drawingVisual);
buttonModel.Material = new DiffuseMaterial(new ImageBrush(bmp));
Score Board
The next problem was how to show the current score. Since I was able to place the formatted text onto an image and stretch that onto a button mesh, I figured I should be able to just grab a regular polygon and draw a texture on it with the current score. This was a pretty simple procedure. I created the score board in a manner very similar to creating the buttons except that the polygon has a fixed size. The texture is what changes. So, each time the score changes, I update it with the following method:
private void UpdateScore() {
   if (bmpScore != null) {
      FormattedText ft = new FormattedText(_CurrGame.Score.ToString(),
         new CultureInfo("en-us"),
         FlowDirection.LeftToRight,
         new Typeface(new FontFamily("Arial"), FontStyles.Normal,
            FontWeights.Normal, new FontStretch()),
         16D,
         Brushes.DarkRed);
      DrawingVisual drawingVisual = new DrawingVisual();
      DrawingContext drawingContext = drawingVisual.RenderOpen();
      drawingContext.DrawRectangle(Brushes.LightGray,
         new Pen(Brushes.LightGray, 1), new Rect(0, 0, ft.Width + 4,
                                                       ft.Height * 4));
      drawingContext.DrawText(ft, new Point(120 - ft.Width - 2, 2));
      drawingContext.Close();
      bmpScore = new RenderTargetBitmap(120, 25, 0, 0, PixelFormats.Pbgra32);
      bmpScore.Render(drawingVisual);
      scoreBoard.Material = new DiffuseMaterial(new ImageBrush(bmpScore));
   }
}
I thought that maybe just changing the texture bitmap itself would be enough for the score to change. However, it seems like that doesn't have any effect. Since the score isn't changing many times a second, I think it's ok to just go ahead and create a new material for the mesh with the changed texture.
Showing Time
Another key element to the user interface is showing the user how much time they have left to guess words. I could try to do it the same way I did the score board with a display of how many minutes and seconds are left in the round. But, this just didn't really seem all that interesting. I thought maybe I could mock up a digital display, but that could get overly complicated. What I ended up deciding to do was show an analog clock. It's very easy to tell how much time you have left in the game on this sort of clock. It also gives you an idea of how quickly time is running out. Even better than this, it's simple to execute because all we have to do is animate the clock needle.
My first task was to create a clock. Now, I could very easily just create a rectangle and texture a clock onto it. But I got it in my head that I should make a real circle in the mesh. Writing the math for it is fun and perhaps in the future I can animate it a little bit. Anyways, using our friends sin and cos I created a circle mesh that has appropriate texture coordinates.
MeshGeometry3D mg3d = new MeshGeometry3D();
mg3d.Positions.Add(new Point3D(0, 0, 0));
mg3d.TextureCoordinates.Add(new Point(0.5, 0.5));

for (double d = 0; d <= 360; d += 5) {
   double x = 4.0 * Math.Sin(d / 180.0 * Math.PI);
   double y = 4.0 * Math.Cos(d / 180.0 * Math.PI);
   mg3d.Positions.Add(new Point3D(x, y, 0));
   x = x / 8.0 + 0.5;
   y = y / 8.0 + 0.5;
   mg3d.TextureCoordinates.Add(new Point(x, y));
}

for (int i = 1; i <= 360 / 5 + 1; i++) {
   mg3d.TriangleIndices.Add(0);
   mg3d.TriangleIndices.Add(i);
   mg3d.TriangleIndices.Add(i + 1);
}
Being a programmer who loves optimizing things, this routine makes me twitch a little bit. But it's only called once so I decided not to bother with making it faster. Basically the way I created this circle is like putting a whole pizza together by adding each individual slice. The first point I create is in the center of the circle, the other points make up triangles going all the way around. As you can see, it's pretty easy to create a circle mesh and it's kinda fun.
The next thing having to do with the clock is the needle in the middle. I created a very simple mesh with one triangle and put a rotation animation on it. All I have to do is rotate it around the Z-axis for the amount of time that the round will actually take. This was the easy part. The hard part is covered in the next section.
Difficulties
So far, I've covered lots of reason why I like WPF and how it makes 3D programming a ton easier. Now it's time to cover some of the stupid things that I wasted a lot of time on. This had to do with timing the rounds.
It's a pretty simple concept. After a certain amount of time, you want to end the game and move on. With the Windows Forms interface, all I had to do was create a Timer and listen for the elapsed event. When time ran out, I would call a method to end the round. The method call has to be made in the same thread as the GUI and not the timer's thread. No problem, just use InvokeRequired and Invoke.
You'd think something like that would be available in WPF, but I certainly couldn't find it. I was unable to find a way to get a method call to occur in the GUI thread. Alright, I said, what other options do I have? Well, the animations are most likely running in the GUI thread. Maybe there's an event that fires that indicates that those have finished. Sure enough, there's a Completed event that I can subscribe to. Great! Now I don't even need a separate timer, I can just signal the end of the round from the actual clock animation. Plus there's no synchronization issues.
But all was not well. My strategy was that when the round ends, I show a message box. When the user clicks OK, I move on to the next round. It's a pretty simple concept. So, I implemented that, but I noticed that after I clicked OK, the timer needle jumped ahead. I spent days trying to figure out why it was doing this. Finally, I came to the only logical conclusion left:
While the message box is up, WPF believes that whatever was going on in the GUI should still be going. So, the time that elapses from when the message box appears and when the user clicks OK is actually used to "fast-forward" the animations in the GUI.
Don't believe me? Try it yourself. This is one of those insane errors that can have you chasing your tail for days. Not to say that it's an error in WPF, they probably intended it that way. But when writing software it's very frustrating to have things happen that defy the logic you wrote into the code.
To counter this, I created another animation on the clock needle to wind it back to the start position. This animation is designed to take the exact amount of time that had elapsed between when the message box popped up and when the user clicked OK. When I get a notice that that animation has completed, then I move on to the next round. To the user, it's seamless, because they never see WPF "fast-forwarding" time on them.
Summary
I started out with trying to find a way to show how my DmRules library could work in an application. Being interested in 3D programming since I was kid, I jumped at the chance of being able to use Windows Presentation Foundation to do my 3D programming. This little game should introduce you to two things that I think are going to make programming for Windows Vista a lot of fun.
History
- 0.1 : 2006-07-08 : Initial version
This member has not yet provided a Biography. Assume it's interesting and varied, and probably something to do with programming.


 General
  News
News  Suggestion
  Question
  Bug
Bug  Answer
  Joke
Joke  Praise
  Rant
Rant  Admin
Admin 


 Good one!