Introduction
This article describes how to create an ASPX project in such a way that the source code is easily managed and distributed. It is aimed at developers writing applications for use on a corporate intranet, though it would be equally appropriate for other scenarios.
Background
When creating a Visual Studio project, it is important that all the project files are stored in a single location from where it can be backed up, copied to a live server, or just copied to be reused. I recently helped a junior programmer create an ASP.NET project. While showing him the ropes, I realised how overwhelming it can be the first time.
Here is a description of what VS does when you create a new project, and how you can manipulate the files to make the project more manageable.
Procedure
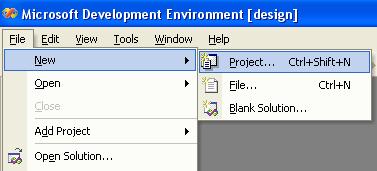
Once you have opened VS.NET, go to File - New - Project.

For "Project Type", select "Visual C# Projects", and for "Template", select "ASP.NET Web Application". For "Location:", change only the name of the application (not the location itself, i.e., "http://localhost/Test_App").

VS will now create a solution with the same name as your project as well as your project and also list it in IIS (Internet Information Services). In the “Solution Explorer” pane you can see your application with “Webform1.aspx” selected. We are going to make this form our home page (the first page that opens when you navigate to this application). In the “Properties” pane, change the Form name to something like "Test_App_Index.aspx" - Save the solution and close VS.
VS now saves your application under the default web location: “C:\Inetpub\wwwroot\Test_App”, but the solution file is saved in the VS default project directory. In my case: “My Documents\Visual Studio Projects” The location of this default directory can be found in VS under “Tools - Options” Then “Environment - Projects & Solutions”.

This is where our problems start:
- We now have a web application saved under “Inetpub\wwwroot” and thus listed in IIS. This means that your application is now available via a web browser.
- We have a solution file that is not saved in the same directory as the application..
What we want to do is to group all the relevant files of our project together in a location where we have better control over our application’s web presence.
The first thing we want to do is to copy our project folder to a location convenient to us. To do this, in Windows Explorer go to "C:\Inetpub\wwwroot" and find your project folder (Test_App). Copy it to the desired location and rename the folder if you like. In order to keep things organised, it is advisable to create a root folder (Test_App) and a subfolder (Interface) that will contain the User interface documents (i.e., everything that was in "C:\Inetpub\wwwroot\Test_App").

My file structure now looks like this:

The next step is to remove the initial instance of our project from IIS and replace it with the one in the directory we have just created.
So open IIS and delete the project. (IIS can be found by right clicking on “My Computer” and then selecting “Manage”. IIS is located at the bottom under “Services & Applications”.) This will also delete the project from "C:\Inetpub\wwwroot". Close IIS.

In Windows Explorer, go to our folder and “web share” it. You can use any name, but then you will have to edit the project file, so rather just stick with the name you used right in the beginning (“Test_App”).
Note
The folder you want to share is the folder containing the project files, not the root folder. In my case “
Interface” and not “
Test_App”. Remember that my folder structure looks like this: “
C:\Test_App\Interface”.

In Windows Explorer, navigate to the VS project folder. (Remember the path to this directory can be found in VS under "Tools/options/Projects & Solutions".) Mine is in “My Documents\Visual Studio Projects”. Delete the project folder (“Test_App”) from the "Visual Studio Projects" directory. This will delete the Solution that was automatically created by VS when we first saved the project.

Open IIS again. You will see that our project is listed here again. This is because we “Web shared” the containing folder. Right click on our project and select “Properties”. On the "Virtual Directory" tab, “Remove” and then “Create” the "Application name:".

Now go to the "Documents" tab and remove all documents from the list, and add only your default page name ("Test_App_Index.aspx").

Note
If you are going to capture the user's network ID (Windows user name) you also have to go to the "Directory Security" tab, click "Edit" and remove the "Anonymous access" tick at the top of this tab. At the bottom of the same tab, make sure "Integrated Windows authentication" is ticked.
In Windows Explorer, navigate to your project folder. Double click the ".csproj" file to open the project in VS. This will again create a solution, but in the current directory.

In VS, in the “Solution Explorer” pane, right click the web form “Test_App_Index.aspx” and select “Set As Start Page”. Save the Solution by clicking on the "Save All" icon (Toolbar Left top) Or press Ctrl+Shif+S.

In future when you want to open the project, double click the “.sln” file in order to open the whole solution in VS.

There you have it! You now have all your project files together in one known location. If you need to add any other files to your project (like graphics or existing .html or .aspx pages) you can copy them to this location and then add them to your project/solution. This way you keep everything neat and manageable.
History
This member has not yet provided a Biography. Assume it's interesting and varied, and probably something to do with programming.
 General
  News
News  Suggestion
  Question
  Bug
Bug  Answer
  Joke
Joke  Praise
  Rant
Rant  Admin
Admin 


