|
| Author | Erik Brown | | Title | Windows Forms Programming with C# | | Publisher | Manning Publications | | Published | April 2002 | | ISBN | 1930110286 | | Price | US 49.95 | | Pages | 752 |
|
Chapter 3 Menus
Menu bars provide a good starting point for our discussion in
this part of the book. Menus provide a convenient way to group similar or
related commands in one place. Most users are familiar with the menu bar
concept and expect standard menus such as File, Edit, and Help to appear in
their applications. Even novice computer users quickly learn that clicking a
menu on the menu bar displays a dropdown list of commands.
Menus became popular on Windows applications in the late 1980s,
following their success on the Apple Macintosh. Prior to menus, users had to
cope with a wide array of interfaces offered by desktop applications. The
function keys still found at the top of computer keyboards were developed in
part as a standard way to access common functions in an application, and some
programs even went so far as to provide a plastic template that sat on top of
these function keys to help users remember the available commands.
Perhaps because of this history, many developers take the
usefulness and popularity of menus for granted and do not spend sufficient time
laying out a consistent, usable interface for their application. While
graphical elements like menus, toolbars, and other constructs make applications
much more friendly, this is not an excuse to ignore good user design and rely
on customers to become “experienced” to make effective use of your interface.
Well, if that little lecture doesn’t get your creative juices
flowing, then nothing will. Back in .NET land, Visual Studio .NET provides a
rather intuitive interface for the construction of menus that does away with
some of the clunkiness found in earlier Windows development environments from
Microsoft. No more dealing with menus in one place, the application in another
place, and the menu handlers in a third place.
This chapter will cover the following aspects of menu creation
and handling:
- Defining different types of menus.
- Creating and modifying menus and menu items.
- Handling menu events.
- Handling multiple menus from a single event handler.
- Cloning (as in copying) menu items from one menu to another.
The examples in this chapter assume you have the code for
MyPhotos version 2.4 available, as developed with Visual Studio .NET in the
previous chapter. You can use this code with or without Visual Studio as a
starting point for the tasks covered here. If you did not work through chapter
2, download the project from the book’s web site at
http://www.manning.com/eebrown. Follow the links and instructions on the page
to retrieve version 2.4 of the application.
Before we add some menus to our application, we should talk
about the different kinds of menu structures and the classes that support them
in the .NET Framework. The traditional menu bar,sometimes
called the main menu or an anchored menu, is a set of menus shown horizontally across the top of most applications. The menus in a
typical menu bar display a dropdown list of commands when they are activated
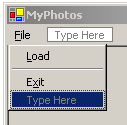
with the mouse or by a keyboard accelerator. Figure 3.1 shows an example of a
menu bar containing a File, View, and Help menu. The View menu is exposed, and
a submenu of the Image menu item is displayed as well.
![]()
Figure 3.1 A traditional
menu bar provides a set of menus across the top of an application
Another type of menu is a context menu, also called a popup menu or shortcut menu. A context menu is a menu that appears
in a particular situation, or context. Typically, a context menu contains a
set of commands or menus related to a specific graphical element of the
application. Such menus appear throughout the Windows environment at the
right-click of the mouse. For example, right-click the Windows desktop, any
program icon on your screen, or even the Windows start menu, and a context menu
will pop up with a set of commands related to the desktop display, the program,
or the start menu, respectively. Newer keyboards contain an accelerator key
designed to simulate this behavior at the cursor’s current location.
Context menus in .NET are typically associated with a specific
control, the contents of which may change to reflect the condition of the
control or type of item selected within the control. Note that context menu
items can also contain submenus similar to those appearing in the menu bar.
Figure 3.2 shows an example of a context menu associated with the main window
of the application.
![]()
Figure 3.2 A context
menu provides a set of commands or menus related to a specific portion of an
application.
All menus in .NET derive from the Menu class. This class provides the core capabilities required by all menus, such as the
parent menu, if any, and the collection of submenu items for the menu. The Menu class, summarized
in .NET Table 3.1, is abstract, meaning you cannot create an instance of it.
.NET Table 3.1 Menu class
The Menu class is the base class for all menus in the .NET
Framework. This abstract class is part of the System.Windows.Forms
namespace, and inherits from the System.ComponentModel.Component
class.
| Public Properties
| Handle
| Gets the window handle for the menu. Used as a back door
to special operations not supported by the framework.
|
| IsParent
| Gets whether this menu contains any MenuItem objects.
|
| MdiListItem
| Gets the MenuItem,
if any, that will display the list of MDI child forms currently open in the
application.
|
| MenuItems
| Gets the MenuItemCollection object that holds the list of MenuItem objects
attached to this menu, or null if no items are attached.
|
| Public Methods
| GetContextMenu
| Returns the ContextMenu
object that contains this menu, or null.
|
| GetMainMenu
| Returns the MainMenu
object that contains this menu, or null.
|
| MergeMenu
| Merges a given Menu
object into the current menu.
|
| Public Events
| Disposed (inherited from Component)
| Occurs when the component is disposed, such as when the Dispose method is called for the component.
|
You will note in .NET Table 3.1 that the Menu.MenuItems property contains a
collection of MenuItem
objects. This is an odd notion for object-oriented environments, since Menu is the base
class of MenuItem,
yet it uses this derived class as part of its definition. Such an arrangement
is not disallowed, and is useful in situations like this when an object should
contain instances of its own type.
Before we plunge into specific types and examples of menus, it
is useful to step back and consider the class hierarchy for the Menu class. A class
hierarchy is the set of classes from which a particular class is derived,
and gives some indication of the purpose and capabilities behind the specific
class. The class hierarchy for the Menu class is also interesting because it is all or part
of the class hierarchy for most Windows Forms controls. As you can see from
figure 3.3, there are three classes besides Menu in this hierarchy.
![]()
Figure 3.3 The Menu
class hierarchy includes the three classes behind all Windows Forms controls
The Menu
class derives from the Component
class, which derives from the MarshalByRefObject class, which derives from the Object class. All classes in C#, even internal types such as int and char,
implicitly derive from the object
class.[1]
In the .NET Framework, this class is equivalent to the Object class. We will discuss this
class in more detail in chapter 5.
The MarshalByRefObject
class is an object that must be marshaled by reference. Marshalling is a method of passing an item from one context so that it can be understood in
another context. A typical use for marshalling is in remote procedure calls
between two different machines, where each parameter of a function call must be
converted into a common format (that is, marshaled) on the sending machine so
that it may be interpreted on the receiving machine. In the .NET world,
Windows controls are MarshalByRefObject
objects since they are only valid in the process that creates them, and
can be used outside this process only by reference.[2]
The Componentclass is the base implementation of the IComponent interface. A component is an object that can exist within a container, and allows cleanup of
non-memory resources via the Dispose
method. This class supports the IDisposable interface as well the IComponent interface.
We’ll cover interfaces in chapter 5 as well, so don’t get caught up in the
terminology here. Since graphical controls exist within a Form window or other
container control, all Windows Forms controls ultimately derive from this
class.
The .NET Framework derives three menu classes from the abstract Menu to
support menu bars, context menus, and the menu items they contain.
- The MainMenuclass represents a
main menu for an application. MainMenu
objects contain a collection of MenuItem objects to display in the menu bar.
- The ContextMenu class represents a context menu associated with a specific control. ContextMenu objects
also contain a collection of MenuItem
objects to display when this menu pops up.
- The MenuItem class represents a menu item that appears within another menu. An instance of a MenuItem can contain
a collection of MenuItem
objects to appear as the submenu of this item. While an unrestricted number of
submenus are permitted, it is a good idea to keep such menu hierarchies limited
to no more than two or three levels. Too many submenu levels can be confusing
for users and are best avoided when possible.
We will discuss each class separately, beginning with the MainMenu class.
So, let’s do it. Looking at our MyPhotos application, it would
be nice to replace the Load button with a menu option. This will allow more
space in our window for the displayed image, and permit additional commands to
be added in the future related to loading images. As an added benefit, it
provides a nice example for this book, which is, of course, our ultimate goal.
Our new application using a menu bar is shown in figure 3.4. A
Load and Exit menu have been added to a File menu on the main menu bar. The
Load menu item will replace our Load button from the previous chapter. Notice
how these menu items are separated by a small line. Such a line is called a menu
separator. A View menu is also shown, which will be discussed later in
this section.
As you may expect, the menu bar will appear in our code as a MainMenu object. Menus
such as the File menu are represented as MenuItem objects contained within the MainMenu object. The
dropdown menus underneath the File menu are also MenuItem objects. This includes the menu
separator as well as the Load and Exit menu items.
![]()
Figure 3.4 Notice in
this File menu how the Load item displays Ctrl+L as its keyboard shortcut.
The steps to add the MainMenu object to our application are shown below. As
already mentioned, this book uses Visual Studio .NET in the examples. If you
are writing the code by hand and using the C# compiler on the command-line,
read through the steps and use the code inside or following the task
description as a model for your own program. Note that this and most other
tables at the beginning of a section change the version number in the program
as a way to track our progress throughout the book and as a link to the online
code at the book’s web site. If you recall, the version number is modified in
the AssemblyInfo.cs file of the project.
Before we add the menu, we need to remove the existing Load
button from the form.
Remove the Load button
Set the MyPhotos application version to 3.2.
|
| Action
| Result
|
| 1
| Remove the Load button from the form.
How-to
a.
Display the MainForm.cs file in the Windows Form Designer.
b.
Right-click the Load button.
c.
Select the Delete option.
Alternately, simply select
the button and hit the Delete key.
| Visual Studio automatically removes all generated code
related to the button from the InitializeComponent
method of the MainForm.cs file.
Note
When a control is deleted, the
declaration of any event handlers are removed, but the actual event handling
code, in this case our btnLoad_Click method,
must be removed manually.
We will remove this code later
in the chapter.
|
| 2
| Display the properties for the PictureBox control.
How-to
a.
Right-click the control.
b.
Select Properties.
Alternatively, click the
control and use the keyboard shortcut Alt+Enter.
| The property values for this control are displayed.
|
| 3
| Set the value of the Dock
property to Fill.
How-to
a.
Locate the Dock property.
b.
Display the dropdown window for this property.
c.
Click the center button.
| Clicking the center button as shown in the graphic sets the
value of the Dock property to Fill, so that the PictureBox control takes up the
entire display window of the form.

Note
When the Dock property is set to a value other than None, the Anchor property is automatically set to its default
value of Top and Left.
|
With the Load button gone, our way is now clear to move this
functionality into a menu bar. We continue the above steps and add a menu bar
to our form.
Create the main menu bar
|
| Action
| Result
|
| 4
| Display the Toolbox window.
How-to
a.
Click the View menu.
b.
Select the Toolbox option.
Alternately, click the
wrench and hammer icon on the left side of Visual Studio.
| A list of available controls is displayed.
|
| 5
| Drag a MainMenu object
from the Toolbox onto your form.
| A MainMenu object
called mainMenu1is added to your form. This object is
displayed in a new area called the component tray below the form where objects that may not have a physical presence in the window appear. Such
objects include timers, database connections, and main menus.
Note
An example of the component
tray showing the mainMenu1
object appears later in this chapter in figure 3.9 on page 99.
|
Let’s take a look at the source code generated by these actions
in the MainForm.cs window. If this window is not shown, right-click the mainMenu1 object and
select View Code. You will note that the Windows Forms Designer has added the mainMenu1 variable to
the MainForm
class.
private System.Windows.Forms.MainMenu mainMenu1;
The InitializeComponent method we discussed in
chapter 2 initializes this variable and attaches it to the form. An object for
this variable is created using the new keyword. As we mentioned in Part I, the this keyword refers
to the current class instance, just as it does in C++.
this.mainMenu1 = new System.Windows.Forms.MainMenu();
At the end of the method, the MainMenu object is attached to the form using
the Form.Menu property.
This property sets or retrieves a MainMenu object to appear as the main menu bar for the
application, and can be used to swap in and out different menu bars to
customize how the menu looks for specific situations. We will only use a
single MainMenu
object in this chapter. See .NET Table 3.2 for additional details on the MainMenu class.
this.Menu = this.mainMenu1;
Also notice in the code how the Anchor property setting for the PictureBox control
has been replaced by the Dock
property.
this.pbxPhoto.Dock = System.Windows.Forms.DockStyle.Fill;
.NET Table 3.2 MainMenu class
The MainMenu
class is a container class that holds a collection of MenuItem objects to appear as a menu bar
on a windows form. This class is part of the System.Windows.Forms
namespace, and inherits from the Menu
class. A main menu is assigned to a specific window using the Menu property in the Form class. See the .NET Table 3.1on page 72 for a list of members
inherited from Menu.
| Public Properties
| RightToLeft
| Gets or sets whether text displayed by the menu should use
a right-to-left alignment. This is useful when displaying a language such as
Hebrew or Arabic which reads from right to left.
|
| Public Methods
| CloneMenu
| Returns a new MainMenu
as a duplicate of the current menu.
|
| GetForm
| Returns the Form
object that contains this menu, or null
if this menu is not contained by a Form.
|
With a MainMenu
on our form to act as the menu bar, we can now add the menus that should
appear. Each menu is created using the MenuItem class. In this section we will
create the top-level File menu only. In the next section we will create the
dropdown menu that appears when the user clicks on this menu.
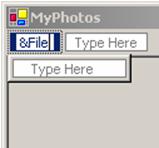
Create the File menu
|
| Action
| Result
|
| 1
| Edit the menu bar in the MainMenu.cs [Design] window.
How-to
Click the mainMenu1variable in the component tray of the window.
| An empty menu bar appears at the top of the form. The
space for the first top-level menu contains the words “Type Here.”
|
| 2
| Type in a top-level File menu as “&File.
| A File menu appears on the form.
Note
The ampersand (&) specifies the character, in this case F, to use as the access key for this menu. Such access keys are used with the Alt key. In our application, the File menu
can be displayed by clicking it or with the access key Alt+F.
|
| 3
| Modify the (Name) property
for this menu to be “menuFile.”
How-to
a.
Display the Properties window for the new File menu item.
b.
Click the (Name) entry.
c.
Enter the text “menuFile.”
| The (Name) setting
represents the variable name used for the object in the MainForm.cs source
code. Changing this value automatically changes all generated instances of
the variable in the source code to the new name.

Note
The string “&File” we
entered for the menu appears in the Text
property.
|
Your application now contains a File menu on the menu bar. In
the source code, the menuFile
variable is created as a private MenuItem object within the class.
private System.Windows.Forms.MenuItem menuFile;
The InitializeComponent method now contains
additional lines to initialize this menu and add it to our MainMenu object. The
relevant lines are extracted here.
private void InitializeComponent()
{
. . .
this.menuFile = new System.Windows.Forms.MenuItem ();
. . .
this.mainMenu1.MenuItems.AddRange(new
System.Windows.Forms.MenuItem[] { this.menuFile } );
this.menuFile.Index = 0;
this.menuFile.Text = "&File";
. . .
}
Note in particular how the File menu is
added to our mainMenu1
object by creating an array of MenuItem
objects with menuFile as
the only entry. This code also sets an Index property, which we will discuss in the
next section.
So far, we have added the main menu and inserted a File menu in
it. Next we will create the dropdown menu that appears when this menu is
clicked.
Create the File dropdown
menu
|
| Action
| Result
|
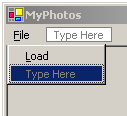
| 1
| Enter a Load menu item within the File menu. Use the text
“&Load.”
How-to
a.
Make sure the designer window is displayed.
b.
Click the File menu.
c.
Type in “&Load” below the File menu where it says Type Here.
| A Load menu appears as the first item in the dropdown list
for the File menu.
|
| 2
| Display the Properties window for the Load menu item and
set the following property values:
Settings
| Property
| Value
| | (Name)
| menuLoad
| | Shortcut
| CtrlL
| | Text
| &Load
|
| The modified properties are displayed in the Properties
window.
Note
The Shortcut property defines a keyboard shortcut, in this case Ctrl+L, that immediately invokes the menu as if it were
clicked, without actually displaying the menu.
The access key Alt+L for this
menu can be used to select this menu from the keyboard after the File menu
has been displayed
|
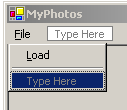
| 3
| Add a menu separator after the Load menu.
How-to
Enter a dash character ‘-‘ as the next menu item.
| A menu separator is added to the dropdown menu.
Note
By definition, menu separator in
.NET is a MenuItem with its Text property set to a single dash.
We will leave the (Name) of the separator as the
default value.
|
| 4
| Finally, add the Exit menu item.
Settings
| Property
| Value
| | (Name)
| menuExit
| | Text
| E&xit
|
| The File menu is now complete.
Note
Of course, the Windows keyboard
shortcut Alt+F4 can always be used to close the application. There is no
need to add this keystroke to our menu as it is imposed by the operating
system.
|
As you might expect, the code generated for the MainForm.cs file
uses MenuItem objects
to add this dropdown list to the File menu, with the objects initialized in the
InitializeComponent
method. The relevant code from the source file is shown here.
private System.Windows.Forms.MenuItem menuLoad;
private System.Windows.Forms.MenuItem menuItem1;
private System.Windows.Forms.MenuItem menuExit;
. . .
private void InitializeComponent()
{
. . .
this.menuLoad = new System.Windows.Forms.MenuItem();
this.menuItem1 = new System.Windows.Forms.MenuItem();
this.menuExit = new System.Windows.Forms.MenuItem();
. . .
this.menuFile.Index = 0;
this.menuFile.MenuItems.AddRange(new System.Windows.Forms.MenuItem[] {
this.menuLoad,
this.menuItem1,
this.menuExit});
this.menuFile.Text = "&File";
this.menuLoad.Index = 0;
this.menuLoad.Shortcut = System.Windows.Forms.Shortcut.CtrlL;
this.menuLoad.Text = "&Load";
this.menuItem1.Index = 1;
this.menuItem1.Text = "-";
this.menuExit.Index = 2;
this.menuExit.Text = "E&xit";
. . .
}
Some aspects of this code worth
highlighting:
1. Create File dropdown menu. As we saw for our main menu, the
items to appear under the File menu are added by constructing an array of the
desired MenuItem
objects and assigning them to the menuFile.MenuItems property. Note that this array does
not establish the order in which these items will appear. The display order is
established by the menu index assigned to each object.
2. Define keyboard shortcut. The Ctrl+L shortcut for the Load menu
is defined using the System.Windows.Forms.Shortcut
enumeration.
3. Create menu separator. This line creates our separator menuItem1 by setting
its Text property to a dash (-).
4. Set menu index. The Index property defines the zero-based position of the menu item within its parent menu. This position establishes the order
in which menu items are displayed. In our code, the dropdown list for the File
menu should display the Load menu, then a separator, and then the Exit menu.
This is done by setting Index
property for these objects to 0, 1, and 2, respectively.
Our code uses a few of the properties provided by the MenuItem class.
Other properties will be used as we progress through this and subsequent
chapters. An overview of the MenuItem
class appears in .NET Table 3.3.
.NET Table 3.3 MenuItem class
The MenuItem
class represents a menu within a MainMenu
or ContextMenu object, or a submenu of another MenuItem object. MenuItem objects are displayed to the user,
while MainMenu and ContextMenu objects simply establish a
container in which MenuItem objects
can appear. The MenuItem class
is part of the System.Windows.Forms namespace,
and inherits from the Menu class.
See .NET Table 3.1 on page 72 for a list of members inherited from this base
class.
| Public Properties
| Checked
| Gets or sets whether a checkmark appears next to the text
of the menu item.
|
| Enabled
| Gets or sets whether the menu item is enabled. A disabled
menu is displayed in a gray color, cannot be selected, and does not display
and child menu items.
|
| Index
| Gets or sets the position of the menu item within its
parent menu.
|
| MergeOrder
| Gets or sets the value of the relative position for the
menu when it is merged with another.
|
| OwnerDraw
| Gets or sets whether Windows draws the menu (false) or the
application will draw the item (true). Used to create custom menus.
|
| Parent
| Gets the Menu object
that is the parent of this menu.
|
| RadioCheck
| If Checked is
true, gets or sets whether to display a radio button next to the menu instead
of a checkmark.
|
| Shortcut
| Gets or sets the shortcut key for this menu item.
|
| ShowShortcut
| Gets or sets whether to display the Shortcut setting when displaying the menu.
|
| Text
| Gets or sets the text to display for the menu. The
character following an ampersand (&) is used as an accelerator key.
|
| Visible
| Gets or sets whether to display the menu item.
|
| Public Methods
| CloneMenu
| Creates a copy of the MenuItem.
|
| MergeMenu
| Merges this menu with another MenuItem.
|
| PerformClick
| Generates a Click event
for this item.
|
| PerformSelect
| Generates a Select event
for this item.
|
| Public Events
| Click
| Occurs when the user clicks the menu or accesses it via an
accelerator or shortcut key.
|
| DrawItem
| Occurs when the OwnerDraw
property is true and a request is made to draw the menu item.
|
| MeasureItem
| Occurs when the size of the menu item is required before
drawing it.
|
| Popup
| Occurs before the menu item displays its list of child
menus.
|
| Select
| Occurs when the menu is highlighted using the mouse or
keyboard.
|
If you wish to see the application so far, compile and run the
code to view the File menu. You will notice that the menu bar contains only a
single item, which is perhaps a bit boring. We do not want a boring
application, so we will double the number of menus in our next section.
We have seen how to add simple menu items and menu separators,
so here we will do something different. Let’s add a menu with a submenu to set
how the displayed image should appear in the window. This will give us an
opportunity to cover checked menus as well. Figure 3.5 shows the View menu we
will create as it appears in Visual Studio.
![]()
Figure 3.5 Menus in
Windows Forms Designer are similar to their appearance in an application, with
the addition of a “Type Here” wherever a new menu item can be added.
The View menu and its single menu item Image are created
similarly to how the File menu was previously created.
Create the View menu
|
| Action
| Result
|
| 1
| Add a top-level View menu to the right of our existing File
menu.
Settings
| Property
| Value
| | (Name)
| menuView
| | Text
| &View
|
| A new MenuItem object
called menuView is created in
the MainForm.cs source code
private System.Windows.Forms.MenuItem
menuView;
This object is initialized in the InitializeComponent method as well.
private void InitializeComponent()
    {
      this.menuView
          = new System.Windows.Forms.MenuItem ();
      . . .
      menuView.Index = 1;
      menuView.Text = "&View";
      . . .
    }
|
| 2
| Underneath the View menu, add an Image menu item.
Settings
| Property
| Value
| | (Name)
| menuImage
| | Text
| &Image
|
| A new MenuItem called
menuImage is created and
initialized in the source code.
|
So far this is similar to our File menu. We continue by creating
the submenu to appear when the user clicks the Image menu.
Create the Image submenu
|
| Action
| Result
|
| 3
| Add the “Stretch to Fit” submenu item and assign its
properties.
How-to
Enter this menu to the right of
the Image item (not underneath it).
Settings
| Property
| Value
| | (Name)
| menuStretch
| | Text
| S&tretch to Fit
|
| The new menu appears in Visual Studio .NET as in figure
3.5. A new MenuItem is
created in the MainForm.cs source file as well.
private System.Windows.Forms.MenuItem
menuStretch;
. . .
|
| 4
| Add the “Actual Size” submenu item.
Settings
| Property
| Value
| | (Name)
| menuActual
| | Text
| &Actual Size
|
| These changes are reflected in the MainForm.cs source
code. In particular, the collection of menus in the menuImage submenu is initialized to contain our two new
values:
this.menuImage.MenuItems.AddRange(new
          System.Windows.Forms.MenuItem[] {
                  this.menuStretch,
                  this.menuActual});
|
The code generated in MainForm.cs for the View menu is very
similar to the code we looked at previously, so we will not discuss it in more
detail. Realize that all of our visible menus are MenuItem objects regardless of what level
they appear on. The View menu, the Image menu item, and the Stretch to Fit
submenu item are all objects of type MenuItem.
TRY IT!
Compile and run the application to see the menus in action.
Notice how the shortcut for the Load menu is displayed within the menu. Try
setting the ShowShortcut
property for this menu to false
in order to prevent this shortcut from appearing on the menu. Note that the
keyboard shortcut still works, the user is just not told about it in the menu
bar.
Sit back for a moment and think about what we have done here. If
you have used Visual C++ with MFC, you should realize that the secret macros
and magic interface files required by this environment are gone. In their
place are well-designed objects that can quickly and easily be used to create
arbitrarily complex menu structures.
If you have been following the examples with Visual Studio .NET,
also realize that you have not written any code thus far. This will change
when we add event handlers for our menus in the next section.
Of course, a menu is not very useful if you can’t make it do
something. In this section we’ll define some event handlers for our menus and
examine how these handlers work in more detail than we covered in chapter 2.
This section builds on the MyPhotos version 3.2 project constructed in section
3.2, or available on the book’s web site.
Events for Windows Forms controls can be added from the Windows
Forms Designer window, or in the Properties window. We will discuss each
method separately.
As you might guess, Visual Studio adds a Click event handler whenever you
double-click a menu control in the Windows Forms Designer. We already saw this
behavior for buttons in chapter 2. Let’s use this feature to add a handler to
the Load menu here.
Add Click handler for the Load menu
Set the application version number to 3.3.
|
| Action
| Result
|
| 1
| Display the MainForm.cs [Design] window.
|
|
| 2
| Add a Click
handler for the Load menu
How-to
a.
Click the File menu.
b.
Double-click the Load menu.
Note
This double-click method only
works for the Click event. We
will see how to add events more generally in the next section.
| A new event handler for the Load menu is added and the
cursor is placed in the MainForm.cs code window within the newly added handler.
protected void menuLoad_Click(object sender,
    System.EventArgs e)
{
}
The new handler is also registered as a Click handler for the Load button in
the InitializeComponent method.
menuLoad.Click += new System.EventHandler
      (this.menuLoad_Click);
|
| 3
| Copy the code from the now defunct btnLoad_Click into our new method and delete the old
method.
Note
Unless you removed it, the code
for btnLoad_Click should still
be present in your code. After copying this code, remove the method.
| This code is identical to the code used with our Load
button in chapter 2; it is just invoked via a menu rather than a button.
protected void menuLoad_Click
     (object sender, System.EventArgs e)
 {
   OpenFileDialog dlg = new OpenFileDialog();

   dlg.Title = "Open Photo";
   dlg.Filter = "jpg files (*.jpg)"
       + "|*.jpg|All files (*.*)|*.*";

   if (dlg.ShowDialog() == DialogResult.OK)
   {
     try
     {
       pbxPhoto.Image = new
           Bitmap(dlg.OpenFile());
     }
     catch (Exception ex)
     {
       MessageBox.Show(
           "Unable to load file: "
               + ex.Message);
     }
   }

   dlg.Dispose();
 }
|
Since this code matches the handler we discussed in chapter 2 for
the Load button, we will not discuss it again.
Compile the application to verify that the Load menu now works as
expected. You should be able to load a new image using the menu bar via the mouse,
using the accelerator keys Alt+F and then Alt+L, or using the keyboard shortcut
Ctrl+L.
Double-clicking our controls in Visual Studio is fine when we
wish to add a Click event
handler for a menu item. What about other types of events? The .NET classes
provide a rich set of events for everything from keyboard presses and mouse
clicks to redrawing a control. To support these and other events, Visual
Studio provides a more generic way to add an event handler than the
double-click we have used thus far.
This is done using the Properties window. We have seen how this
window provides the list of properties associated with a specific control. It
also provides the list of events for each control and allows new event handlers
to be added. Figure 3.6 shows the relevant elements of the Properties window.
Note the small toolbar buttons between the object dropdown and the list of
object members. The Properties button is the default and displays a list of
properties for the current object. If you click the Events button, this
windows displays a list of events. The events for the menuExit object are shown in the
figure.
![]()
Figure 3.6 The
Properties window displays both the properties and events for the controls on
the form.
As you can see in the figure, our menuExit object supports six different
events. These correspond to the events for the MenuItem class shown in .NET Table 3.3 on
page 82. To the right of these events, the registered event handlers are
displayed, with a menuExit_Click
method shown as the handler for the Click event.. To add a specific type of
event, you simply need to double-click the entry in this window. We will illustrate
this by defining a Click
event handler for the Exit menu.
Add Click handler for the Exit menu
|
| Action
| Result
|
| 1
| Display the Properties window for the Exit menu.
| The available properties for the menuExit object are shown.
|
| 2
| Click the Events button in the Properties toolbar.
| The events for the menuExit
object are displayed.
|
| 3
| Double-click the Click item listed in the window.
| A menuExit_Click
handler is added to the menuExit object.
The new method is registered and defined in the InitializeComponent
method, and the cursor is located within this new method.
protected void menuExit_Click
        (object sender, System.EventArgs e)
  {
|
| 4
| Call the Form.Close
method within this handler.
|
this.Close();
 }
Note
Note how the code for this event
handler is split across steps 3 and 4 of this table. We will do this
throughout the book as a convenient way to discuss different sections of code
for a single member of a class.
|
The Form.Close
method is used to exit the application. This method closes the associated form,
or the entire application if the form was the startup form for the application.
As you may have noticed in chapter 1, the Application class provides an Exit method that we could use instead here. This call forces all message loops started by Application.Run
methods to exit, and closes any forms associated with them. Usually, this will
cause the application itself to exit as well.
Usually, but not always. Programmers familiar with threading
will realize that other threads may be created that do not use the Application.Run
method. Such threads are unaffected by the Application.Exit call, so that even though no
windows may remain open after a call to Application.Exit, the application itself can
still be working away. As a result, the application will not, in fact, exit.
Because of this behavior, the use of the Forms.Close method is your best bet
when trying to exit the application. As a result, we use this method in the Click handler for our
Exit menu.
TRY IT!
Once again, compile and run the code to verify that the Load and
Exit menus now work. If you feel like experimenting, modify the Enabled and Visible properties for the Exit menu to see how they
change the behavior of this menu.
Our handling of the File menu is now complete. Next we will
handle the items in the View menu.
The File menu is fairly straightforward as menus go. There is a
Load item, a separator, and an Exit item. Each menu item raises a Click event when
pressed, and the associated event handler performs the appropriate operations.
Our View menu will handle things a little differently. This menu contains a
single Image menu, which in turn points to a submenu with two entries. When a MenuItem object
contains a non-empty collection in its MenuItems property, the Click event for that
menu is not raised. This makes sense, as the submenu automatically pops up
when the parent menu is clicked, making a Click event a bit extraneous.
This is the case for the File and View menus on the menu bar.
These menus never raise a Click
event. The same applies to the Image menu, since it is the parent of
the MenuItem objects
menuStretch and
menuActual. Rather
than Click events,
menus such as the Image menu raise a Popup event just before their submenu is displayed. This
permits an event handler to modify the contents or appearance of the submenu as
dictated by the application. An example of this type of handler can be found
in the Windows operating system. Display the My Computer window and look at
the File menu. The contents of the File menu changes depending on what type of
file is currently selected.
In .NET,
Popup events can be associated with any MenuItem or ContextMenu object that contains a collection
of MenuItem objects
in their MenuItems
property.
In this section we will use a Popup event associated with the Image menu to
control how our two submenu items appear when displayed. Before we do this, we
will need a Click event
handler for our submenu items.
The submenu for the Image menu item pops up whenever the Image
menu is clicked. Our submenu items are selected by the user to control how the
image should appear in the window. To implement this behavior, we will alter
the SizeMode
property of our PictureBox
control depending on which menu was selected. The SizeMode values for these menus are as
follows:
The SizeMode settings for the Image submenu items
| MenuItem
| SizeMode Setting
| Description
|
| Stretch to Window
| StretchImage
| As we have already seen, this value causes the image to be
stretched or shrunk to exactly fit the display area.
|
| Actual Size
| Normal
| This displays the actual image data in the display area
with the upper left corner of the image in the upper left corner of the
display area.
|
One way to implement this behavior would be to handle the Click event for each MenuItem in the above
table, and modify the SizeMode
setting appropriately in each handler. A fine idea, but not our approach.
Instead, this is a great opportunity to see the power of event handlers in
.NET, not to mention lay the groundwork for some features we will explore later
in this chapter and in other chapters.
For our implementation, we will use a single event handler for
both MenuItem
objects. This handler will also be employed when we discuss context menus
later in the chapter, and will ensure consistency between our menu bar and
context menu as we add more features in future chapters. To facilitate this
amazing behavior, we will define a new structure to hold the SizeMode value
depending on the Index
setting of the menu.
Define array for SizeMode settings
Set the application version to 3.4.
|
| Action
| Result
|
| 1
| Locate the MainForm
constructor in the MainForm.cs window.
|
|
| 2
| Add a private array of PictureBoxSizeMode
values called modeMenuArray
just before the constructor.
|
private PictureBoxSizeMode[] modeMenuArray =
{
PictureBoxSizeMode.StretchImage,
PictureBoxSizeMode.Normal
};
Note
To enter the comment preceding
the array definition, type in three slashes (///)in
Visual Studio and it will automatically expand to a <summary> comment
block.
|
| 3
| Add a private integer nSelectedImageMode
after the array.
| private int
nSelectedImageMode = 0;
Note
This variable will hold the
currently selected display mode for the image.
|
With these variables available, a Click handler for both the menuStretch and menuActual
menu items can now be implemented. One possible implementation for this
handler would is shown below:
protected void menuImage_ChildClick (object sender, System.EventArgs e)
{
if (sender == (object)menuStretch)
{
}
else
{
}
}
This implementation uses the sender
parameter provided to the handler to identify which menu was selected. This is
an excellent idea and would work just fine. Because all classes ultimately
derive from object,
you can compare the sender parameter to your window control variables in order
to identify which control raised the event. This is a common tactic used to
handle a set of menus with a shared implementation.
In order to provide even more flexibility, we will favor an
implementation that is not based on a comparison such as that shown above.
This will allow us to modify our menus without the need to modify the code for
this handler.
If you recall, the order of the menus within the parent menu menuImage is set using
the Index
property. The value of this property can be used as an index into the modeMenuArray
variable to locate the proper SizeMode
value.
Since our handler is not specific to any one item, we will call
the handler menuImage_ChildClick.
Let’s create the code required before we discuss this further. This code
continues the previous steps that created the variables used by this handler.
Add shared Click handler for Image submenu
|
| Action
| Result
|
| 4
| In the MainForm.cs [Design] window, add a Click event handler for the Stretch
to Fit menu called menuImage_ChildClick.
How-to
a.
Display the Properties window for the Stretch to Fit menu.
b.
Click the Events button to show the list of events.
c.
Click in the space to the right of the Click item.
d.
Enter the handler “menuImage_ChildClick” by hand.
e.
Press the Enter key.
| 
The new method is registered with the menuStretch object in the InitializeComponent method of the MainForm.cs
source file:
  menuStretch.Click +=
      new System.EventHandler (
            this.menuImage_ChildClick);
The MainForm.cs code window is shown with the cursor at the
beginning of this new method.
protected void menuImage_ChildClick
     (object sender, System.EventArgs e)
 {
 }
|
| 5
| Add this method as the Click
handler for the Actual Size menu as well.
How-to
a.
Display the events for the Actual Size menu.
b.
Click to the right of the Click item.
c.
Click the down arrow.
d.
Select the menuImage_ChildClick
event handler from the list.
Note
This down arrow is shown in the
graphic for the prior step., Clicking this arrow displays a list of possible
event handlers from your code.
| The selected handler is registered with the Actual Size
menu in the InitializeComponent method
of the MainForm.cs source file.
menuActual.Click +=
     new System.EventHandler (
           this.menuImage_ChildClick);
|
We now have one event handler that receives the Click event for two
different menus. Note how the handler is registered for each menu in the same
way as our previous Click
handlers.
Continuing with our previous steps, we can now implement this
handler.
Implement the menuImage_ChildClick event handler.
|
| Action
| Result
|
| 6
| First, make sure sender
is a MenuItem object.
|
protected void menuImage_ChildClick
      (object sender, System.EventArgs e)
  {
    if (sender is MenuItem)
    {
Note
Readers familiar with C# will
recognize that this implementation requires two casts, one to perform the is statement, another to cast the sender parameter to a MenuItem object. This can be
avoided using the as keyword,
which we will discuss later in the book.
|
| 7
| Create a local MenuItem
instance from sender.
|
MenuItem mi = (MenuItem)sender;
|
| 8
| Set the SizeMode
property to the appropriate array value based on the selected menu.
|
nSelectedImageMode = mi.Index;
pbxPhoto.SizeMode = modeMenuArray[mi.Index];
|
| 9
| Invalidate the PictureBox
control to re-display the image.
|
    pbxPhoto.Invalidate();
    }
  }
|
The code for the menuImage_ChildClick handler
introduces a few new concepts. We duplicate it here so we can discuss it in
more detail.
protected void menuImage_ChildClick (object sender, System.EventArgs e)
{
  if (sender is MenuItem)          |#1
  {
    MenuItem mi = (MenuItem)sender;      |#2

    nSelectedImageMode = mi.Index;      |#3
    pbxPhoto.SizeMode = modeMenuArray[mi.Index];  |#3

    pbxPhoto.Invalidate();          |#4
  }
}
Let’s look at the new concepts introduced here:
1. Verify sender is MenuItem object. In C++, there is no built-in
mechanism for knowing if a variable is a certain type, making it difficult to
safely downcast a variable from a base class (such as object) to a derived class (such as MenuItem). In C#, the
is keyword provides a way to check that an object (such as the sender parameter) is in fact a specific type
(in this case, a MenuItem
instance).
2. Downcast sender to MenuItem instance. The key to this code is the ability to treat sender as a MenuItem object. The Index property is not available in the object class, so we
need to convert our variable of type object into a variable of type MenuItem. Since the conversion is
“down” the class hierarchy, such a conversion is called a downcast. In
C++ such operations are dangerous since object might be something other than the
target class type. In C#, downcasting is much safer. In fact, an illegal cast
of an object throws an exception of type InvalidCastException. We verify that sender is a MenuItem
object to ensure that an exception will not be thrown here.
3. Assign new display settings. The Index parameter is used to set the currently
selected mode as well as an index into the modeMenuArray variable for determining the
new value for the SizeMode
property.
4. Invalidate PictureBox control. Windows Forms controls
support the Invalidate
method. This method invalidates the contents of the control so that the system
will redraw, or paint, any changes onto the screen. In this case, we want the
control to redraw the image with our new SizeMode setting.
Look carefully at what we have done here. This code is based
solely on the index of the menu within its parent. We can add new menu items
to our View menu or even use an alternate menu with a similar list of items.
As long as we keep our modeMenuArray
up to date, this method will reset the SizeMode property appropriately.
TRY IT!
Compile your code and verify that the PictureBox.SizeMode property is altered when you select a
different submenu item. The PictureBox.SizeMode
property contains more than just the two settings we use here. Add a menu item
to the Image menu called menuCenter
with text Center Image to handle the CenterImage
value for this property. You will need to add a new MenuItem to the menuImage
menu and modify the modeMenuArray
definition to include this new value.
We now have a Click
handler that will modify the way an image is displayed based on the
user’s selection. Unfortunately, our interface does not indicate the current
display mode in the Image submenu. We will address this problem in the next
section by adding a check mark to the current value.
Users appreciate feedback on the current settings for an
application. Our current interface does not yet do this. The user has to
understand the possible displays modes in order to know what is currently
selected and to choose a different setting. A nicer interface would somehow
highlight the current selection in the menuImage submenu. This would immediately
indicate what mode is currently displayed, and help our user make a more
informed selection.
If you look at the MenuItem class, there is a Checked property that, when true, will display a
check mark next to the menu. This property could be set whenever the selection
is modified, and our user would see the appropriate feedback. Of course, as
our program changes, there might be other commands or user interactions that
alter the display mode of the image. A better approach would ensure that the
display modes are checked or unchecked as they are displayed to the user. This
approach is more robust in the face of future changes, creating an application
that users, documenters, and testers will appreciate for years to come.
The Popup
event is designed for just this purpose. This event occurs just before a
submenu is displayed, so that its appearance or contents can be modified and
then immediately displayed to the user. In Visual Studio, a Popup event handler
is added from the Properties window much like we added a Click event in the
previous section.
Implement a Popup handler for Image menu
|
| Action
| Result
|
| 1
| Add a Popup event handler for
the Image menu.
How-to
a.
Display the events for the Image menu in the Properties window.
b.
Double-click the Popup
entry
| A Popup event
handler is added for the menuImage object.
The beginning of this code is shown here:
protected void menuImage_Popup
     (object sender, System.EventArgs e)
 {
|
| 2
| Verify that the sender is a MenuItem
object.
|
if (sender is MenuItem)
 {
|
| 3
| Determine if an image has been loaded into the application.
|
bool bImageLoaded
    = (pbxPhoto.Image != null);
|
| 4
| Set the Enabled
and Checked properties for
each submenu item.
|
    foreach (MenuItem mi in
                 ((MenuItem)sender).MenuItems)
    {
      mi.Enabled = bImageLoaded;
      mi.Checked
        = (this.nSelectedImageMode == mi.Index);
    }
  }
}
|
Our new handler downcasts the sender object to a MenuItem instance
similar to the menuImage_ChildClick
handler we already discussed. The handler is repeated below so we can note a
few points in the code.
protected void menuImage_Popup (object sender, System.EventArgs e)
   {
     if (sender is Menu)
     {
       bool bImageLoaded = (pbxPhoto.Image != null);    |#1

       Menu parentMenu = (Menu)sender;
       foreach (MenuItem mi in parentMenu.MenuItems)        |#2
       {
         mi.Enabled = bImageLoaded;
         mi.Checked = (this.nSelectedImageMode == mi.Index);
       }
     }
   }
Note that the parentMenu
variable here could be defined as a MenuItem object. The Menu type is a base class and allows our
handler to accommodate other Menu
types in the future. In addition, a couple C# keywords we have not seen before
are worth a special mention.
1. Determine if an image is loaded. Unlike C and C++, C# has a
built-in boolean type called bool. As a result, boolean
expressions such as the one here evaluate to true or false, rather than 0 or 1 as in C. In this
case, the bImageLoaded
variable will be set to true
only after an image has been assigned to the Image property of the pbxPhoto object.
2. Iterate over each submenu item. In addition to the for loop used in C
and other languages, C# also defines a foreach loop. A foreach loop iterates
over the objects in an array or other container object, with the advantage that
you don’t have to worry about the starting or ending index, or whether the
container is empty. The language ensures that each entry in the given
container is passed to the loop code. In this case, the loop executes for each
MenuItem
contained in the given menuImage
menu. Within the loop, each MenuItem is enabled only if an image has been loaded, and
a check mark is set using the Checked
property based on whether the index of the menu item matches the
selected image mode.
You may also notice that there is nothing in this handler to
indicate that these menu items are part of a specific menu structure. This
will be useful in our upcoming discussion on context menus.
Compile and run the application to verify that the menus work
correctly, and the display mode of the image changes depending on the menu
selection. Figure 3.7 shows the application with an image displayed in Actual
Size mode.
![]()
Figure 3.7 Our Actual
Size display mode only shows a portion of the image. The window must be
resized to view more.
Unfortunately, this figure reveals another problem with our PictureBox control.
In the figure, the image is larger than the display area, but there is no way
to see the rest of the image without resizing the window. While this is
possible when the image is small enough, a high-resolution image may contain
more pixels than our screen. Ideally, the application should display scroll
bars here. Since the PictureBox
control does not support scroll bars, this is not possible.
You may be wondering about a book that teaches you how to build
an application that doesn’t quite work, and you should. Be patient until
chapter 7, where we will get rid of our not-quite-right PictureBox control in order to fix
this problem.
TRY IT!
Okay, I admit this
has nothing to do with our application. Still, if you want to have fun with a
Popup event, add a new menu menuCounter
at the bottom of the View menu called “Counter” and insert a single menu
called “Popup” in its submenu. Define a Popup
event for the menuCounter menu
(which Visual Studio will call menuCounter_Popup).
In this handler, dynamically create a new MenuItem
object and add it to the end of the menuCounter
submenu. Set the Text property to your new menu to “Count #,” where #
is the number of pop-ups that have occurred on your new menu. To do this, add
a static integer popupCount to
the MainForm class to track the number of pop-ups.
The lines to create the new menu in your Popup handler
will look something like the following.
MenuItem mi = new MenuItem();
mi.Text = "Count " + popupCount.ToString();
menuCounter.MenuItems.Add(mi);
This example illustrates how easy it is to create controls on
the fly with the .NET Framework, and how a parent menu can change the contents
of its submenu using the Popup event
handler. This might be used, for example, to display a list of files most recently
opened by an application.
If all this makes no sense to you, download the code for this
TRY IT! from the book’s web site. Have a look at the menuCounter_Popup handler to see the code required.
This concludes our discussion of the main menu in our
application. Some of you may be disappointed that we did not look at
owner-drawn menus, such as menus that display an icon or other image in
addition to or instead of a text string. If this applies to you, skip ahead
and go read chapter 4. There we discuss owner-drawn status bar panels, which
use a similar mechanism to that required for owner-drawn menus. In the
meantime, the rest of us will move on to context menus.
While the creation of context menus requires a little extra
effort by a programmer, they also improve the usability of an application
greatly and should be seriously considered for any application. The ability of
a user to right-click a control and instantly see a list of commands is a
powerful mechanism that experienced users especially appreciate. Context menus
are typically associated with a specific graphical control, but can also be
brought up programmatically. As a result, context menus provide quick access
to commands immediately relevant to what the user is currently trying to
accomplish or understand.
Most controls in the System.Windows.Forms namespace have a ContextMenu property that specifies a ContextMenu object to associate with the control. Like the Menu property on Form objects, this setting can be changed
dynamically to allow different context menus to display depending on the state
of the control.
In this section we will add a context menu to our PictureBox control
that will match the contents of the View menu. The contents and behavior of
our context menu will be inherited from the View menu items. As you will see,
our careful handling of these menus earlier in the chapter will make processing
events for our context menu a snap. Figure 3.8 shows this context menu both
before and after an image has been loaded by the user.
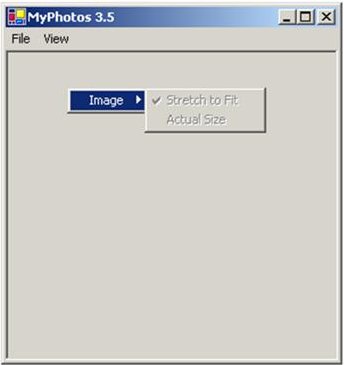
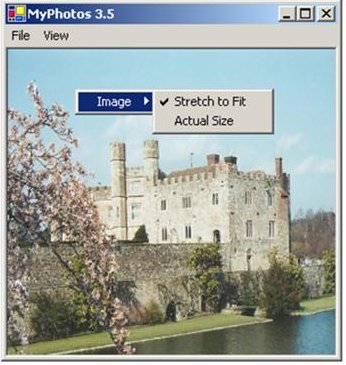
Figure 3.8 In both
the main View menu and the context menu, the display options are disabled
before an image is loaded.
We will begin by simply adding a new context menu to our
application and associating it with the pbxPhoto control. The next section will
discuss how to populate this menu with our existing menu items.
Add a context menu
Set the application version to 3.5.
|
| Action
| Result
|
| 1
| Add a ContextMenu object to the form in the MainForm.cs
[Design] window.
How-to
a.
Open the Toolbox window.
b.
Drag a ContextMenu object
onto the form.
| The new object appears below the form next to the existing MainMenu object.
Note
The Visual Studio window for
this step is a bit too big for this space, but is shown in figure 3.9.
|
| 2
| Rename the new context menu to “ctxtMenuImage.”
How-to
Use the Properties window to
modify the (Name) setting for
the object.
| The new name is displayed both below the form and in the
Properties window.
All instances of the ContextMenu
object in the source code MainForm.cs are renamed as well.
private System.Windows.Forms.ContextMenu
ctxtMenuImage;
|
| 3
| Associate this new context menu with our PictureBox control.
How-to
a.
Display the properties for the pbxPhoto
object.
b.
Locate the ContextMenu property.
c.
Click to the right of this entry.
d.
Click the down arrow.
e.
Select the ctxtMenuImage item
from the list.
| The down arrow for the ContextMenu
property displays the list of available ContextMenu
objects available in the form. In our case, only the ctxtMenuImage is shown.
In the InitializeComponent
method of our MainForm class,
the selected context menu is assigned to the property.
private void InitializeComponent()
{
  . . .
  pbxPhoto.ContextMenu = this.ctxtMenuImage;
|
When you are finished, your Visual Studio .NET window should look
something like figure 3.9. Visual Studio generates all the necessary source
code for these changes, excerpts of which appear in the steps shown in the
previous table.
![]()
Figure 3.9 <a
name=fig0309>The component tray below the designer window is used for
objects that do not have a representation on the form itself.
The .NET ContextMenu
class is essentially a container for the MenuItem objects that appear within the
menu. An overview of this class is shown in the .NET Table 3.4.
.NET Table 3.4 ContextMenu class
The ContextMenu
class is a popup menu that appears at the current cursor location when a user
right-clicks an associated object. This class is part of the System.Windows.Forms namespace, and
inherits from the Menu class.
Context menus are typically associated with a graphical control, and are
displayed automatically at a right-click of the mouse within the control. The Control class contains a ContextMenu property inherited by most controls that establishes a context menu to automatically
display for the control. See the Menu
class description in .NET Table 3.1 on page 72 for a list of inherited members.
| Public Properties
| RightToLeft
| Indicates whether text in the control should be displayed
right to left.
|
| SourceControl
| Gets the last Control
object that displayed this context menu.
|
| Public Methods
| Show
| Displays the menu at a specified position within a given
control.
|
| Public Events
| Popup
| Occurs before a context menu displays its list of child
menus.
|
We are now ready to add menu items to our context menu. Within
Visual Studio, you can click the ctxtMenuImage object in the designer window to display a
“Type Here” message on your form much like it did for the MainMenu object. You
can enter the items to include on this menu and create submenus and handlers as
we discussed earlier in the chapter.
We could use this feature to manually enter the contents of the
main View menu into our context menu. The behavior and events would have to be
set manually for each menu, and the menu would require updating every time the
View menu changes. While this could be done, it would be ideal if we could
simply copy the contents of the existing View menu into our new context menu,
and inherit the behavior and event handlers already established.
Fortunately, the MenuItem
class provides a CloneMenu
method to create a duplicate copy of a menu item. This permits us to very
quickly create our context menu with the identical behavior as the existing
View menu in the menu bar.
Clone the View menu items into the context menu
|
| Action
| Result
|
| 1
| Create a private DefineContextMenu
method at the end of the MainForm.cs source file.
|
  private void DefineContextMenu()
  {
|
| 2
| For each MenuItem
in the View menu, clone the menu and add it to our context menu.
|
foreach (MenuItem mi in menuView.MenuItems)
{
ctxtMenuImage.MenuItems.Add
(mi.Index, mi.CloneMenu());
}
}
|
| 3
| Call the new DefineContextMenu
method from the end of the MainForm
constructor.
|
  public MainForm()
  {
    . . .
    DefineContextMenu();
  }
Note
Unlike C++, C# does not require
forward declarations of functions. The method may be used at the beginning
of the file even though it is not defined until the end of the file.
|
In the implementation of DefineContextMenu, note how a foreach loop is used
to iterate over the items in the View menu. Each item is added to the ctxtMenuImage context
menu using the MenuItems
property of the class. The identical menu index is used for the new menu so
that the order of menus in the context menu will match the order used in the
View menu. This feature is important, since the foreach loop does not provide any guarantees
on the order in which MenuItem
objects are presented to the loop.
Compile and run this application to see our new context menu in
action. The CloneMenu
method provides a deep copy, in that it duplicates not only the Image
menu item, but its child menu items and all event handlers associated with each
menu. Because of our careful construction of the Popup and Click event handlers earlier in the chapter,
these handlers work without any changes.
It is important to realize that the MenuItem objects within our context menu are
not the same as those under the View menu. In particular, if you manually
modify an item (such as the menuStretch
menu), it will have no effect on the context menu. This may seem a bit
strange to programmers used to managing memory in their application, since
there are no pointers or other mechanisms required to track these new MenuItem objects.
The references to these objects from the context menu are tracked internally as
part of the garbage collection system, leaving us to concentrate on our next
subject instead of worrying about memory management.
That’s it for menus in .NET. In this chapter we showed how both
menu bars and context menus can be created, modified, and handled within the
.NET Framework by adding these controls to our MyPhotos application. We looked
at submenus, and showed how a single event handler can be used by multiple menu
objects.
The shared event handlers we created supported both our menu bar
as well as our context menu. The contents of our context menu were cloned, or
copied, based on the contents of the top-level View menu so that the behavior
and processing of both constructs were identical.
We also examined some C# keywords such as the is, in, and foreach keywords, as
well as the bool type.
We looked at the Properties window in Visual Studio .NET in more detail, and
used this window to add various events to our program.
Future chapters will rely on our knowledge of menus and the C#
and Visual Studio items we have learned here. The next chapter will take us to
the bottom of the application window, where the status bar normally resides.
More .NET
Throughout the book, short notes like this will discuss
concepts and examples beyond the scope of the text. This includes additional
classes worth investigating as well as sources for additional information
related to the topic at hand. One resource for menus specifically and .NET in
general is the GotDotNet web site at www.gotdotnet.com. This site is currently
managed by Microsoft, and bills itself as the “.NET Framework Community
Website.”
General information about the .NET Framework can also be found
on the Microsoft Developer Network at msdn.microsoft.com. These and other
Internet sites with information on .NET are listed in Appendix C.
[1]
It is worth noting that object,
as a class, is a reference type, whereas types such as int and char are
value types. When a value type is used as an object
instance, the value type is converted to a reference type via a process
called boxing. This process is totally hidden from the programmer, but does
have performance implications. See Appendix A for a discussion of this concept
in more detail.
[2]
The details of marshalling is totally hidden for most Windows Forms
applications, so you do not really need to know any of this. I hope you find
it somewhat interesting if not useful.
Copyright 2002 Manning Publications Company. Reprinted with permission
Erik Brown is the author of "Windows Forms in Action" and a veteran of three startup companies, all successful. He holds a B.S. and M.S. in Mathematics from Carnegie-Mellon University and currently works as an architect and project manager at Unisys Corporation.
When not in front of his computer, Erik can be found on and around the soccer fields of Northern Virginia, where he lives with his wife and two daughters.


 General
  News
News  Suggestion
  Question
  Bug
Bug  Answer
  Joke
Joke  Praise
  Rant
Rant  Admin
Admin 


