Introduction
If you are a regular user of Microsoft's Outlook, you may have come across the most useful "Rules and Alerts..." feature. This feature is a great tool to help you automatically manage and organize your emails. The power in this feature lies in the fact that it allows the user to define his or her own set of rules on how he/she would like to have things organized. This gives a great sense of freedom and configurability within an application for the user.
The wizard in Outlook may look very intuitive and easy, however I found that it is actually quite a bit of work to implement this in my own application and faced some challenges. So what I tried to do here is to make a framework where this same concept can be used in your own applications and applied to any type of business objects you are managing in the application. E.g. this could be a list of emails such as in Outlook, but also for managing other 'business domain types' such as Contacts, Transactions, Sales, Suppliers, Projects or any other business domain you can think of. The sky is the limit.
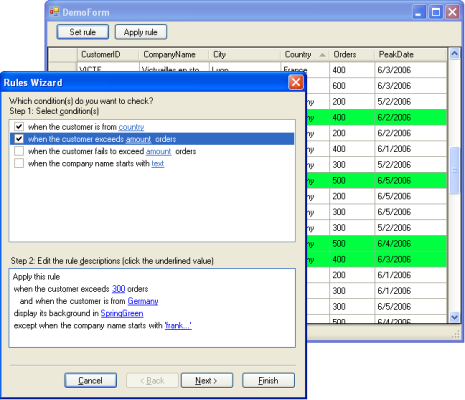
In the demo application I have added examples where it is possible to manage a list of customers using the Rules Wizard, simply by defining your own set of applicable rule conditions and actions to be performed that are relevant and tailored for your own application and business domain. I also included an example on how to simply save and load the rules to and from file.
Background
The Rules Wizard is modeled after Outlook's 'Rules and Alerts...' feature. It comes with some predefined GUI elements that will handle the wizard process for you (Rules.Forms namespace). These can be copied and pasted directly into your project without modifications. One sidenote here, is that the wizard form right now contains hardcoded texts in English. If this is a problem than you will need to either translate them or put those into a satellite assembly yourself.

Secondly it comes with a Rule business model (under the namespace Rules) that is used by the wizard. Basically a Rule can be broken down into several parts, I call them RuleParts. There are three parts: conditions, actions and exceptions. However because an exception is also a condition, I did not bother to make a separate class for that, in fact, it will also mean less work when defining your own conditions and actions. So the class model looks like this:
A RuleCondition specifies some kind of condition that needs to be met before a rule is executed. A RuleAction executes the actual action. The main difference is that a RuleCondition has an Evaluate method while the RuleAction has an Execute method.
Notice that RuleCondition, RuleAction and RulePart are all abstract classes. In order to use the framework you will only need to subclass from RuleCondition and RuleAction.
Using the code
First I will explain how the Rules Wizard needs to be setup before it can be used, and then how it is used. After that I will explain how you can implement your own rules.
Using the Wizard
First we need to setup the RuleMaster as I call it. The RuleMaster is not a rule that will be applied, but is merely the Rule that contains all available conditions, actions and exceptions that a user can choose from. It functions like a rule template.
Rules.Rule ruleMaster = new Rules.Rule();
ruleMaster.Conditions.Add(new RuleCondition1());
ruleMaster.Conditions.Add(new RuleCondition2());
...
ruleMaster.Actions.Add(new RuleAction1(this));
ruleMaster.Actions.Add(new RuleAction2(this));
...
ruleMaster.Exceptions.Add(new RuleCondition1();
ruleMaster.Exceptions.Add(new RuleCondition2();
...
As shown in this example, RuleCondition1 and RuleCondition2 and RuleAction1 and RuleAction2 are classes that must be defined in your own project and are not part of the framework. They are subclasses from RuleCondition and RuleAction respectively. Also notice that the same RuleCondition1 and RuleCondition2 are supplied to the list of conditions, but also to the exceptions list. Also notice the this parameter supplied to RuleAction1 and RuleAction2. Of course depending on the kind of action the RuleAction is to perform, you may want to supply it with additional parameters. Supplying it with the this object allows the rules to change something in the user interface when the action is executed. In the Demo I used some other techniques, however ultimately it is entirely up to the developer how to implement these classes.
Next, start the wizard to allow the user to setup a new rule:
Rules.Rule theRule = null;
Rules.Forms.RulesWizard wizard = new Rules.Forms.RulesWizard();
if (wizard.SetupRule(this, ruleMaster, theRule) == DialogResult.OK)
{
theRule = wizard.Rule;
if (theRule != null && theRule.ApplyNow)
ExecuteRule(theRule);
}
Once the rule has been setup by the user, we can execute it as in the following example:
private void ExecuteRule(Rule rule)
{
if (rule.IsComplete)
foreach (BusinessObject bo in BusinessObjectList)
rule.Execute(bo);
else
MessageBox.Show("This rule is not complete,
some fields have not been filled correctly.");
}
Notice here that I supply the rule.Execute with a 'BusinessObject'. This is merely an example. Obviously you are to fill in your own business domain objects used in the application.
Creating Conditions and Actions
This is the most challenging part when using this framework. In the demo I included a number of examples of conditions, actions and exceptions. I will shortly explain here how it works.
Each RuleCondition and RuleAction has a Value attribute. This Value attribute is to be set by the user at run time and specifies when a condition is met, or how the action is to be executed. When the user clicks on the value at run time the UpdateValue method is triggered in the subclass. This method requires supplying the user with a dialog to set the Value for the respective action or condition. This could be a text dialog, a color picker, a file dialog or any other type of input dialog. Note also that it is possible to set only one value per action or condition. E.g.:
public override bool UpdateValue(object sender)
{
ColorDialog cd = new ColorDialog();
if (cd.ShowDialog((Form)sender) == DialogResult.OK)
{
Value = cd.Color;
return true;
}
return false;
}
When a rule is executed, first the conditions are evaluated. Therefore you must implement the RuleCondition.Evaluate method. The Evaluate method gets an object as parameter. This will be your own defined business object. so you will need to cast it first, e.g.:
public override bool Evaluate(object o)
{
BusinessObject bo = (BusinessObject)o;
return (bo.Number == (int) Value);
}
When all conditions are met and there are no exceptions, the actions are executed one-by-one. Therefore the RuleAction.Execute method needs to be implemented as in this example:
public override void Execute(object o)
{
BusinessObject bo = (BusinessObject)o;
Move(bo.File, (string) Value);
}
Last but certainly not the least, each class requires implementing the Clone method. Cloning is used heavily in this framework so it is very important to implement this method correctly. When cloning you are required to copy at least the following members to the clone: TextFormat and Value. E.g.:
public override object Clone()
{
return new RuleActionX(this.TextFormat, this.Value);
}
What I personally prefer to do, is to make sure that the constructor of the condition or action class takes the basic parameters needed for cloning.
Saving and Loading Rules
When allowing users to configure their rules, there is one issue you would most likely run into: users want to be able to save their changes.
Therefore I also included an example in this demo on how you can (de)serialize your own rules, conditions and actions using the RuleSerializer. To make sure your classes can be serialized you need to take care of the following:
- All derived
condition and action classes must implement a parameterless constructor. - Declare your derived class for the
RuleSerializer class using an XmlInclude, so the serializer can make a correct XML mapping. XmlInclude any other types that your condition or action classes are using.
The RuleSerializer currently loads and saves the rule from and to an XML file. On startup of the demo the application will check if the rule.xml exists and load it.
Points of Interest
To conclude, when using the framework a lot of work is already taken out of your hands. You can concentrate immediately on implementing the business logic for the conditions and actions, without worrying about how the user is to manage the rules.
At first it took me a bit of puzzling at what the final class model would look like. Also I found when implementing the screens for the wizard, that the wizard as used in Outlook uses some fancy controls, i.e.. the ListView contains texts with hyperlinks. In order to simulate this functionality, I overrode the ListViewItem, and extended the ListView control with my own implementation of the RuleviewItem and painted the items ownerdrawn.
Also presenting the Rule details at the bottom of the wizard presented some challenges. I implemented it by extending a Panel control with the RuleViewDetails class. This class will dynamically add LinkLabels to the Panel.
History
- Version 1.0 of the
RulesWizard was published on the 7th of April, 2007.
Currently Herre Kuijpers is employed at Rubicon. During his career he developed skills with all kinds of technologies, methodologies and programming languages such as c#, ASP.Net, .Net Core, VC++, Javascript, SQL, Agile, Scrum, DevOps, ALM. Currently he fulfills the role of software architect in various projects.
Herre Kuijpers is a very experienced software architect with deep knowledge of software design and development on the Microsoft .Net platform. He has a broad knowledge of Microsoft products and knows how these, in combination with custom software, can be optimally implemented in the often complex environment of the customer.


 General
  News
News  Suggestion
  Question
  Bug
Bug  Answer
  Joke
Joke  Praise
  Rant
Rant  Admin
Admin 


 . How do I get a copy of v1 as an add-in to try as I'm not capable of coping with the code above?