Introduction
The major problem of programmers is that programming and repeating some routine operations in forms of projects on designing time is time consuming. If you are working on a project which has many forms that each one has some components, surely the programmer should make coordination between them.
For example form's caption,company's sign,text format (e.g Font setting) ,TextBox backcolor , etc. OR maybe a programmer needs to do some routine operations when the user try to focus on the textbox.
The Solution
Maybe your software company's strategy is that if the focused textboxs on all the forms be different from other objects (e.g by assigning different color) , it cause that the software's user attend better on forms.
For doing that, Normally you must add some TextBoxs as many as you need on each form ,then do the same operation for each of them on their OnEnter and OnLeave events. Maybe you say that you can write a function instead of doing all these operations and assign it to each events.So by doing that, you won't need to write a code many times .But I should say that its a good way just if the software hasn't give you the ability of building component. No doubt your company is working on more than one application project, not only one project. And surely it will follow the same rules in all forms of projects on designing time. So recontorlling and rewriting these functions will be so boring and time consumming.
By designing your necessary components,you can solve this kind of problems.
Building a new Component
in this article ,we are going to design a special TextBox that have some features more than its usual ones.
For making a new component ,follow these steps:
Firstly,its better to assign a name to your new component. we name it NikTextBox.
Start Steps: Creating a Class Library
Step 1. Create a new Class Library Project and name it NikComponents.
Step 2. Add the base components and others (that should be used in new component) to this project. So right click on References in Solution Explorer windows , then select Add Reference. When the list of references is opend, then add System.Windows.Forms and System.Drawing to your project's references list.

Step 3. Then add a new class to your project and name it as NikTextBox.
<pre>[ToolboxItem(true)]
public class NikTextBox : System.Windows.Forms.TextBox
{
public NikTextBox()
{
}
}
As you can see, we used ToolboxItem(true) keyword before the class,that indicates this component will be appeared in Toolbox. Meanwhile writting System.Windows.Forms.TextBox (is called base class) in the front of class name could means that our new component will inherit all properties and events of System.Windows.Forms.TextBox component (inheritance is one of the most important feature of object oriented programming).
public NikTextBox() is the class constructor that will be called once the class objects be created.
Intermediate Steps: Defining your necessary Properties
Now it is the time of defining special properties for our new component.
Step 4. Suppose we are going to design this component to let programmer to select the model of editing text in this edit control: OverWrite or Normal(Not overwrite). When it is on 'OverWrite' model, then each character that will be entered to its text will be overwrited on its perior text. So this component should has a property that we named as OverWrite and has boolean type value (True or False). This kind of component could be used for the textboxs that have date format.
In this case, we add follow code to the class body:
private bool _overWrite = false;
[Category("New Properties"),
Description("Indicates whether the text in the edit control"+
           " will be overwrited or not"),
DefaultValue(false)]
public bool OverWrite{
     get { return _overWrite; }
     set { _overWrite = value; }
}
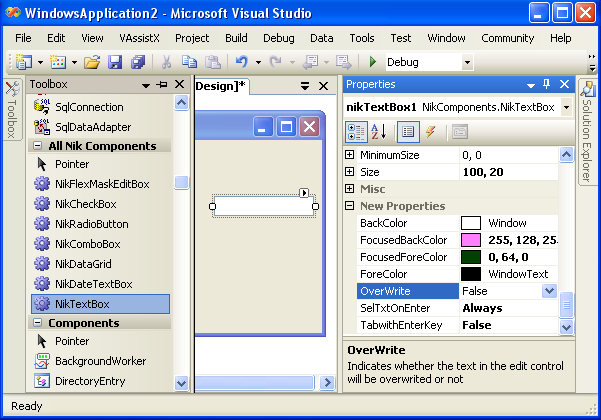
Adding above code to the class, cause new OverWrite property be appeared in properties window like other properties (that now, they are as same as usual TextBox properties) .
The Category keyword in code holds a string indicating the name of category to which property belongs. Description holds a string that is appeared in the description area at the bottom of properties windows. Default value holds the default value of the property, So when its current value is the same as default value, will be displayed in bold style.
By writing that, we just added OverWrite property to the list of NikTextBox's properties, but it won't be done any special operations yet. Because of these operations is related to KeyPress event, So we should change that event and add some other codes, to do them. Now we create a function as NiktextBox_KeyPress (with our own name) in the class:
private void NiktextBox_KeyPress(object sender, System.Windows.Forms.KeyPressEventArgs e)
{
    if (_overWrite && this.SelectedText == "")
    {
        this.SelectionLength = 1;
    }
}
But its not enough yet. We should write additional code to relate this function to the main KeyPress event that has inherited from the base class.
Do this by adding follow code to the class constructor:
this.KeyPress += new System.Windows.Forms.KeyPressEventHandler(this.NiktextBox_KeyPress);
Step 5. Certainly, you have encountered issues such as using ENTER key like TAB key for giving focus to the next control with pressing them, many times. With this property we will let the users to do their operations (e.g input operations) faster than befor.
In the other hand, we need a new property named as TabWithEnterKey ,which has a Boolean value and will act when its value be True. For doing that, we should do like befor:
protected bool _bTabwithEnterKey = true;
[Category("New Properties"),
Description("Indicates whether the user can use the ENTER key "+
       "Instead of TAB key to give focus to the next control."),
DefaultValue(true)]
public bool TabwithEnterKey
{
   get { return _bTabwithEnterKey; }
   set { _bTabwithEnterKey = value; }
}
By writing above code, we will add TabWithEnter to NikTextBox's list properties. Now a function for doing the main operation should be writen.
protected void NiktextBox_KeyDown(object sender, System.Windows.Forms.KeyEventArgs e)
{
  if (e.KeyCode == System.Windows.Forms.Keys.Enter && _bTabwithEnterKey)
         System.Windows.Forms.SendKeys.Send("{TAB}");
}
Then add follow code to the class constructor:
this.KeyDown += new System.Windows.Forms.KeyEventHandler(this.NiktextBox_KeyDown);
Step 6. We have defined some new properties that have boolean value (True or False),up to now. Now, we are going to define some new properties that let you choose from multiple selection.
Suppose that we want to have a property that named SelTxtOnEnter ,which indicates how the text will be select when it has been focused (ALWAYS,ONCE, NEVER).If we select the NEVER value, it cause that the text in edit control never be selected when we focus on it .If we select ONCE, cause that the text be selected just for the first time of enterance and when ALWAYS be selected, the text on that edit control would be selected every time that we focus on it.
public enum SelectTxt { Always, Once, Never };
protected SelectTxt _SelectTxt = electTxt.Never;
protected bool _SelTxtAllowed = false;

[Category("New Properties"),
Description("Indicates how the text will be select when it is focused."),
Browsable(true),
EditorBrowsable(EditorBrowsableState.Always),
DefaultValue(SelectTxt.Never),
DesignerSerializationVisibility(DesignerSerializationVisibility.Visible)]
public SelectTxt SelTxtOnEnter
{
  get{ return _SelectTxt;}
  set{  _SelectTxt = value;
        _SelTxtAllowed = (value != SelectTxt.Never);
     }
}
protected void NiktextBox_Enter1(object sender, System.EventArgs e)
{
   base.SelectionLength = 0;
   if ( _SelectTxt != SelectTxt.Never || _SelTxtAllowed)
   {
        if (_SelTxtAllowed)
        {
           base.SelectAll();
           _SelTxtAllowed = true;
        }
        _SelTxtAllowed = (_SelectTxt == SelectTxt.Always);
   }
}
Then add follow code to the class constructor:
this.Enter += new System.EventHandler(this.NiktextBox_Enter1);
Step 7. Now we are going to append some other features to this component in order to ,the user could have more control on the forms of project and get out of the confusing on not finding the focused object on form. because sometimes it would be difficult for the user to figure out which object has been focused on that time. For example by different coloring the focused component.
In the other hand, we are going to add a new ability to NikTextBox ,that could get different color from other objects on the form when it be focused. And when it loses focus, its color will back to its prior color. Meanwhile you can make them different by their Font Style ,etc.
To obtain this goal, we need to define two other new properties that are named FocusdBackColor , FocusdForeColor and add some new variables to prior properties BackColor, ForeColor.
protected System.Drawing.Color _FocusedBackColor;
protected System.Drawing.Color _BackColor;
protected System.Drawing.Color _FocusedForeColor;
protected System.Drawing.Color _ForeColor;

[Category("New Properties"),
Browsable(true),
EditorBrowsable(EditorBrowsableState.Always),
DesignerSerializationVisibility(DesignerSerializationVisibility.Visible)]
public override System.Drawing.Color BackColor
{
   get
   {
     return base.BackColor;
   }
   set
   {
    _BackColor = value;
    base.BackColor = value;
   }
}
[Category("New Properties"),
Browsable(true),
EditorBrowsable(EditorBrowsableState.Always),
DesignerSerializationVisibility(DesignerSerializationVisibility.Visible)]
public override System.Drawing.Color ForeColor
{
    get
    {
       return base.ForeColor;
    }
    set
    {
       _ForeColor = value;
       base.ForeColor = value;
    }
 }
[Category("New Properties"),
Description("The background color of the component when it is focused."),
Browsable(true),
DefaultValue("Window"),
EditorBrowsable(EditorBrowsableState.Always),
DesignerSerializationVisibility(DesignerSerializationVisibility.Visible)]
public System.Drawing.Color FocusedBackColor
{
   get
   {
     return _FocusedBackColor;
   }
   set
   {
     _FocusedBackColor = value;
   }
}
[Category("New Properties"),
Description("The foreground color of this component when"+
          " it is focused,which is used to display text."),
Browsable(true),
DefaultValue("WindowText"),
EditorBrowsable(EditorBrowsableState.Always),
DesignerSerializationVisibility(DesignerSerializationVisibility.Visible)]
public System.Drawing.Color FocusedForeColor
{
   get
   {
        return _FocusedForeColor;
   }
   set
   {
       _FocusedForeColor = value;
    }
}
protected void NiktextBox_Enter2(object sender, System.EventArgs e)
{
       base.BackColor = _FocusedBackColor;
       base.ForeColor = _FocusedForeColor;
}
protected void NiktextBox_Leave(object sender, System.EventArgs e)
{
       base.BackColor = _BackColor;
       base.ForeColor = _ForeColor;
}
Look at above code, as you can see, for adding new code to the NikTextBox's base code that has been inherited from System.Windows.Forms.TextBox ,we must use override keyword.
Then add follow code to the class constructor:
<p class="MsoNormal" style="MARGIN: 0in 0in 0pt; DIRECTION: ltr; unicode-bidi: embed; TEXT-ALIGN: left; mso-layout-grid-align: none">this.Enter += new System.EventHandler(this.NiktextBox_Enter2);
this.Leave += new System.EventHandler(this.NiktextBox_Leave);

</p>
Finish Step: Building the Component
Now it's the time of compiling the project to build dll file (for using the component and adding it to the toolbox list, we need dll file of that component)
By default, the output type of compiler will be 'Class Library' to build a dll file, but you can check it, by right clicking on NikComponent that has been placed in Solution Explorer window and then select properties. So you should see output type as 'Class Library' otherwise change it to this value and then click OK button. By doing that, you will change output type of compiler from NikComponents.exe to NikComponents.dll.
Here, we must compile this project. So right click on project name and select Build. After building, the dll file of our component will be build in \bin\Debug path.
Using the Component
This is very similar to using other components in c#. However, you can follow these structure:
Step 1. create a new Windows Application project or other project that you are going to use this component on it, with your own name.
Step 2. Add this component to toolbox list forever. So right click on toolbox ,then by selecting 'Add Tab' ,create a new Tab with your own name(note that you can use other Tabs,too).
Step 3. Then right click on your favorite tab and choose 'Customize Toolbox'. Go to '.Net Framework Components' section and click on browse button ,then find and choose NikComponents.dll .
Next click on OK button. By doing that, you will add all components that have been defined in a dll to your project.
Note that the NikComponents.dll could be involved more components by adding more classes in it.
Now,simply you can add this component to your project's form like you did befor. Use its new properties and enjoy them.
History
[12.07.2007] - 1.0 - Initial release.
This member has not yet provided a Biography. Assume it's interesting and varied, and probably something to do with programming.


 General
  News
News  Suggestion
  Question
  Bug
Bug  Answer
  Joke
Joke  Praise
  Rant
Rant  Admin
Admin 


 .
.