Introduction
This article describes about how to create your own custom column like asp:BoundField & asp:ButtonField and adding them dynamically to a grid view.
In one of my project I am being asked to develop code for a requirement
- The number of columns is not known till the execution time. The columns can be of any number.
- Some columns in the grid need to be editable.
- Should be able to display controls like check box/list box in one of the column.
<o:p>
In this article I am going to describe about how to achieve the above said requirements by creating a custom column of my own and dynamic adding columns in the grid view. Here I have used the DataTable as the datasource. As data table provides more extendable features.
<v:shapetype id="_x0000_t75" stroked="f" filled="f" path="m@4@5l@4@11@9@11@9@5xe" o:preferrelative="t" o:spt="75" coordsize="21600,21600"><v:stroke joinstyle="miter"><v:formulas><v:f eqn="if lineDrawn pixelLineWidth 0"><v:f eqn="sum @0 1 0"><v:f eqn="sum 0 0 @1"><v:f eqn="prod @2 1 2"><v:f eqn="prod @3 21600 pixelWidth"><v:f eqn="prod @3 21600 pixelHeight"><v:f eqn="sum @0 0 1"><v:f eqn="prod @6 1 2"><v:f eqn="prod @7 21600 pixelWidth"><v:f eqn="sum @8 21600 0"><v:f eqn="prod @7 21600 pixelHeight"><v:f eqn="sum @10 21600 0"><v:path o:connecttype="rect" gradientshapeok="t" o:extrusionok="f"><o:lock aspectratio="t" v:ext="edit"><v:shapetype id="_x0000_t75" stroked="f" filled="f" path="m@4@5l@4@11@9@11@9@5xe" o:preferrelative="t" o:spt="75" coordsize="21600,21600"><o:lock aspectratio="t" v:ext="edit"><v:shapetype id="_x0000_t75" stroked="f" filled="f" path="m@4@5l@4@11@9@11@9@5xe" o:preferrelative="t" o:spt="75" coordsize="21600,21600"><o:lock aspectratio="t" v:ext="edit"><v:shapetype id="_x0000_t75" stroked="f" filled="f" path="m@4@5l@4@11@9@11@9@5xe" o:preferrelative="t" o:spt="75" coordsize="21600,21600"><o:lock aspectratio="t" v:ext="edit"><v:shapetype id="_x0000_t75" stroked="f" filled="f" path="m@4@5l@4@11@9@11@9@5xe" o:preferrelative="t" o:spt="75" coordsize="21600,21600"><o:lock aspectratio="t" v:ext="edit"><v:shapetype id="_x0000_t75" stroked="f" filled="f" path="m@4@5l@4@11@9@11@9@5xe" o:preferrelative="t" o:spt="75" coordsize="21600,21600"><o:lock aspectratio="t" v:ext="edit"><v:shapetype id="_x0000_t75" stroked="f" filled="f" path="m@4@5l@4@11@9@11@9@5xe" o:preferrelative="t" o:spt="75" coordsize="21600,21600"><o:lock aspectratio="t" v:ext="edit"><v:shapetype id="_x0000_t75" stroked="f" filled="f" path="m@4@5l@4@11@9@11@9@5xe" o:preferrelative="t" o:spt="75" coordsize="21600,21600"><o:lock aspectratio="t" v:ext="edit">
 <o:p>
<o:p>
Let’s walk through the steps.
Code walkthrough
<o:p>
Create a grid view in the page,
- Drag and drop the GridView control on to the page.
Or
- Manually type GridView control’s definition in the page.
<o:p>
<table border="0" cellpadding="0" cellspacing="0"><o:p>
<tr><o:p>
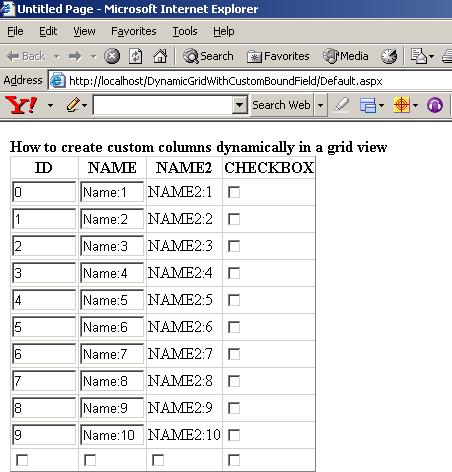
<td><strong>How to create custom columns dynamically in a grid view</strong></td><o:p>
</tr><o:p>
<tr><o:p>
<td><o:p>
<asp:GridView ID="GrdDynamic" runat="server" AutoGenerateColumns="False" ShowHeader="true" ShowFooter="true"><o:p>
<Columns><o:p>
</Columns><o:p>
</asp:GridView><o:p>
</td><o:p>
</tr><o:p>
<tr><o:p>
<td><o:p>
<asp:Button ID="cmdSave" runat="server" OnClick="cmdSave_Click" Text="Save" /><o:p>
</td><o:p>
</tr><o:p>
</table>
<o:p>
With this we are done with creating a GridView in the page.
Let’s move on to the code-beside to understand the background history of the page.
Here I will describe about, how to create our own custom bound field column.
<o:p>
//Iterate through the columns of the datatable to set the data bound field dynamically.<o:p>
foreach (DataColumn col in dt.Columns)<o:p>
{<o:p>
//Declare the bound field and allocate memory for the bound field.<o:p>
CustomBoundField bfield = new CustomBoundField();<o:p>
<o:p>
//Initalize the DataField value.<o:p>
bfield.DataField = col.ColumnName;<o:p>
<o:p>
//Initialize the HeaderText field value.<o:p>
bfield.HeaderText = col.ColumnName;<o:p>
<o:p>
//Check if any property has been defined for the editing.<o:p>
if (col.ExtendedProperties["Editable"] != null)<o:p>
{<o:p>
bfield.Editable = Convert.ToBoolean(col.ExtendedProperties["Editable"]);<o:p>
}<o:p>
<o:p>
//Check if any property has been defined for displaying the checkboxes.<o:p>
if (col.ExtendedProperties["CheckBox"] != null)<o:p>
{<o:p>
bfield.ShowCheckBox = Convert.ToBoolean(col.ExtendedProperties["CheckBox"]);<o:p>
}<o:p>
<o:p>
//Add the newly created bound field to the GridView.<o:p>
GrdDynamic.Columns.Add(bfield);<o:p>
}<o:p>
<o:p>
Let’s start dissecting right from the top,
<o:p>
- Create a DataTable, which will hold the table definition and data for the Grid View. This table is used as a Data Source for the Grid View.
DataTable dt = new DataTable();
- Once the Data Table is created, let’s add few columns to the Data Table.
- The logic behind creating dynamic column starts by creating a CustomBoundField instance.
- Once the CustomBoundField is created, I am initializing the DataField and HeaderText properties of the newly created CustomBoundField.We will come back to the CustomBoundField class in detail again.
- Once the creation of the dynamic column and assigning values to the column is complete. Add the column to the Grid View.
<o:p>
How to create the CustomBoundField
<o:p>
Till now the above-described method is the same old story as before, but the interesting part of this story starts when you look at the class CustomBoundField.<o:p>
<o:p>
public class CustomBoundField : DataControlField<o:p>
{<o:p>
public CustomBoundField()<o:p>
{<o:p>
//<o:p>
// TODO: Add constructor logic here<o:p>
//<o:p>
}<o:p>
<o:p>
#region Public Properties<o:p>
<o:p>
/// <summary><o:p>
/// This property describe weather the column should be an editable column or non editable column.<o:p>
/// </summary><o:p>
public bool Editable<o:p>
{<o:p>
get<o:p>
{<o:p>
object value = base.ViewState["Editable"];<o:p>
if (value != null)<o:p>
{<o:p>
return Convert.ToBoolean(value);<o:p>
}<o:p>
else<o:p>
{<o:p>
return true;<o:p>
}<o:p>
}<o:p>
set<o:p>
{<o:p>
base.ViewState["Editable"] = value;<o:p>
this.OnFieldChanged();<o:p>
}<o:p>
}<o:p>
<o:p>
/// <summary><o:p>
/// This property is to describe weather to display a check box or not. <o:p>
/// This property works in association with Editable.<o:p>
/// </summary><o:p>
public bool ShowCheckBox<o:p>
{<o:p>
get<o:p>
{<o:p>
object value = base.ViewState["ShowCheckBox"];<o:p>
if (value != null)<o:p>
{<o:p>
return Convert.ToBoolean(value);<o:p>
}<o:p>
else<o:p>
{<o:p>
return false;<o:p>
}<o:p>
}<o:p>
set<o:p>
{<o:p>
base.ViewState["ShowCheckBox"] = value;<o:p>
this.OnFieldChanged();<o:p>
}<o:p>
}<o:p>
<o:p>
/// <summary><o:p>
/// This property describe column name, which acts as the primary data source for the column. <o:p>
/// The data that is displayed in the column will be retreived from the given column name.<o:p>
/// </summary><o:p>
public string DataField<o:p>
{<o:p>
get<o:p>
{<o:p>
object value = base.ViewState["DataField"];<o:p>
if (value != null)<o:p>
{<o:p>
return value.ToString();<o:p>
}<o:p>
else<o:p>
{<o:p>
return string.Empty;<o:p>
}<o:p>
}<o:p>
set<o:p>
{<o:p>
base.ViewState["DataField"] = value;<o:p>
this.OnFieldChanged();<o:p>
}<o:p>
}<o:p>
#endregion<o:p>
<o:p>
#region Overriden Life Cycle Methods<o:p>
/// <summary><o:p>
/// Overriding the CreateField method is mandatory if you derive from the DataControlField.<o:p>
/// </summary><o:p>
/// <returns></returns><o:p>
protected override DataControlField CreateField()<o:p>
{<o:p>
return new BoundField();<o:p>
}<o:p>
<o:p>
/// <summary><o:p>
/// Adds text controls to a cell's controls collection. Base method of DataControlField is<o:p>
/// called to import much of the logic that deals with header and footer rendering.<o:p>
/// </summary><o:p>
/// <param name="cell">A reference to the cell</param><o:p>
/// <param name="cellType">The type of the cell</param><o:p>
/// <param name="rowState">State of the row being rendered</param><o:p>
/// <param name="rowIndex">Index of the row being rendered</param><o:p>
public override void InitializeCell(DataControlFieldCell cell, DataControlCellType cellType, DataControlRowState rowState, int rowIndex)<o:p>
{<o:p>
//Call the base method.<o:p>
base.InitializeCell(cell, cellType, rowState, rowIndex);<o:p>
<o:p>
switch (cellType)<o:p>
{<o:p>
case DataControlCellType.DataCell:<o:p>
this.InitializeDataCell(cell, rowState);<o:p>
break;<o:p>
case DataControlCellType.Footer:<o:p>
this.InitializeFooterCell(cell, rowState);<o:p>
break;<o:p>
case DataControlCellType.Header:<o:p>
this.InitializeHeaderCell(cell, rowState);<o:p>
break;<o:p>
}<o:p>
}<o:p>
#endregion<o:p>
<o:p>
#region Custom Protected Methods<o:p>
/// <summary> <o:p>
/// Determines which control to bind to data. In this a hyperlink control is bound regardless<o:p>
/// of the row state. The hyperlink control is then attached to a DataBinding event handler<o:p>
/// to actually retrieve and display data.<o:p>
/// <o:p>
/// Note: This control was built with the assumption that it will not be used in a gridview<o:p>
/// control that uses inline editing. If you are building a custom data control field and <o:p>
/// using this code for reference purposes key in mind that if your control needs to support<o:p>
/// inline editing you must determine which control to bind to data based on the row state.<o:p>
/// </summary><o:p>
/// <param name="cell">A reference to the cell</param><o:p>
/// <param name="rowState">State of the row being rendered</param><o:p>
protected void InitializeDataCell(DataControlFieldCell cell, DataControlRowState rowState)<o:p>
{<o:p>
//Check to see if the column is a editable and does not show the checkboxes.<o:p>
if (Editable & !ShowCheckBox)<o:p>
{<o:p>
string ID = Guid.NewGuid().ToString();<o:p>
TextBox txtBox = new TextBox();<o:p>
txtBox.Columns = 5;<o:p>
txtBox.ID = ID;<o:p>
txtBox.DataBinding += new EventHandler(txtBox_DataBinding);<o:p>
<o:p>
cell.Controls.Add(txtBox);<o:p>
}<o:p>
else<o:p>
{<o:p>
if (ShowCheckBox)<o:p>
{<o:p>
CheckBox chkBox = new CheckBox();<o:p>
cell.Controls.Add(chkBox);<o:p>
}<o:p>
else<o:p>
{<o:p>
Label lblText = new Label();<o:p>
lblText.DataBinding += new EventHandler(lblText_DataBinding);<o:p>
cell.Controls.Add(lblText);<o:p>
}<o:p>
}<o:p>
}<o:p>
<o:p>
void lblText_DataBinding(object sender, EventArgs e)<o:p>
{<o:p>
// get a reference to the control that raised the event<o:p>
Label target = (Label)sender;<o:p>
Control container = target.NamingContainer;<o:p>
<o:p>
// get a reference to the row object<o:p>
object dataItem = DataBinder.GetDataItem(container);<o:p>
<o:p>
// get the row's value for the named data field only use Eval when it is neccessary<o:p>
// to access child object values, otherwise use GetPropertyValue. GetPropertyValue<o:p>
// is faster because it does not use reflection<o:p>
object dataFieldValue = null;<o:p>
<o:p>
if (this.DataField.Contains("."))<o:p>
{<o:p>
dataFieldValue = DataBinder.Eval(dataItem, this.DataField);<o:p>
}<o:p>
else<o:p>
{<o:p>
dataFieldValue = DataBinder.GetPropertyValue(dataItem, this.DataField);<o:p>
}<o:p>
<o:p>
// set the table cell's text. check for null values to prevent ToString errors<o:p>
if (dataFieldValue != null)<o:p>
{<o:p>
target.Text = dataFieldValue.ToString();<o:p>
}<o:p>
}<o:p>
<o:p>
protected void InitializeFooterCell(DataControlFieldCell cell, DataControlRowState rowState)<o:p>
{<o:p>
CheckBox chkBox = new CheckBox();<o:p>
cell.Controls.Add(chkBox);<o:p>
}<o:p>
<o:p>
protected void InitializeHeaderCell(DataControlFieldCell cell, DataControlRowState rowState)<o:p>
{<o:p>
Label lbl = new Label();<o:p>
lbl.Text = this.DataField;<o:p>
cell.Controls.Add(lbl);<o:p>
}<o:p>
<o:p>
void txtBox_DataBinding(object sender, EventArgs e)<o:p>
{<o:p>
// get a reference to the control that raised the event<o:p>
TextBox target = (TextBox)sender;<o:p>
Control container = target.NamingContainer;<o:p>
<o:p>
// get a reference to the row object<o:p>
object dataItem = DataBinder.GetDataItem(container);<o:p>
<o:p>
// get the row's value for the named data field only use Eval when it is neccessary<o:p>
// to access child object values, otherwise use GetPropertyValue. GetPropertyValue<o:p>
// is faster because it does not use reflection<o:p>
object dataFieldValue = null;<o:p>
<o:p>
if (this.DataField.Contains("."))<o:p>
{<o:p>
dataFieldValue = DataBinder.Eval(dataItem, this.DataField);<o:p>
}<o:p>
else<o:p>
{<o:p>
dataFieldValue = DataBinder.GetPropertyValue(dataItem, this.DataField);<o:p>
}<o:p>
<o:p>
// set the table cell's text. check for null values to prevent ToString errors<o:p>
if (dataFieldValue != null)<o:p>
{<o:p>
target.Text = dataFieldValue.ToString();<o:p>
}<o:p>
}<o:p>
#endregion<o:p>
}
<o:p>
Any class that should be used as a custom bound field column should be inherited from the DataControlField class.
DataControlField serves as the base class for all data control field types, which represent a column of data in tabular data-bound controls such as Details View and Grid View.
<o:p>
In the newly created class, I have created properties
- Editable
- ShowCheckBox
- DataField
<o:p>
Editable<o:p>
This property describe weather the column should be an editable column or non editable column.<o:p>
<o:p>
ShowCheckBox<o:p>
This property is to describe weather to display a check box or not.<o:p>
<o:p>
DataField<o:p>
This property describe column name, which acts as the primary data source for the column. The data that is displayed in the column will be retreived from the given column name.<o:p>
<o:p>
Now, we have to override one important property i.e. InitializeCell to create the required format for the column.
<o:p>
InitializeCell:<o:p>
Types derived from DataControlField implement the InitializeCell method to add text and controls to a DataControlFieldCell object that belongs to a data control that uses tables to display a user interface (UI). These data controls create the complete table structure row by row when their respective CreateChildControls methods are called.
The InitializeCell method is called by the InitializeRow method of data controls such as DetailsView and GridView.
<o:p>
In this article, lets have a look at the initializeCell method’s definition
<o:p>
switch (cellType)<o:p>
{<o:p>
case DataControlCellType.DataCell:<o:p>
this.InitializeDataCell(cell, rowState);<o:p>
break;<o:p>
case DataControlCellType.Footer:<o:p>
this.InitializeFooterCell(cell, rowState);<o:p>
break;<o:p>
case DataControlCellType.Header:<o:p>
this.InitializeHeaderCell(cell, rowState);<o:p>
break;<o:p>
}<o:p>
<o:p>
Based on the passed cell type, invoking the corresponding methods to initialize the cells data accordingly. This method would be called for every row that is created in the Grid View.
<o:p>
InitializeFooterCell:<o:p>
InitializeFooterCell is a private method, which will be called while creating the footer row in the Grid View. To see how the footer row looks like, make sure you have the property ShowFooter="true". Then only the footer row can be seen. The code displays the checkboxes in the footer row.<o:p>
<o:p>
InitializeHeaderCell:<o:p>
InitializeHeaderCell is a private method, which will be called while creating the header row in the Grid View. To see how the header row looks like make sure you have the property ShowHeader="true". While creating the header or footer you can create more controls than what I have shown in the example like hiddencontrols, table control etc.
<o:p>
InitializeDataCell:<o:p>
InitializeDataCell is a private method, where most of the magic will be done. In this method at first, I am checking to see if the column is an editable and does not show the checkboxes. If the condition is met, I am creating a text box control and adding the control to the table’s cell, otherwise I am checking weather I have to show the checkbox or label control. If you notice one of the interesting funda is the DataBinding event of the text box or label control. The DataBinding event occurs when the server control binds to a data source. Since I am overriding the default behaviour of the system. I have to manually set the value for the text box also. Have a look at the attached code for more details on how to read the data from the container and set the values in to the text box.
<o:p>
The various advantages with this approach are
- Customize the appearance of the control.
- Format how the UI should look like. Can format the header, footer and item
- Can add JavaScript support like the way we support from the code beside.
<o:p>
That’s your entire dynamic GridView is ready. I hope this information would be helpful.
Enjoy programming.
PAN style="FONT-SIZE: 10pt; FONT-FAMILY: 'Courier New'"><o:p>
<o:p>
InitializeHeaderCell:<o:p>
InitializeHeaderCell is a private method, which will be called while creating the header row in the Grid View. To see how the header row looks like make sure you have the property ShowHeader="true". While creating the header or footer you can create more controls than what I have shown in the example like hiddencontrols, table control etc.
<o:p>
InitializeDataCell:<o:p>
InitializeDataCell is a private method, where most of the magic will be done. In this method at first, I am checking to see if the column is an editable and does not show the checkboxes. If the condition is met, I am creating a text box control and adding the control to the table’s cell, otherwise I am checking weather I have to show the checkbox or label control. If you notice one of the interesting funda is the DataBinding event of the text box or label control. The DataBinding event occurs when the server control binds to a data source. Since I am overriding the default behaviour of the system. I have to manually set the value for the text box also. Have a look at the attached code for more details on how to read the data from the container and set the values in to the text box.
<o:p>
The various advantages with this approach are
- Customize the appearance of the control.
- Format how the UI should look like. Can format the header, footer and item
- Can add JavaScript support like the way we support from the code beside.
<o:p>
That’s your entire dynamic GridView is ready. I hope this information would be helpful.
Enjoy programming.
This member has not yet provided a Biography. Assume it's interesting and varied, and probably something to do with programming.


 General
  News
News  Suggestion
  Question
  Bug
Bug  Answer
  Joke
Joke  Praise
  Rant
Rant  Admin
Admin 


