Introduction
The C# Scheduler project is aimed at demonstrating writing a
service in C# and what setup options .NET provides, rather than being the
main goal itself the final application is more a hanger to place the rest of
the topics on. This doesn't mean that the finished project is useless rather
that it serves its purpose as a demonstration and if the end result proves
useful then that is even better.
The project consists of two parts the first part being the simple
dialog application that stores data in the registry and a service that
will use a timer to check the current time and if there is a program set
up to run at that time run it. The focus of this article will be
mainly on the service and what it takes to get everything working.
The Scheduler project consists of three sub projects and a test
project that is used to test the registry code that runs in the installer
class. The reason for the test project is because you cannot debug an installer
project if you generate it through the development environment. You can only
debug the code in an installer if you create the class yourself and inherit
from installer, and run it as part of an application.
The three main projects are the Schedule project which is the
dialog application for setting up applications that run as the scheduler and
the SchedulerService which is the main guts of the application and the
SchedulerSetup which is the setup project that is generated by the development
environment.
The program is designed to run on Windows XP (Home and
Professional) and Windows 2000.
The Dialog Application
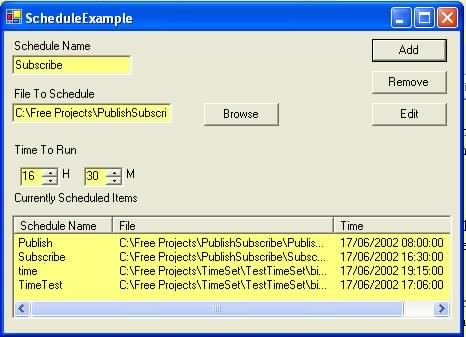
The ScheduleExample executable pictured above is a simple dialog
application that stores the information about what is to be scheduled in the
registry. The information is stored in the format of ScheduleName which is an
arbitrary name that you assign for this schedule and the file to schedule,
which is stored as the full path and executable name of the file to be
scheduled. Each scheduled item is then displayed in the listbox.
The Time to Run portion of the dialog is a simple user control that
allows someone to enter the hours and minutes of the day that the scheduled
task is to run. There is no option given for seconds in the application as this
would require the service to be almost constantly checking to see if there was
anything to run, instead of doing this the service will only check once per
minute if there is anything set to run during that minute.
The Service
The SchedulerService part of the program is a standard C Sharp
service program that runs as part of the windows subsystem. A Service typically
has no user interface and performs back ground processing. A Service inherits
from the ServiceBase class
public class ScheduleService : System.ServiceProcess.ServiceBase
which allows it to override the members the new Service needs. The most popular
functions to be overridden will be the
protected virtual void OnStart( string[] args )
and
protected virtual void OnStop()
These are the functions that most services will override in order to carry out
their tasks. This is due to the fact that when the Service is started up the
OnStart
function is called and the
OnStop function is called when the service
is stopped. The part of the Windows system that does this is called the SCM ( I
pronounce it SCUM ) or the Service Control Manager. Other functions that can be
overridden are shown in the
ServiceBase class help file so I wont repeat them
here, but they all respond to different system functions
specified by the SCM.
The job of the Service is fairly simple in that all it does is whenever the
timer is called at a rate of once a minute it checks the registry to see
if there are any programs off the ScheduleExample key that are required to
be run. The main piece of code is.
Process process = new Process();
ProcessStartInfo startInfo = new ProcessStartInfo();
string strHours;
string strMins;
DateTime dtNow = DateTime.Now;
foreach( string strName in subKeys )
{
subKey = key.OpenSubKey( strName );
if( subKey == null )
continue;
process.StartInfo = startInfo;
startInfo.FileName = subKey.GetValue( "FileToRun" ).ToString();
startInfo.UseShellExecute = true;
strHours = subKey.GetValue( "Hours" ).ToString();
strMins = subKey.GetValue( "Mins" ).ToString();
if( dtNow.Hour == Int32.Parse( strHours ) && dtNow.Minute == Int32.Parse( strMins ) )
{
if( process.Start() == false )
{
EventLog.WriteEntry( "Unable to start the process " + startInfo.FileName );
}
}
}
Most of the above code should be self explanatory. The interesting points are
the Process and the EventLog. To deal with EventLog first an Event Log is a
system wide logging system that has been around for quite a while now but it
tends to get mostly overlooked for a simple reason that most computer users
don't even know it exists and therefore if applications are constantly writing
data to it the event log will become huge and start taking massive amounts of
space, so discretion is usually required when writing to it. Throughout this
code I have maintained the rule only to write to the Event Log on an error,
although during debugging there was code in there telling me what was going on,
this has been removed. A Service already comes with an Event Log member that
will by default write to the application section of the Event Log ( Accessible
through Control Panel\Administrative Tools\Event Viewer on Windows XP ) But
when using a Service Installer you will need to add your own EventLog object
which can be found in System.Diagnostics.
A Process is any application running on the computer. The process class can be
used to get information about programs that are running on a computer and
manipulate them on the fly as it were. They can also as in the code above be
used to start new processes on the computer. This is done in pretty much the
same way as a process can be started on NT 4 using C++. A StartInfo object, in
this case an object of the type ProcessStartInfo is created and filled out with
data relating to the program to be started and in this case it is made equal to
the Process' own ProcessStartInfo member. You can also just create the
ProcessStartInfo
object and fill it out and then call the static function
Process.Start( ProcessStartInfo startInfo )
.
Using Timers In A Service
In .NET there are three different types of timers that can be used.
The standard Timer that is used with the forms that is the standard timer that
was available in earlier versions of windows. The System.Threading.Timer which
is a new kind of timer that instead of just calling a predefined function as
with the old timer, calls a funtion that is started on a new thread and the
System.Timer
which is used here and is different from the others in that it is
specifically designed for use in server type applications that don't always
have a user interface.
timer = new System.Timers.Timer();
timer.Interval = 60000;
timer.Elapsed += new ElapsedEventHandler( ServiceTimer_Tick  );
Here you can see the set up code for the timer that instantiates the timer and
sets the Interval to be fired every 60 seconds. The Elapsed event handler is
set up in exactly the same way that a remoting function call is set up and the
function has to be defined in the same way.
private void ServiceTimer_Tick(object sender, System.Timers.ElapsedEventArgs e)
which is how you'd expect a remote function to be defined with the
ElapsedEventArgs
object inheriting the from the
EventArgs class.
Accessing The Registry
Registry Access has been covered just about everywhere that .Net programming is
mentioned so I wont go over it in great detail here. The major registry keys
are predefined in .NET and are used as static object off the registry
objects,
Registry.CurrentUser
and
Registry.LocalMachine
These are well documented in MSDN under the Registry class. In order to
open a key you have two overrides of the OpenSubKey function, One that
takes the name of the key only and one that takes the name of the key
to open and a boolean value which if false means that the key is read only and
if true means that write access to the key is required.
I will just point out one little thing I discovered and that was
that originally the registry access in the code was all using the CurrentUser
key. Everything was working fine as the Installers were doing their job and the
dialog application was doing its job, it was the Service that was behaving
strangely. What I discovered was that when running in a service a line of code
that reads,
RegistryKey reg = Registry.CurrentUser.OpenSubKey( "Software",
                                false ).OpenSubKey( "ScheduleExample", false );
which was cut and pasted from the dialog application wasn't working the way I
expected. it was blatently failing to open the correct registry key so I used
the CreateSubKey call that if it doesn't find a key will create it. Then I
searched through the registry for the ScheduleExample key. I found that when
running from a Service the above line of code wasn't opening the registry key
under the HKEY_CURRENT_USER key but was using the HKEY_USER key and
creating the ScheduleExample key there. I just thought I'd mention this as a
note to the unwary.
The Service Installers
To add custom installers to a Service double click the.cs file that
contains the Service and then click on the "Add Installer" option that will
appear on the panel above the "Misc" panel. This will add ProjectInstaller.cs
file to the project that contains two Items, A ServiceProcessInstaller and a
ServiceInstaller.
The ServiceProcessInstaller contains the system options in that it
controls how the service will be run, in the current case the service will run
on the LocalSystem account and the ServiceInstaller controls the Service
itself, this sets the ServiceName and the StartType of the service which will
usually be automatic unless you want to start it from another program, in which
case you set it to manual. I can;t off hand think of a reason why you would
want to install your shiny new service as disabled but I'm sure someone will.
The main. The most important thing here is that the ServiceName set within the
service must exactly match the ServiceName given to the ServiceInstaller. All
the options that are required to set up the Installers can be done through the
options in the user interface.
Installation options
There are two ways to install this project which cannot just be
copied and run because it requires a service to be setup on the computer it is
to run from. The first is through the use of the InstallUtil.exe application
that comes with the .NET framework, the second makes use of the development
environments ability to create installation projects and add them to the the
code.
Installing The Application Through The InstallUtil.exe
To install the service there is an install.bat file in the debug
directory when the project is upzipped. This uses the InstallUtil.exe program
which is distributed as a part of the .NET Framework. To use this I set my
windows path to include the .NET framework directory but if you prefer you can
copy the files to the required folder or alternatively use a full path in the
install.bat. I presume that installers that use the framework will work out
where the .NET Framework is but this will do the job for now. It should be
noted that you have to include the .exe on the end of the file name.
InstallUtil doesn't automatically do this so if you don't specify it you will
get error messages saying that a file was not found.
Once the file paths are sorted out the installutil will start to do
its job. This on my Windows XP Home Computer caused a dialog box to pop up
requesting the login parameters for the service to run under. This
dialog only appears if the service is chosen to run in the user
account. Theoretically this requires that the user enter the login
information for the current account although I found that both on Windows XP
home and Windows 2000 Professional that the dialog reported an error when
the correct information for the account was entered.
Running a transacted installation.

Beginning the Install phase of the installation.
See the contents of the log file for the
     c:\freepr~1\schedu~1\schedu~1\bin\debug\schedulerservice.exe assembly's progress.
The file is located at Service.log.
Installing assembly 'c:\freepr~1\schedu~1\schedu~1\bin\debug\schedulerservice.exe'.
Affected parameters are:
   assemblypath = c:\freepr~1\schedu~1\schedu~1\bin\debug\schedulerservice.exe
   logfile = Service.log
Installing service SchedulerService...
Creating EventLog source SchedulerService in log Application...

The Install phase completed successfully, and the Commit phase is beginning.
See the contents of the log file for the
       c:\freepr~1\schedu~1\schedu~1\bin\debug\schedulerservice.exe assembly's progress.
The file is located at Service.log.
Committing assembly 'c:\freepr~1\schedu~1\schedu~1\bin\debug\schedulerservice.exe'.
Affected parameters are:
   assemblypath = c:\freepr~1\schedu~1\schedu~1\bin\debug\schedulerservice.exe
   logfile = Service.log

The Commit phase completed successfully.

The transacted install has completed.
The above is the print out to the log file when the project was installed on my
computer.
Installing The Application Through The Setup Project.
To create a setup project for your application click on File\New\Project and
choose "Setup and Deployment Projects" and select a Setup project and click on
the radio button to add it to the current solution. Once you have done this the
project will be created along with a Detected Dependencies folder.
If you select the Setup project in the solution explorer pane then you will
notice that there are a number of options for editors that appear across the
top. These are the "File System Editor" which is used to setup the files that
are to be included in the project. The Registry Editor that Allows you to
create keys and setup the registry for any program that you want to setup. It
should be noted here that I add registry entries through the installer, the
reason for this is quite simple. I didn't know it did that when I wrote the
installer and the registry access code within the projects needs to remain
anyway so I decided to leave it as it was.
Next there is the "File Types Editor" this allows you to setup custom file types
that you want to be associated with your application. Then there is the "User
Interface Editor" that allows you to add and remove dialogs to the setup
process in a way that has only previously been available through products like
InstallShield and its ilk. The next one is the "Custom Actions Edtior", this is
the one that will be used soon to start the Installers that are part of the
SchedulerService assembly. The final one is the launch conditions editor that
allows you to check for certain conditions within the registry or that the
machine the code is to be setup on has the .NET installed.
To add the required files to the setup project click on the "File System Editor"
button and select the Application folder. Right click on the application folder
and select Add\Project Output. This will give you a dialog with a list of files
that can be added to the installation. Interstingly enough one of these options
is to include the source code for the project which it strikes me would be a
good way to distribute demo projects such as this one. For a normal application
and for now we are interested in the "Primary Output" option that will
include the primary output of our projects and will also include the
dependencies that are detected for running the project.
The problem I encountered then was that although the files were being installed
the project didnt install because the Installers in the SchedulerService were
not automatically run by the setup program. The answer to ts,his one is simple.
Tell it to install it. The way this is done is through the "Custom Actions
Editor" Selecting this gives you a screen with four folders that are the
overridden functions that are used for a custom installation with an Installer,
these being, install, rollback, commit and uninstall. Select the actions that
you have overriden in the install class you have created and right click and
select "Add Custom Action", this gives you a dialog that allows you to select
any option from the "File System Editor". Select the "Application Folder" and
this will give you a list of the applications that are setup to be installed.
By selecting the application that contains the custom Installers you tell the
setup program that when it runs the install you want to execute the installers
in the application.
One more problem to be aware of, is that with the Add\Project Output is
that if you run and installer in an application that is setup as a Project
Output the file will be setup to run from the directory that the
project file is added to the setup from. This meant that in testing I
found that although the setup was working the service itself was actually being
run from the debug development folder and not from the installation
folder. The way around this problem is to place the executable file in the
application folder and not the Project Output.
Running The Service
The SchedulerService program is configured to start up automatically although
this doesn't mean that it will start immeadiately once installed, so a little
manual help is required here. When the installation has finished the go to
Control Panel\Administrative Tools\Services and double click on "Services".
This will open the services dialog box, locate the SchedulerService and double
click on it. This will bring up the service properties dialog from here click
on the Log on Tab and check the "allow service to interact with desktop". This
will give the service permission to start programs that have a graphical user
interface. The reason that this is required to be a manual operation is that
there is a ServiceType Enumeration within the System.ServiceProcess namespace
but this is only used by the ServiceController class and its access is limited
to a get which means that although you can use the ServiceController to check
that a service can access the desktop, it is currently not possible to directly
set the service to using the ServiceType enumeration as there is no mention of
it in any of the other service classes. I can only presume that I have missed
something somewhere or that the functionality in this area will be extended in
later versions of the .NET framework.

Once the "allow service to interact with desktop" checkbox has been checked,
select the general tab and click on the start button. Finally click
the Apply button and the service will be started normally every time the
computer is rebooted, then you will only need to run the dialog part of the
application to maintain the scheduler.
This member has not yet provided a Biography. Assume it's interesting and varied, and probably something to do with programming.


 General
  News
News  Suggestion
  Question
  Bug
Bug  Answer
  Joke
Joke  Praise
  Rant
Rant  Admin
Admin 


 now I know that it has something to do with the ServiceProcessDescription class. But I don't know how to use it
  When I added this attribute to the service class itself (ServiceBase derived class) it did not work. And I couldn't find any example. Would you be so kind and clarify the use of this attribute to me, please? Thank you in advance!
 Separate