Contents
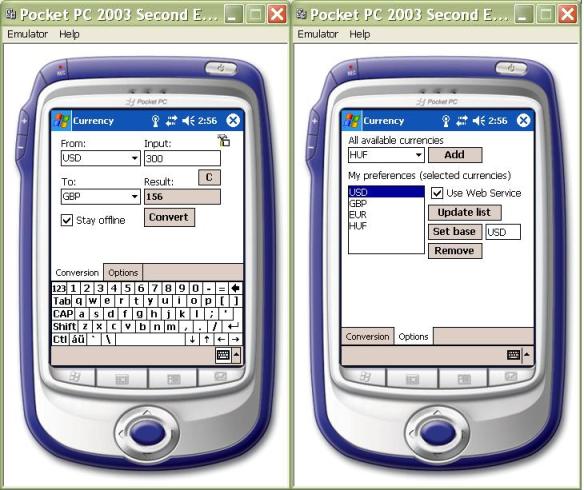
Figure 1. The application's main (Conversion) and Options pages
A few weeks ago, in the company I work for, all old fashioned cellular phones were retired and exchanged to fresh new models running Microsoft's Windows Mobile 2003 edition. Thus I become both curious and motivated, on as to how to write real world code for the Pocket PC considering all the possible pitfalls on the long way from the idea to the finished installer package, which at the end smoothly runs on the physical device. In this article, I will guide you through all the necessary steps required to fulfill this task and will share with you the big picture I learned experimenting with this technology.
I started my learning effort with a thin yet very useful booklet from Wei-Meng Lee - .NET Compact Framework. The author introduced in the booklet a limited edition of a currency converter example which uses a Currency - Web Service for just three currencies. I decided to finish that example and extend it for all available currencies the Currency - Web Service offers. My goal was to provide a tested and easily deployable package using the convenient and standard Windows installer way. Another useful article I found, is from the Code Project web site "Developing and Deploying Pocket PC Setup Applications". The idea to write an article and share my experience was born; while doing all the right things during the deployment on my Pocket PC, the following message box popped up: "The program you have installed may not display properly because it was designed for a previous version of Windows Mobile software." (figure 2). Let's investigate.

Figure 2. Deployment time message on Pocket PC 2003 SE
Visual Studio .NET 2003 Professional, or higher is required to develop .NET Compact Framework-based applications for devices based on Pocket PC 2002, Pocket PC 2003, Pocket PC Phone Edition or Windows CE .NET 4.1. But bear in mind, the Pocket PC family is just a specialized version, a little brother of the more sophisticated Windows CE .NET, which is a more generalized platform running a wide array of devices. If you would like to exploit the full power of the Windows CE .NET platform and want to have complete and unlimited control, you have to start using eMbedded Visual C++ 4.0 (and additionally eMbedded Visual C++ 4.0 SP3) to develop your applications. A comprehensive overview about the exact differences between Pocket PC and Windows CE .NET is described on MSDN in the article Differences in Microsoft .NET Compact Framework Development between the Pocket PC and Windows CE .NET. To develop using C# for Pocket PC devices including those running on Pocket PC 2003 Second Edition, you will have to download and install the following packages:
Perhaps you are already familiar with the fact, that Windows Mobile 2003 Second Edition supports the following modes, resolutions and DPI implementations:
- Portrait / Landscape QVGA (240x320, 96 DPI)
- Portrait / landscape VGA (480x640, 192 DPI)
- Square screen (240x240, 96 DPI)
- Square screen VGA (480x480, 192 DPI)
The bad news is, that the Visual Studio .NET 2003 development environment supports only the Portrait QVGA mode. Developers do not even have the possibility to catch the WM_SIZE event, which is sent to the full sized main window while the screen orientation is changing from Portrait to Landscape or vice versa. This is due to the reason, that the WndProc method is not supported in the .NET Compact Framework 1.0, thus there is no way to override it (e.g., for the main Windows.Forms.Form class) in order to react with it.
The good news is, there is a workaround possible. We can safely determine the screen's current resolution and therefore also the Portrait / Landscape modes; using the Form class' Bottom, Top, Left & Right properties (e.g., in the GetFocus event handler like figure 3), outlines, and rearrange any controls' size and position. The only control whose behavior is somewhat untypical is the application's underlying main window (the root control - in this example, a TabControl). The width of that control is adjusted automatically to 240 or 320 according to the Portrait / Landscape modes. The height, however, is resizable in a limited manner and can resist every altering attempt unless the Soft Input Panel (SIP) is enabled and is visible prior and while the screen's orientation has been changed. In other words, you just can adjust the height of the root control if the SIP is present on the screen.
The best workaround for the Portrait / Landscape dilemma seems to be the simplest (although not always practicable), which means to design an application which fits into the square screen (240x240). If you are interested in further details, you can read the article on MSDN: Developing Screen Orientation-Aware Applications, which is also a part of the Windows Mobile 2003 Second Edition Developer Resources package.
private void Form1_GotFocus(object sender, System.EventArgs e)
{
int screenHeight = this.Bottom + this.Top;
int screenWidth = this.Left + this.Right;
if (screenHeight == 320 && screenWidth == 240)
{
...
}
else if (screenHeight == 240 && screenWidth == 320)
{
...
}
}
Figure 3. GetFocus event handler
The C# solution consists of three projects. The main project is the SmartDeviceCurrency, which holds the whole application. The two other projects (InstallerService and Setup) are needed for deployment reasons like the Developing and Deploying Pocket PC Setup Applications article explains. The Setup project wraps up all the binaries and finishes the build process creating the setup.exe bootstrapper and the PocketCurrencySetup.msi Windows installer package, whereas the InstallerService project is responsible for creating the setup's custom action assembly (DLL), which launches the deployment on the physical pocket device. But don't bother about these other two projects now, I will explain them in detail later on in this article.
Figure 4. The Solution Explorer
The requirements for the application can be summarized as follows:
- The application should deal with any currency from the list of 152 offered by the addressed Currency - Web Service.
- Offline mode accesses the last downloaded and preserved currency rates (in CurrencyRates.xml).
- Users should have their own limited list of preferences (it is unlikely somebody will want all the 152 currencies).
- The first time, the application starts with an empty currency list, the user has to be diverted to the Options page (see figure 1) to configure its own currency preferences.
The project is a Smart Device Application C# project. I added a Web Reference to the project which is located at http://www.webservicex.net/CurrencyConvertor.asmx and renamed the type to WebServiceX (see Figure 4.). WebServiceX offers a "Currency" enumeration type, which is a static list of 152 currencies, and furthermore, a CurrencyConvertor class with a "ConversionRate" method executable both in synchronous and asynchronous manners. This application uses the synchronous call only. Although in the WSDL XSD-Schema, the "Currency" enumeration is defined as a restriction type based on a string and limited to three characters in length, Visual Studio's Web Reference wraps it up into a regular enumeration based on a list of integers.
<s:simpleType name="Currency">
    <s:restriction base="s:string">
              <s:enumeration value="AFA" />
              <s:enumeration value="ALL" />
                    ...
              <s:enumeration value="BHD" />
              <s:enumeration value="ZWD" />
    </s:restriction>
</s:simpleType>
Figure 5. The Schema definition in WSDL (part)
[System.Xml.Serialization.XmlTypeAttribute(Namespace
                                             ="http://www.webserviceX.NET/")]
public enum Currency {
   AFA,
   ALL,
   ...
   BHD,
   ZWD
}
Figure 6. The Currency enumeration
In the code, you have to deal with the enumeration list of integers (figure 6.) with no obvious relation to their original string representations (figure 5.). Of course, I could hack and alter the Visual Studio generated wrapper classes for the Web Service, but this did not seem to be a very good idea. Therefore, I had to figure another simpler way to switch between the three character length symbols and their integer values. Fortunately, I had a FieldInfo class which provides access to the enumerations metadata and establishes the relation from the integer value to the string. Moreover, I could use the HashTable class to establish the quick switch back from the string to the integer representation.
Looking more carefully on the currency enumeration, you can discover another obstacle: the enumeration list is not sorted. This can hurt especially when the symbols of the currencies are added to a ComboBox instance and users will start to look for their currencies supposedly in an alphabetical order. Unfortunately, neither the ComboBox nor the HashTable have sort capabilities supported in the .NET Compact Framework 1.0, thus I had to use an additional ArrayList class to sort the symbols. The described initialization should be done just once the application starts up, e.g., in the manner figure 7. shows.
void initializeAvailableCurrencies()
{
ArrayList al = new ArrayList(164);
ht = new Hashtable(164);
Cursor.Current = Cursors.WaitCursor;
comboBoxCurr.Items.Clear();
Type currency = typeof(WebServiceX.Currency);
int key = 0;
foreach(FieldInfo s in currency.GetFields())
{
string str = s.Name;
if (str.Length == 3)
{
al.Add(str);
ht.Add(str, key);
key++;
}
}
al.Sort();
for (int i = 0; i < al.Count; i++)
comboBoxCurr.Items.Add(al[i]);
comboBoxCurr.SelectedItem = comboBoxCurr.Items[0];
comboBoxCurr.Refresh();
Cursor.Current = Cursors.Default;
}
Figure 7. Initializing the list of available currencies
Be aware, the ArrayList is used temporarily, however, the HashTable should be declared as "global" variable in the Forms class and has to be available in order to switch from the string symbol to the integer, like figure 8. shows.
private WebServiceX.Currency getCurrency (string symbol)
{
    int i = 0;
    if (ht.Contains(symbol))
        i = (int)ht[symbol];

    return (WebServiceX.Currency)i;
}
Figure 8. Converting the string symbol back to the Currency enumeration type
The application's visual appearance is based on a TabControl which consists of two pages, Conversion and Options. The ComboBox on the Options page holds all available currencies I described above. Users can select a currency symbol in the ComboBox and tap the "Add" button which adds the symbol into the list of preferred currencies (ListBox). As the first symbol is added, it will be automatically selected as a base currency for all the conversion rates, thus its base currency rate has a value "1". The user can later on override and select another base currency tapping the "Set base" button. If new currencies arrive in the ListBox, a yellow exclamation icon and a message appears warning the user to update the offline store in order to get the latest currency rates from the Web Service. Tapping on the "Update list" button, the user can decide whether to go online, stay offline (in this case, 0 is assigned to the new currency rate) or cancel the operation.
Now, time to switch to the Conversion page. The user's preferences are stored as a two column table "Currency" in a DataSet instance. The table has the columns named "Sym" and "Rate". Interestingly, at least three controls have to share this data stored in a table, and clearly all three instances have and present different views over the same data. The mentioned controls are:
ListBox (Options page) - From -
ComboBox (Conversion page) - To -
ComboBox (Conversion page)
These three controls have to use different instances of a DataView class, which are created based on a DataSet's "Currency" table, like the code in figure 9. shows. The ListBox and ComboBox controls display the currencies' symbols and retrieving the symbols' values will automatically ship the corresponding currency rates. Take a note, I have created a primary key for the table in the Form1 constructor which should prevent adding the same symbol multiple times.
public Form1()
{
InitializeComponent();
checkPrivateFolders();
ds = new DataSet("MyCurrency");
DataTable dt = new DataTable(CURRENCY);
dt.Columns.Add(SYMBOL, typeof(string));
dt.Columns.Add(RATE, typeof(double));
DataColumn[] key = new DataColumn[1];
key[0] = dt.Columns[SYMBOL];
dt.PrimaryKey = key;
ds.Tables.Add(dt);
}
private void Form1_Load(object sender, System.EventArgs e)
{
initializeAvailableCurrencies();
initializeViews();
...
}
private void initializeViews()
{
viewFrom = new DataView(ds.Tables[CURRENCY]);
viewTo = new DataView(ds.Tables[CURRENCY]);
viewBox = new DataView(ds.Tables[CURRENCY]);
comboBoxFrom.Items.Clear();
comboBoxFrom.DataSource = viewFrom;
comboBoxFrom.DisplayMember = SYMBOL;
comboBoxFrom.ValueMember = RATE;
comboBoxTo.Items.Clear();
comboBoxTo.DataSource = viewTo;
comboBoxTo.DisplayMember = SYMBOL;
comboBoxTo.ValueMember = RATE;
listBoxCurr.Items.Clear();
listBoxCurr.DataSource = viewBox;
listBoxCurr.DisplayMember = SYMBOL;
listBoxCurr.ValueMember = RATE;
}
Figure 9. Creating DataSet and DataView instances
Let us now discuss some topics around user-friendly application behavior. With regards to a Pocket PC, it implies first of all the attempt to display the SIP (InputPanel control) at the right moment and hide it automatically if supposedly the user does not need it any more. As you can see in figure 1., the Conversion panel will probably use the SIP whereas the Option panel will not. The SIP is enabled and then activated setting its single property "Enabled" to true or false. Changing the property value will trigger an "EnabledChanged" event which can be captured (figure 10.) in order to adjust the root control's (TabControl) height. As I mentioned earlier in this article, this works fine in Portrait mode (on Pocket PC 2003 SE) but can fail switching to Landscape mode if SIP is not enabled. However, you can safely ignore this, as switching to Landscape mode the TabControl's height remains the size of Portrait mode and the user will experience a scroll bar on the right (or left) hand side of the screen.
private void inputPanel1_EnabledChanged(object sender, System.EventArgs e)
{
    int currentHeight = this.Bounds.Height;
    tabControl1.Height = (inputPanel1.Enabled) ?
                   currentHeight - inputPanel1.Bounds.Height : currentHeight;
}

private void inputPanel1_EnabledChanged(object sender, System.EventArgs e)
{
    tabControl1.Height = (inputPanel1.Enabled) ?
                                     272 - inputPanel1.Bounds.Height : 272;
}
Figure 10. EnabledChanged event handler - two versions
In figure 10., there are two variants of the EnabledChanged eventhandler. The second variant assumes the vertical height of the TabControl in Portrait mode which seems to be a good guess although I'm never happy about using fixed values for environments where those sizes can undergo dynamic changes, like switching to the Landscape mode. Thus, I prefer the first variant which captures the current Form's height. In my test, I figured it returns in Portrait mode the value of 268 and in Landscape mode 188.
As users switch between the Conversion and Options pages, the SIP should appear and disappear. This behavior can be achieved capturing the TabControl's "SelectedIndexChanged" event, like figure 11. shows. There are a few event handlers implemented in the code serving the user's convenience by searching for entries in the Options page ComboBox and so on. The fact that the application can be reactivated (become visible on the screen) should also be considered. This moment can be captured implementing the main Form's GetFocus event handler.
private void tabControl1_SelectedIndexChanged(object sender,
System.EventArgs e)
{
switch (tabControl1.SelectedIndex)
{
case 0:
inputPanel1.Enabled = true;
textBoxValue.Focus();
break;
case 1:
inputPanel1.Enabled = false;
break;
default:
break;
}
}
Figure 11. SelectedIndexChanged event handler
Now the application is compiled and runs in the Pocket PC emulator. It is left to solve deployment issues. The preferable scenario for that is discussed in "Developing and Deploying Pocket PC Setup Applications" and I'm focusing here just on steps, bringing more clarity and transparency into the process of creating the Windows installer packages. In order to start with this, it is inevitable to fulfill two more steps still directly related with the SmartDeviceCurrency project, which are:
- Creating cabinet files manually (once)
- Creating a custom cabinet building batch and an "inf" file
The results of these steps will serve later on as starting point for the InstallerService's pre-build event. To be honest, the InstallerService project does not need these results in anyway. Just let me explain! The last (the third) project in our solution is the Setup project which wraps up everything your application relies on and therefore needs all the cabinet files along with the InstallerService's assembly. The pre-build step only builds the cabinets. The preferred solution would be to do that via a post-build event immediately in the SmartDeviceCurrency project. Unfortunately, there is no such possibility like pre/post build events offered in the SmartDeviceCurrency project, which brings us to the idea to transfer this task into any other project that has a pre- or post- build event possibility and in which the build order comes after the SmartDeviceCurrency project but prior to the Setup project. Yes, as you can see, there is just a single project left which fulfills these requirements.
You should create cabinets manually for the first time, switching to the Release version of your solution, rebuilding it, and subsequently clicking on the menu "Build/Build Cab File... ". This will create in the project folder a new directory named "\cab\Release" along with the cabinets in it. Furthermore, you will see a few more new files appearing in the project's "\obj\Release" directory, most important the BuildCab.bat and SmartDeviceCurrency_PPC.inf files. You can now safely ignore the cabinets, you can even delete them as we will create our own location and build-batch to fulfill this task again, in an automated manner in the announced pre-build event.
Wondering which purpose can these cabinet files serve, you can start the following experiment. Determine your Pocket PC's processor type. If you are using Pocket PC 2002 or 2003, there is a high likelihood you have an ARMV4 processor. In this case, copy the corresponding SmartDeviceCurrency_PPC.ARMV4 cab- file into a directory on your Pocket PC and tap on the cab-file. The cabinet will be extracted and the application will be deployed according to the definitions in the .inf file. Of course, this approach is inconvenient. Each time prior to the deployment, the processor type should be determined and manually copied to the device.
Create a new directory named, e.g., "BuildCab", and a new child directory in it named "cabs" (see figure 4.) in the SmartDeviceCurrency project folder. Copy the two essential files BuildCab.bat and SmartDeviceCurrency_PPC.inf from the source folder "\obj\Release" into the new "BuildCab" folder. In the Visual Studio IDE, add the two new files to your SmartDeviceCurrency project. Open the BuildCab.bat file and make sure the cabwiz.exe utility uses the correct absolute paths pointing to your new SmartDeviceCurrency_PPC.inf file and the /dest switch targets your new "BuildCab\cabs" folder. Save the BuildCab.bat file.
Now open the SmartDeviceCurrency_PPC.inf file and take a closer look at the contents. The file is organized into sections. You can visit Microsoft Windows CE .NET: Creating an .inf File, for more information on .inf files. Follow these steps:
Now we are prepared to integrate the BuilCab.bat batch file into the InstallerService's project pre-build event.
The approach to start and proceed with this is as follows:
- Add a new "Class Library" type project to the solution.
- Rename the default
Class1 class to InstallerService class and let inherit it from the class System.Configuration.Install.Installer. - Add a project reference to the System.Configuration.Install.dll.
- Add a namespace reference to the
System.ServiceProcess namespace. - Add a project reference to the System.Windows.Forms.dll.
- Add a namespace reference to the
System.Windows.Forms namespace. - Add the
[RunInstaller(true)] attribute to the InstallerService class. - You should be able to compile it now without errors.
- Switch to the Designer View; now in the Properties window, the lightening sign should already be present. Switch to the Events and add two new event handlers for
AfterInstall and AfterUninstall events.
Take the rest from the article Developing and Deploying Pocket PC Setup Applications. Do not proceed until the project is compiled without errors.
Start filling out a few properties in the Setup's Properties pane like what the figure 14. shows:
Figure 14. Setup properties
Switch to the File System View and make sure the Application Folder's DefaultLocation property is set by default to "[ProgramFilesFolder][Manufacturer]\[ProductName]". Optionally, you can create a subfolder, for e.g., Setup, and manually add all the files as shown in figure 4. Thereafter, switch to the Custom Actions View and add an Install and an Uninstall custom action with the Name property referring to the InstallerService.dll assembly created in the InstallerService project (this is the Project Output/Primary output). Rebuild the solution. The resulting Windows installer files are placed into your project's "Setup\Release" folder. To avoid confusion, be aware that the dotnetfx.exe is used by the setup.exe in order to rollout the .NET Framework on a desktop or laptop computer, which is connected to the pocket device. Remember? The .NET Framework is needed there to start the custom action which is provided by InstallerService.dll assembly and has to start CeAppMgr.exe. Thus the dotnetfx.exe is definitely not the package the .NET CF resides in. And lastly, please do not forget; on Pocket PC 2002 and earlier, you have to deploy the .NET Compact Framework 1.0 SP3 Redistributable manually.
This publication verifies approaches and methods suggested in articles published earlier regarding Pocket PC applications, building a real world Pocket PC application installable in a regular manner via Windows installer service. You learned how to deal with long enumeration lists switching from the integer values to the filed names in string formats and vice versa. You learned a workaround by dealing with the new Pocket PC 2003 SE feature which allows Portrait and Landscape modes, and you learned about obstacles creating Windows installer packages for your finished Pocket PC applications.
I started my professional career learning FORTRAN in 1979. Later I graduated Master of Science in power engineering and wrote assembly language programs in the mid 80s in order to control huge and heavy equipments at a hydro power station on the Danube River. Next I graduated PhD in control engineering. At that time I spent long nights to learn and practice both Basic- and C languages on my precious Atari ST. Do you remember the classical book from Ritchie and Kernighan? In the 90s I used Visual C++ working for the Vienna City Government. In the new millennium I joined Microsoft, passed exams for MCAD and now I’m working as consultant serving for software developers in Austria. Please take a note, my articles are not checked by the product teams, therefore they are reflecting just my personal experience.


 General
  News
News  Suggestion
  Question
  Bug
Bug  Answer
  Joke
Joke  Praise
  Rant
Rant  Admin
Admin 


