Introduction
Tic-tac-toe is a simple game that has been played for several centuries. Known in the United Kingdom as "noughts and crosses", the hash-mark grid for the game has been found etched in stones dating to the Roman Empire. It is a great study for computer applications due to the simplicity of the game. This makes it easy to build algorithms for the computer to play its own move.
Tic-tac-toe presents the opportunity to build a simple, easy, yet fun Silverlight application. When this article is finished, you should have a good idea about how Silverlight works. There will also be an opportunity to extend and enhance the application even further.
Concepts
This article assumes you have at least basic knowledge of Silverlight. If you require an introduction, I recommend Beginning Silverlight Part 1. Microsoft also has excellent learning resources on their site at Silverlight.Net.
By the end of this article, you should be able to:
- Build a simple Silverlight application
- Format and position elements in Silverlight
- Rotate and scale elements using
RenderTransform - Animate Silverlight elements using
Storyboard - Use asynchronous timers to drive game logic
- Understand the use of delegates for dependency injection
- Use the method template pattern to apply a variable algorithm to the game
Getting Started
To get started, create a sample Silverlight application. I prefer to use Visual Studio 2008 for this because it automatically creates a web application to host the Silverlight application. When you create the project in Expression Blend it simply builds the Silverlight. Either way, when you build your project, a stubbed "default.html" is placed in the drop directory of the Silverlight project that can be used to host the application.
Before we write a line of code, we should step back to design our application. It's always better to have a blueprint before you lay the first brick. Think about the application in general and how we can implement the concept of tic-tac-toe using Silverlight.
The Application
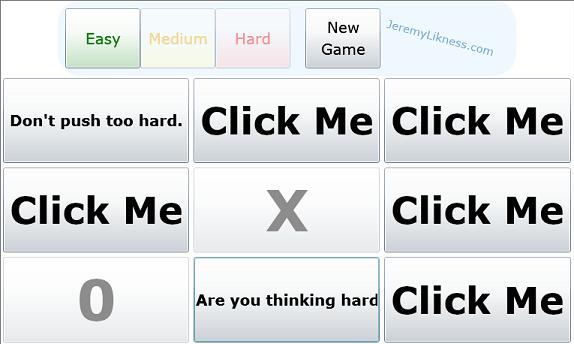
The overall application will present the player with three game options: easy, medium, and hard. This way small children can have fun playing the "easy" mode while more experienced players can enjoy trying to stump the computer's more advanced algorithms. There should be a way to play a new game, a way to enter moves, and as I host the game on my site, I also want to have a link back to the main page so the user isn't "lost" in the game.
Separation of Concerns
The first key to the game is the algorithm. How do we get the computer to make its move?
The tic-tac-toe board is actually a matrix that consists of rows and cells. In this case, I use "row" as a generic term for consecutive cells, whether they are in an actual row, a column, or a diagonal. The strategy to win is simple: be the first to fill an entire row of three consecutive cells with your marks.
Let's start at the most basic level: an empty board. Each "cell" in the board will have a state. We know there are three states: an empty cell, a cell with a "cross" or X, and a cell with a "nought" or O. We can represent this with an enumeration:
public enum State
{
    None = 0,

    X = 1,

    O = 2
}
Next, we have a "cell." To begin with, we know that a given cell has at least three attributes: it has a state, a row, and a column in the grid. We know where the cell is and what is in it.
The cells are organized in what I would call a "matrix" which is a 3 x 3 grid of cells.
As we begin to consider the algorithm, it becomes important to think about those "rows" I mentioned that determine whether or not the game is won. A row becomes important to us if it is filled with X's or O's, and for creating an algorithm we need to know the state of a row to determine whether or not we would want to place our mark there.
We know a row should contain exactly three cells. What else is important about a row?
- It should probably contain some sort of score or "weight" to determine how important it is compared to other rows.
- I should be able to see what cells are in the row.
- A row may have its own "state" such as "won" (there are all X's or O's) or "drawn" (i.e. both an X and an O are in the row, so it cannot be used to win the game).
Because we're so early in planning, it doesn't make sense to try to score the row now. Instead, we'll use a delegate. I simply want to take the list of cells in the row and return a score. That is simple enough:
public delegate int RowScoreStrategy(Cell[] cells);
Now I can expose a Score property that simply calls the strategy for scoring the row and passes the cells for the row:
public int Score
{
    get
    {
        return _strategy(_rowCells);
    }
}
There we go ... now we have some fundamentals for a row. In fact, we have enough to construct the row object. I take in the strategy for scoring along with the actual cells in the constructor, then expose some properties to determine if the row was won or drawn and what the score is:
using System.Collections.Generic;

namespace TicTacToe.Matrix
{
    public class Row
    {
        public Row(Cell cell1, Cell cell2, Cell cell3, RowScoreStrategy scoreStrategy)
        {
            _strategy = scoreStrategy;
            _rowCells = new[] { cell1, cell2, cell3 };
            cell1.AddRow(this);
            cell2.AddRow(this);
            cell3.AddRow(this);
        }

        private readonly Cell[] _rowCells;

        private readonly RowScoreStrategy _strategy;

        public int Score
        {
            get
            {
                return _strategy(_rowCells);
            }
        }

        public List<Cell> EmptyCells
        {
            get
            {
                List<Cell> retVal = new List<Cell>();
                foreach (Cell cell in _rowCells)
                {
                    if (cell.CellState.Equals(State.None))
                    {
                        retVal.Add(cell);
                    }
                }
                return retVal;
            }
        }

        public List<int> GetCells()
        {
            List<int> retVal = new List<int>();
            foreach (Cell cell in _rowCells)
            {
                retVal.Add(cell.CellRow * 3 + cell.CellCol);
            }
            return retVal;
        }

        public bool Won
        {
            get
            {
                return !_rowCells[0].CellState.Equals(State.None) &&
                       _rowCells[0].CellState.Equals(_rowCells[1].CellState) &&
                       _rowCells[1].CellState.Equals(_rowCells[2].CellState);
            }
        }

        public bool Drawn
        {
            get
            {
                return ((_rowCells[0].CellState.Equals(State.X) ||
			_rowCells[1].CellState.Equals(State.X) ||
                         	_rowCells[2].CellState.Equals(State.X)) &&
                        	(_rowCells[0].CellState.Equals(State.O) ||
			_rowCells[1].CellState.Equals(State.O) ||
                         	_rowCells[2].CellState.Equals(State.O)));
            }
        }
    }
}
Having built out the row, I now realize that we should probably go ahead and score an individual cell. A "pure" way to do this would obviously be to have a cell scoring strategy, but for now I'm happy to just call a cell's score the sum of all of the scores for the rows it belongs to. To do this, we'll create a circular reference because Rows hold Cells and Cells know what Rows they belong to, but this is simply a two-way object graph and will be safe if we don't try to recursively traverse from one type of entity to another.
We already said our cell would have a state and a reference to the position in the matrix. Now we'll add a list of the rows the cell belongs to. We protect against recursion by going from a row to a cell to a row and so forth by making the row collection private and exposing a method that only allows you to add a row to the collection. Finally, we have the concept of a score (the sum of scores for all of the rows the cell belongs to) and whether or not the cell is part of a winning row (by checking to see if any row the cell belongs to is "won.")
This image should help illustrate the concept of rows:

And here is the completed cell class:
using System.Collections.Generic;

namespace TicTacToe.Matrix
{
    public class Cell
    {
        public Cell(int row, int col)
        {
            CellRow = row;
            CellCol = col;
        }

        public State CellState { get; set; }

        public int CellRow { get; private set; }

        public int CellCol { get; private set; }

        public int Score
        {
            get
            {
                int score = 0;
                foreach (Row row in _rows)
                {
                    score += row.Score;
                }
                return score;
            }
        }

        public bool Won
        {
            get
            {
                bool retVal = false;

                foreach (Row row in _rows)
                {
                    if (row.Won)
                    {
                        retVal = true;
                        break;
                    }
                }

                return retVal;
            }
        }

        private readonly List<Row> _rows = new List<Row>();

        public void AddRow(Row row)
        {
            _rows.Add(row);
        }
    }
}
Now we can put together the actual Matrix class, which will hold the cells and also be responsible for the strategy of making moves. This allows us to completely encapsulate the logic of "thinking" and maintaining the board's state in a separate class that is decoupled from how we build the game interface (see my article SOLID and Dry Part 1 and Part 2 for more on this).
The matrix itself is straightforward, and mirrors what the grid looks like:
private readonly Cell[][] _matrix = {
                                 new[] {new Cell(0, 0), new Cell(0, 1), new Cell(0, 2)},
                                 new[] {new Cell(1, 0), new Cell(1, 1), new Cell(1, 2)},
                                 new[] {new Cell(2, 0), new Cell(2, 1), new Cell(2, 2)}
                                    };
We can now organize the cells into our rows:
private readonly Row[] _rows;

_rows = new[]
            {
                new Row(_matrix[0][0], _matrix[0][1], _matrix[0][2], rowStrategy),
                new Row(_matrix[1][0], _matrix[1][1], _matrix[1][2], rowStrategy),
                new Row(_matrix[2][0], _matrix[2][1], _matrix[2][2], rowStrategy),
                new Row(_matrix[0][0], _matrix[1][0], _matrix[2][0], rowStrategy),
                new Row(_matrix[0][1], _matrix[1][1], _matrix[2][1], rowStrategy),
                new Row(_matrix[0][2], _matrix[1][2], _matrix[2][2], rowStrategy),
                new Row(_matrix[0][0], _matrix[1][1], _matrix[2][2], rowStrategy),
                new Row(_matrix[0][2], _matrix[1][1], _matrix[2][0], rowStrategy),
            };
Similar to the rows, we also need a strategy for making a move. Again, we can delay this by using a delegate and worry about the actual algorithm later. We want to pass the matrix itself along with the rows in the matrix and get back the cell that the computer wants to make its next move in. This looks like:
public delegate Cell CellStrategy(Row[] rows, Cell[][] matrix);
Now we can stub out a quick and dirty strategy to use for now before tackling the more complex algorithms, and just pick a random cell that's empty:
public static CellStrategy EasyStrategyDelegate =
    (rows, matrix) =>
        {
            _CheckBounds(rows,matrix);

            List<Cell> available = new List<Cell>();

            for (int rowIdx = 0; rowIdx < 3; rowIdx++)
            {
                for (int colIdx = 0; colIdx < 3; colIdx++)
                {
                    if (matrix[rowIdx][colIdx].CellState.Equals(State.None))
                    {
                        available.Add(matrix[rowIdx][colIdx]);
                    }
                }
            }

            Cell retVal;

            lock (_random)
            {
                retVal = available[_random.Next(available.Count)];
            }

            return retVal;
        };
The check bounds method simply ensures we are getting what we expect, and throws an appropriate exception otherwise:
private static void _CheckBounds(ICollection<row /> rows, ICollection<cell[] /> matrix)
{
    if (rows == null)
    {
        throw new ArgumentNullException("rows");
    }

    if (rows.Count != 8)
    {
        throw new ArgumentOutOfRangeException("rows");
    }

    if (matrix == null)
    {
        throw new ArgumentNullException("matrix");
    }

    if (matrix.Count != 3)
    {
        throw new ArgumentOutOfRangeException("matrix");
    }
}
That's good enough for now, let's move into our presentation layer and start to build a screen.
Layout
The Tic-Tac-Toe Board
The first piece to focus on is the tic-tac-toe board itself. We can make a simply grid of buttons to click to make it easy for the user, and simply disable them when they have content. The grid should size each button the same and resize based on the user's display settings.
The XAML for this is straightforward — note that I named the buttons based on the row and column they are in for easy reference later:
<UserControl
	xmlns="http://schemas.microsoft.com/winfx/2006/xaml/presentation"
	xmlns:x="http://schemas.microsoft.com/winfx/2006/xaml"
	xmlns:d="http://schemas.microsoft.com/expression/blend/2008"
	xmlns:mc="http://schemas.openxmlformats.org/markup-compatibility/2006"
	xmlns:TicTacToe="clr-namespace:TicTacToe"
	mc:Ignorable="d"
	x:Class="TicTacToe.TicTacoToeMain"
	d:DesignWidth="640" d:DesignHeight="480">
    <UserControl.Resources>
        <Style x:Key="BigButton" TargetType="Button">
            <Setter Property="FontSize" Value="50"/>
            <Setter Property="FontWeight" Value="Bold"/>
        </Style>
    </UserControl.Resources>
	<Grid x:Name="LayoutRoot">
		<Grid.RowDefinitions>
			<RowDefinition Height="0.333*"/>
			<RowDefinition Height="0.333*"/>
			<RowDefinition Height="0.334*"/>
		</Grid.RowDefinitions>
		<Grid.ColumnDefinitions>
			<ColumnDefinition Width="0.333*"/>
			<ColumnDefinition Width="0.333*"/>
			<ColumnDefinition Width="0.334*"/>
		<Grid.ColumnDefinitions>
		<Button x:Name="b00" HorizontalAlignment="Stretch"
			VerticalAlignment="Stretch"
			Content="Click Me" Margin="3,3,3,3" Grid.Row="0"
			Grid.Column="0" Style="{StaticResource BigButton}"/>
        <Button x:Name="b10" HorizontalAlignment="Stretch" VerticalAlignment="Stretch"
        	Content="Click Me" Margin="3,3,3,3" Grid.Row="1"
        	Grid.Column="0" Style="{StaticResource BigButton}"/>
        <Button x:Name="b20" HorizontalAlignment="Stretch" VerticalAlignment="Stretch"
        	Content="Click Me" Margin="3,3,3,3" Grid.Row="2"
        	Grid.Column="0" Style="{StaticResource BigButton}"/>
        <Button x:Name="b01" HorizontalAlignment="Stretch" VerticalAlignment="Stretch"
        	Content="Click Me" Margin="3,3,3,3" Grid.Row="0"
        	Grid.Column="1" Style="{StaticResource BigButton}"/>
        <Button x:Name="b11" HorizontalAlignment="Stretch" VerticalAlignment="Stretch"
        	Content="Click Me" Margin="3,3,3,3" Grid.Row="1"
        	Grid.Column="1" Style="{StaticResource BigButton}"/>
        <Button x:Name="b21" HorizontalAlignment="Stretch" VerticalAlignment="Stretch"
        	Content="Click Me" Margin="3,3,3,3" Grid.Row="2"
        	Grid.Column="1" Style="{StaticResource BigButton}"/>
        <Button x:Name="b02" HorizontalAlignment="Stretch" VerticalAlignment="Stretch"
        	Content="Click Me" Margin="3,3,3,3" Grid.Row="0"
        	Grid.Column="2" Style="{StaticResource BigButton}"/>
        <Button x:Name="b12" HorizontalAlignment="Stretch"
        	VerticalAlignment="Stretch" Content="Click Me" Margin="3,3,3,3"
        	Grid.Row="1" Grid.Column="2" Style="{StaticResource BigButton}"/>
        <Button x:Name="b22" HorizontalAlignment="Stretch" VerticalAlignment="Stretch"
        	Content="Click Me" Margin="3,3,3,3" Grid.Row="2"
        	Grid.Column="2" Style="{StaticResource BigButton}"/>
        <TicTacToe:GameOver x:Name="GameOverSplash"
        	Grid.ColumnSpan="3" Grid.RowSpan="3" Visibility="Collapsed"/>
    </Grid>
</UserControl>
Let's break this down.
Any element can contain its own resources, you simply do element.resources to embed them. We are including a simple Style for the buttons. The style is called BigButton and targets elements of type Button. We simply set the size to 50 pixels and the weight to bold. In the buttons themselves, you'll see the attribute:
Style="{StaticResource BigButton}"
The brace notation is the XAML way of embedding special instructions. In this case, it simply means there is a static resource embedded in this XAML that I want you to use called BigButton. It's as easy as that! Resources can be scoped from the element level on up to the master control.
The grid is one of the more common layout elements. You have the ability to define the rows and columns, then define children that are positioned relative to each row and column. In this case, we simply declare three "almost" equally sized rows and columns. A fractional width or height will scale as a percentage of the parent's dimensions.
Each button has a padding within the grid cell (the margin, note that if you put a single value it will automatically apply to all dimensions, here I have them explicitly listed for you).
- Self-study idea: extend the style to include a "template" and put the "Click Me" content in the template so it's not repeated for each button. Also use the style to set the vertical and horizontal alignments as well as the margins.
You'll notice a reference to the "GameOverSplash". This is another control we've defined. You can see we declare how to find the control at the top:
xmlns:TicTacToe="clr-namespace:TicTacToe"
If the namespace is in a different assembly, you simply add an "assembly=" directive with the fully qualified assembly name.
Now the runtime knows where to find TicTacToe.GameOver. You'll note we have it span the entire grid and that it starts out invisible.
Game Over
The game over control is displayed at the end of each game session. It is a simple control:
<UserControl x:Class="TicTacToe.GameOver"
    xmlns="http://schemas.microsoft.com/winfx/2006/xaml/presentation"
    xmlns:x="http://schemas.microsoft.com/winfx/2006/xaml"
    Width="Auto" Height="Auto">
    <UserControl.Resources>
        <Storyboard x:Name="GameOverFade">
            <DoubleAnimation Storyboard.TargetName="LayoutRoot"
            	Storyboard.TargetProperty="Opacity" From="0.0"
		To="0.90" Duration="0:0:5"/>
        </Storyboard>
    </UserControl.Resources>
    <Grid x:Name="LayoutRoot" Background="Gray" Opacity="0.75"
    	HorizontalAlignment="Stretch" VerticalAlignment="Stretch">
        <Border x:Name="GameOverBorder"  CornerRadius="30"  Width="400" Height="200"
        	Opacity="1.0" VerticalAlignment="Center" HorizontalAlignment="Center">
            <TextBlock FontSize="50" FontWeight="Bold" Text="{Binding}"
            	HorizontalAlignment="Center"
		VerticalAlignment="Center" TextWrapping="Wrap"/>
        </Border>
    </Grid>
</UserControl>
The visual elements include a grid with a 75% opacity that is set to stretch. This is our "modal dialog" style. It will cover the entire grid and shade it so the user knows the board is disabled. In the middle of the grid, we have a border with rounded edges. This will overlay the model background and display our message. The message is in a text block. Notice this:
Text="{Binding}"
We will bind our text to the control itself, and then whatever we set the control's data context to will be passed down to the text box.
You'll notice there is a Storyboard resource declared at the top of the control. A storyboard is simply a collection of animations or transitions that can be applied. In our case, we use a DoubleAnimation (this doesn't mean "two," but rather that the animation will be used to manipulate a value of type double). In this case, we are taking the opacity of the control from 0 (invisible) to 0.9 (barely "see through"). The duration is set to 5 seconds for a slow fade.
When we end the game, we make the control visible. For example, if the game is a draw, we bind the text "Draw" to the control, set the pop-up background to yellow and then start the story board for it to fade in. The sequence looks like this:
GameOverSplash.DataContext = "Draw.";
SolidColorBrush yellowBrush = new SolidColorBrush { Color = Colors.Yellow };
GameOverSplash.GameOverBorder.Background = yellowBrush;
GameOverSplash.Visibility = Visibility.Visible;
Storyboard fade = GameOverSplash.Resources["GameOverFade"] as Storyboard;
if (fade != null)
{
    fade.Begin();
}
Main Application
Finally, we can layout the main application. I set up a grid that has a fixed height for the top. This is where I'll put my controls for determining how easy the game is, to start a new game, and to click through to my website.
The width of the buttons is fixed to 100 pixels and the font size is 20:
<Style x:Name="ControlButton" TargetType="Button">
    <Setter Property="Width" Value="100"/>
    <Setter Property="FontSize" Value="20"/>
</Style>
To show which level of difficulty is selected, I'll simply make all of the buttons look "faint" by keeping their opacity low:
<Button x:Name="MediumButton" Opacity="0.4" Click="Control_Click" Content="Medium"
	Background="Yellow" Foreground="Orange"
	Style="{StaticResource ControlButton}"/>
We then set the opacity to full (1.0) when the button is clicked.
For the "new game" button, I used a new type of layout control called a StackPanel. StackPanels put elements side-by-side either left-to-right (horizontal) or top-to-bottom (vertical). In this case, I'm using the StackPanel to position and center my two lines of text:
<Button Style="{StaticResource ControlButton}" Click="NewGame_Click">
   <StackPanel Orientation="Vertical">
      <TextBlock Text="New" HorizontalAlignment="Center"/>
      <TextBlock Text="Game" HorizontalAlignment="Center"/>
   </StackPanel>
</Button>
One great aspect of Silverlight is that you can transform anything that is rendered. This means even your composite objects that are built with various other elements can be scaled, transformed, rotated, and skewed to your heart's desire. To demonstrate this, I positioned the link to my own website as an angled link:
<HyperlinkButton Margin="10" NavigateUri="http://jeremylikness.com/">
   <TextBlock Text="JeremyLikness.com" FontSize="15">
      <TextBlock.RenderTransform>
         <RotateTransform Angle="15"/>
      </TextBlock.RenderTransform>
   </TextBlock>
</HyperlinkButton>
As you can see, elements like Button and HyperlinkButton can have simple, on-the-fly content like text appended, or can have nested content that makes available full formatting capabilities. It is a very powerful UI paradigm.
For a little bit of fun, I included my signature logo and gave it an animation for the introduction to the game. The logo zooms in and seemingly spins off into the distance before the game splash fades in. This is all done simply by kicking off storyboard animations. The spinner for the logo looks like this:
<Image Height="80" HorizontalAlignment="Center" Margin="0,0,0,0"
	VerticalAlignment="Center" Width="404" Opacity="1.0"
	Source="Resources/signature_big.PNG" x:Name="ImageSignature">
    <Image.Resources>
        <Storyboard x:Name="LogoStoryboard">
            <DoubleAnimation Storyboard.TargetName="LogoRotate"
            	Storyboard.TargetProperty="Angle" From="0" To="360" Duration="0:0:5"/>
            <DoubleAnimation Storyboard.TargetName="LogoScale"
            	Storyboard.TargetProperty="ScaleX" From="2.0"
		To="0.1" Duration="0:0:5"/>
            <DoubleAnimation Storyboard.TargetName="LogoScale"
            	Storyboard.TargetProperty="ScaleY" From="2.0"
		To="0.1" Duration="0:0:5"/>
        </Storyboard>
    </Image.Resources>
    <Image.RenderTransform>
        <TransformGroup>
            <RotateTransform x:Name="LogoRotate" CenterX="202" CenterY="40"/>
            <ScaleTransform x:Name="LogoScale" CenterX="202" CenterY="40"/>
        </TransformGroup>
    </Image.RenderTransform>
</Image>
I'll let you look at the source for the definition of the introductory splash dialog. In the code behind, we use the storyboard events to chain the sequence together:
First, wire into the completed event of the logo spinner and kick it off:
LogoStoryboard.Completed += _LogoStoryboardCompleted;
LogoStoryboard.Begin();
When the first animation is done, simply hide the image and kick off the next animation:
ImageSignature.Visibility = Visibility.Collapsed;
PresentsStoryboard.Begin();
It is important to note a few things about using storyboards. First, if you wish to reuse a storyboard, you must explicitly "stop" it when the first cycle is completed by issuing a "storyboard.Stop()" call. Second, the properties are only manipulating for the duration of the storyboard. When the storyboard is complete, the properties transition back to their original values, so it is important to wire in the "final" values when the storyboard completes, or your image will "pop back" to what it started as.
Now we've got the UI and the board itself, let's tie into some game play!
Thinking
Tic-tac-toe is an easy algorithm because each player takes an independent turn. We could easily wait for the player to input text and then quickly evaluate a counter-move and place it on the board. To make the game more interesting, however, I wanted to emulate a true opponent and build in some delays.
This requires a "think" method that fires periodically regardless of player interaction. The computer should know whether or not it is time to make a move. We'll also use the "thinker" to display some messages in the unused grid cells. This adds some more fun to the game and also shows the computer is actively thinking even when the player hasn't made a move yet.
This "think" method is commonly referred to as the "game loop." While we are using a timer for this particular implementation, more intensive games just as scrollers and shooters require more frequent processing. One interesting aspect of graphics-intensive games is that the screens are rendered in rapid succession to create the illusion of motion. These are called "frames." It doesn't make sense to redraw a graphic 5 times in a single frame because it only gets displayed to the user once.
Silverlight has a hook into these "frames" that you can use as a target to periodically update aspects of the game and know each update will be reflected in a frame. This is the Rendering event and can be hooked into like this:
CompositionTarget.Rendering += _MyGameLoop;
We'll use a timer instead because we don't have to do so much intensive thinking and we want a delay before we update buttons with our messages. Let's take a look at the constructor for the main tic-tac-toe board:
public TicTacoToeMain() : this(Strategies.EasyStrategyDelegate, Strategies.ScoreDelegate)
{

}

public TicTacoToeMain(CellStrategy cellStrategy, RowScoreStrategy rowScoreStrategy)
{
	InitializeComponent();

	_ticTacToeComputer = new Matrix.Matrix(cellStrategy, rowScoreStrategy);

	_buttons.Add(b00);
	_buttons.Add(b01);
	_buttons.Add(b02);
	_buttons.Add(b10);
	_buttons.Add(b11);
	_buttons.Add(b12);
	_buttons.Add(b20);
	_buttons.Add(b21);
	_buttons.Add(b22);

	foreach (Button button in _buttons)
	{
		button.Click += _Click;
	}

	DispatcherTimer thinkTimer = new DispatcherTimer
			{ Interval = new TimeSpan(0, 0, 0, 5) };
	thinkTimer.Tick += _Think;
	thinkTimer.Start();
}
The default constructor calls the overloaded constructor with a default strategy (the easy strategy) and a default row scoring strategy (more on that later). Then, we create a new matrix (remember, this was our class that maintains the "board state" and evaluates moves) and add our own buttons to an array to easily map them to the matrix. The buttons get a click function to know how to react. Finally, we create a DispatcherTimer. This will fire in 5 seconds and call the _Think method.
Because we simplified the design of our application, the game loop function is very straightforward.
We have a flag called "stop thinking" that is set when the game is over. The timer first checks for this and, if it exists, stops itself from firing:
private void _Think(object sender, EventArgs e)
{
    if (_stopThinking)
    {
        ((DispatcherTimer)sender).Stop();
        return;
    }
If the game is not over and it is the computer's turn, it locks the matrix and calls the matrix to give it the next cell. The matrix computes the move based on the assigned strategy, and returns the row and column of the cell selected for the computer. It also returns true if the game is over. The computer makes its move and then sets the flag to indicate it is the player's turn.
If the game is not over and it is the player's turn, the computer simply picks a random quote and assigns the quote to a random, available button. It then picks a random time to "think" again (this is why there is a delay between making a move and having the computer place its mark).
When the player clicks a button, the computer first checks to see if it is the player's turn in the _Click method. If it is the computer's turn, it updates the button with a message telling the player to hang on because the computer is still thinking. Otherwise, the button is marked and then the matrix is again called to indicate the player's move. Again, the matrix will return whether or not the game is over.
The _CheckWin function determines whether or not the game has ended, and if so, how the game ended. The matrix has a method to return the winning row. If the row is returned, it is highlighted, otherwise we know the game was a draw and we highlight the entire board. The animation for the game over dialog is fired and gameplay ends until the player clicks the "new game" button.
Dynamically Injecting Controls
You might have noticed our main Page does not contain the tic-tac-toe control. Instead, the control is created when the player clicks the "new game" button. The steps to insert the control are simple:
- Clear anything in the main display part of the game. This means clearing the collection of
Children elements. - Instantiate the control. In this case, we pass our strategies to the constructor. We make sure the control is set to stretch to fill the space.
- Finally, we add the control to the children for the main control.
Doing this ensures a "clean slate" each time. Anything that was in the display before - including the logo animations or a prior game - will be erased before a new game is begun. This looks like:
private void NewGame_Click(object sender, RoutedEventArgs e)
{
    Main.Children.Clear();
    UserControl ticTacToe = new TicTacoToeMain(_strategy, Strategies.ScoreDelegate)
    {
        HorizontalAlignment = HorizontalAlignment.Stretch,
        VerticalAlignment = VerticalAlignment.Stretch
    };
    Main.Children.Add(ticTacToe);
}
Algorithms
Clicking any of the buttons: easy, medium, or hard, will set the appropriate strategy for the next game. This is done by declaring the delegate:
private CellStrategy _strategy = Strategies.EasyStrategyDelegate;
And then assigning it based on the difficulty level:
private void Control_Click(object sender, RoutedEventArgs e)
{
    _ResetButtons();
    Button button = (Button) sender;
    button.Opacity = 1.0;
    if (button == EasyButton)
    {
        _strategy = Strategies.EasyStrategyDelegate;
    }
    else if (button == MediumButton)
    {
        _strategy = Strategies.MediumStrategyDelegate;
    }
    else
    {
        _strategy = Strategies.HardStrategyDelegate;
    }
}
Note that all buttons are set to low opacity (0.4), then the selected button is set to full opacity to highlight it, and the corresponding delegate is set. So where are these delegates?
For this application, there are three strategies. One strategy ignores any type of "row scoring" while the other two use the same strategy. The easy level simply picks a random cell and was defined earlier in the article. So what about the medium and hard?
First, we'll focus on the strategy for scoring a row. You could research terms like the minimax algorithm and alpha beta pruning and apply these, or you could follow my own favorite philosophy: "Keep It Simple, Stupid" (KISS).
So let's use some simple logic to determine our algorithm. What makes a row "worthwhile" to us?
- A row with both an "X" and an "O" has no value, it is a "drawn" row because no one can win it.
- A row with only an "X" or an "O" is important to us because we can either build on a potential win, or block our opponent by turning it into a drawn row.
- A row with two of our opponents marks is almost the most important row because if we don't play our mark on that row, our opponent will most likely win.
- The most important row is one with two of our own marks, because a move there will win the game.
- Oh, and we can't forget an empty row: it is more important than a drawn row but less important than any of the other rows.
Now we can simply assign some values based on the relative importance. I did it this way:
- 0 points — drawn row
- 1 point — empty row
- 10 points — row with two marks of the same type
- 100 points — row with two of the opponent's marks
- 110 points — row with two of my marks
All of our strategies are encapsulated in a static class called Strategies. We've already defined the delegate to score a row, so let's wire in our algorithm:
public static RowScoreStrategy ScoreDelegate =
(cells) =>
{
int score = 0;
int empty = 0;
int x = 0;
int o = 0;
for (int idx = 0; idx < cells.Length; idx++)
{
switch (cells[idx].CellState)
{
case (State.None):
empty++;
break;
case (State.X):
x++;
break;
case (State.O):
o++;
break;
default:
break;
}
}
if (empty == 3)
{
score = 1;
}
else if (empty == 2)
{
score = 10;
}
else if (empty == 1)
{
if (o == 2)
{
score = 110;
}
else if (x == 2)
{
score = 100;
}
}
return score;
};
There is probably some clever way to assign weighted values and use masks or some other logic to score the row, but this way works well enough for me and cleanly maps to my algorithm. I simply count the number of each type of cell and then use an if...else tree to score it.
So what about our cell strategies, for determining the computer's move? You saw one strategy, and that was to pick a random cell that is available (the "easy" strategy). Now that we have a scoring strategy for the rows, the "medium" game strategy will be to find the row with the highest score, then pick a random cell in that row. The "hard" strategy will be to find the single cell that has the highest score based on the sum of all of its rows. One is beatable, the other not.
First, find the row with the highest score, find the eligible cells, and return one of those cells at random:
public static CellStrategy MediumStrategyDelegate =
(rows, matrix) =>
{
int highVal = 0;
List<Row> eligibleRows = new List<Row>();
foreach (Row matrixRow in rows)
{
int score = matrixRow.Score;
if (score >= highVal)
{
if (score == highVal)
{
eligibleRows.Add(matrixRow);
}
else
{
highVal = score;
eligibleRows.Clear();
eligibleRows.Add(matrixRow);
}
}
}
int rowIdx = _random.Next(eligibleRows.Count);
Row targetRow = eligibleRows[rowIdx];
int cellIdx = _random.Next(targetRow.EmptyCells.Count);
return targetRow.EmptyCells[cellIdx];
};
Notice that when rows are tied, we pick a random row (that's why a matching score gets added to the list of eligible rows, while a higher score resets the list and is added by itself).
The hard strategy takes advantage of the fact we already added a function to the cell to show a score based on the sum of all rows it belongs to, so we can find the most strategic cell. The following diagram shows a hypothetical game that the computer wins. The player is "X". Each frame shows the players move, the highest ranked rows in yellow, and the highest ranked cell in yellow which is where the computer will move. You can see how it quickly grabs the strategic center cell (higher score because it intersects the most rows) and then jumps on the player's error in missing the row loaded with "O" marks.
Thus, the hard strategy ends up looking like this: grab all eligible cells, find the highest scoring cells, and then pick one:
public static CellStrategy HardStrategyDelegate =
(rows, matrix) =>
{
int highVal = 0;
List<Cell> eligibleCells = new List<Cell>();
for (int rowIdx = 0; rowIdx < 3; rowIdx++)
{
for (int colIdx = 0; colIdx < 3; colIdx++)
{
Cell cell = matrix[rowIdx][colIdx];
if (cell.CellState.Equals(State.None))
{
eligibleCells.Add(cell);
}
}
}
List<Cell> targetCells = new List<Cell>();
foreach (Cell cell in eligibleCells)
{
int score = cell.Score;
if (score >= highVal)
{
if (score == highVal)
{
targetCells.Add(cell);
}
else
{
highVal = score;
targetCells.Clear();
targetCells.Add(cell);
}
}
}
int cellIdx = _random.Next(targetCells.Count);
return targetCells[cellIdx];
};
Points to Consider
The application is a basic start but could be extended in several ways. Here are some ideas to take your knowledge to the next level:
- Port the application to Silverlight 3.0 and take advantage of the newer features
- Add a confirmation popup when the new game button is clicked to avoid accidentally terminating a game already in progress
- Create your own style or template for the main buttons to allow for text wrapping and embed a more interesting font
- Implement the ability to allow the computer to play the first move
- Extend the grid to a more complicated grid such as 4x4 or more cells
- Create a client/server version that allows multiple players
- Find some funnier quotes
These are just a few ideas for projects to build on this original concept.
Summary
Putting it all together, you now have a fully functional application with a clean separation of concerns. In fact, we could have taken it one step further and completely separated the scoring logic from the domain model, but in this case the strategies are so tightly coupled with the data that it didn't seem to make sense. We were able to explore layouts, transformations, and animations while building a simple game loop and even creating strategies loaded by dependency injection to help the computer play the game.
Hopefully you've learned as I have that Silverlight is a very powerful yet flexible framework that is modular, extensible, and readily lends itself to enterprise class application development.
If you're curious about whether the "hard" algorithm is truly unbeatable, try your own hand at the game online here.
Note: articles posted here are independently written and do not represent endorsements nor reflect the views of my employer.
I am a Program Manager for .NET Data at Microsoft. I have been building enterprise software with a focus on line of business web applications for more than two decades. I'm the author of several (now historical) technical books including Designing Silverlight Business Applications and Programming the Windows Runtime by Example. I use the Silverlight book everyday! It props up my monitor to the correct ergonomic height. I have delivered hundreds of technical presentations in dozens of countries around the world and love mentoring other developers. I am co-host of the Microsoft Channel 9 "On .NET" show. In my free time, I maintain a 95% plant-based diet, exercise regularly, hike in the Cascades and thrash Beat Saber levels.
I was diagnosed with young onset Parkinson's Disease in February of 2020. I maintain a blog about my personal journey with the disease at https://strengthwithparkinsons.com/.


 General
  News
News  Suggestion
  Question
  Bug
Bug  Answer
  Joke
Joke  Praise
  Rant
Rant  Admin
Admin 


