Introduction
In applications developed in .NET for data storage is often used MS SQL Server. During distribution of the application, one of the frequently asked questions is Database installation method on the Target Machine (the PC or workstation your project will be installed on).
The method described in this paper allows execute operation Restore Database at installation stage of application.
Application and Database Development
Start with creating an application that works with database.
Create a sample database with name “SampleDatabase”.
Create a sample application that connects to the created database and retrieves data.
(“SampleApplication” is in the file attached to the paper.)
Create Installer
Now let’s create an installer.
- First of all, we need to create a Backup for the Database in “SQL Server Management Studio Express” by selecting required base and clicking “Back Up…”
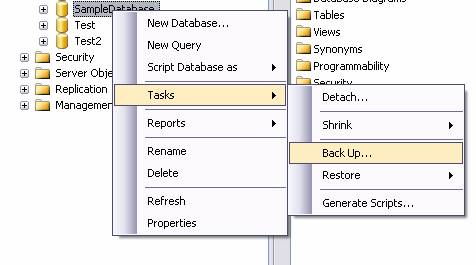
- Then select path and backup copy filename. In this case it is “SampleDatabase.bak”

- Next we create Custom Action.
- Although standard actions are sufficient to execute an installation in most cases, custom actions enable the author of an installation package to extend the capabilities of standard actions by including executables, dynamic-link libraries, and script.
- Create a new project using the Class Library template, then in the Name box, type “
SampleInstallLib”, in the Solution Name box, type “SampleInstallApp”, click OK.
The project is added to Solution Explorer.
- On the Project menu, choose Add Class, and then in the Add New Item dialog box, select
Installer Class. Accept the default name of Installer1.cs. Click Add.
- Delete the default Class1.cs object from the
SampleInstallLib project by expanding the Solution Explorer, right click on the Class1.cs object and select the Delete option. - Then open Installer1.cs for editing.
Adding references to:
Microsoft.SqlServer.ConnectionInfo
Microsoft.SqlServer.Smo
System.Windows.Forms
You will need the following namespaces for the code above to work:
using System.Data.SqlClient;
using System.IO;
using System.Security.AccessControl;
using System.Windows.Forms;
using Microsoft.SqlServer.Management.Common;
using Microsoft.SqlServer.Management.Smo;
Add the next code:
public void RestoreDatabase(String databaseName, String filePath,
String serverName, String userName, String password,
String dataFilePath, String logFilePath)
{
Restore sqlRestore = new Restore();
BackupDeviceItem deviceItem = new BackupDeviceItem
(filePath, DeviceType.File);
sqlRestore.Devices.Add(deviceItem);
sqlRestore.Database = databaseName;
ServerConnection connection;
if(userName == "")
{
SqlConnection sqlCon = new SqlConnection
(@"Data Source="+serverName+@"; Integrated Security=True;");
connection = new ServerConnection(sqlCon);
}
else
connection = new ServerConnection(serverName, userName, password);
Server sqlServer = new Server(connection);
Database db = sqlServer.Databases[databaseName];
sqlRestore.Action = RestoreActionType.Database;
String dataFileLocation = dataFilePath + databaseName + ".mdf";
String logFileLocation = logFilePath + databaseName + "_Log.ldf";
db = sqlServer.Databases[databaseName];
RelocateFile rf = new RelocateFile(databaseName, dataFileLocation);
sqlRestore.RelocateFiles.Add(new RelocateFile
(databaseName, dataFileLocation));
sqlRestore.RelocateFiles.Add(new RelocateFile
(databaseName + "_log", logFileLocation));
sqlRestore.ReplaceDatabase = true;
sqlRestore.Complete += new ServerMessageEventHandler(sqlRestore_Complete);
sqlRestore.PercentCompleteNotification = 10;
sqlRestore.PercentComplete += new PercentCompleteEventHandler
(sqlRestore_PercentComplete);
try
{
sqlRestore.SqlRestore(sqlServer);
}
catch (Exception ex)
{
MessageBox.Show(ex.InnerException.ToString());
}
db = sqlServer.Databases[databaseName];
db.SetOnline();
sqlServer.Refresh();
}
Function RestoreDatabase is an open connection to a SQL Server and restores database from backup.
As a parameter function gets:
databaseName – Name of database for which restore operations will be executed filePath – a pass to a file serverName – name of server userName – name of user password – user’s password dataFilePath – a path that database file will have logFilePath – a path that log file will have
In case Windows Authentication is needed instead of user name, a blank line should be input, a password should be ignored in this case.
Add next code for the function Commit:
public override void Commit(System.Collections.IDictionary savedState)
{
try
{
DirectorySecurity dirSec = Directory.GetAccessControl
(Context.Parameters["TargetDir"]);
FileSystemAccessRule fsar = new FileSystemAccessRule
(@"NT AUTHORITY\NETWORK SERVICE"
, FileSystemRights.FullControl
, InheritanceFlags.ContainerInherit |
InheritanceFlags.ObjectInherit
, PropagationFlags.None
, AccessControlType.Allow);
dirSec.AddAccessRule(fsar);
Directory.SetAccessControl(Context.Parameters["TargetDir"], dirSec);
}
catch (Exception ex)
{
MessageBox.Show(ex.Message);
}
RestoreDatabase(Context.Parameters["databaseName"].ToString(),
Context.Parameters["filePath"].ToString(),Context.Parameters
["serverName"].ToString(),Context.Parameters["userName"].ToString(),
Context.Parameters["password"].ToString(), Context.Parameters
["dataFilePath"].ToString(),
Context.Parameters["logFilePath"].ToString());
base.Commit(savedState);
}
This function code determines full access to directory setup (“TargetDir”) and all attached folders for user group “NT AUTHORITY\NETWORK SERVICE”. This will allow SQL Server to run Restore for our Database. In case of “NT AUTHORITY\NETWORK SERVICE” access is denied while decompression database the function SqlRestore cause the next exception:
Restored failed for server '.\sqlexpress' (Microsoft.SqlServer.Express.Smo)

Additional Information:
System.Data.SqlClient.SqlError: The operating system returned the error '5
	(Access is denied)' while attempting
'RestoreContainer::ValidateTargetForCreation' on '<path />\SampleDatabase_Log.ldf'
	(Microsoft.SqlServer.Expres.Smo)
- Build
SampleInstallLib.
- Start with Setup Project creation.
- In
SampleInstallApp execute File -> Add -> New Project
Select Other Projects -> Setup and Deployment, using the Setup Project template. - Set application name “
SampleInstall” and click Ok.
- In Solution Explorer select newly created project, right click and select Properties. In appeared window click Prerequisites. In Prerequisites window, select checks at Windows Installer 3.1 and SQL Server 2005 Express Edition, and fix “Download prerequisites from the same location as my application” position. This will allow enable Windows Installer and SQL Server in installation pack, if there are no applications on target machine it will install them and then our application will be installed.
- In Solution Explorer, click “File system editor”. Appeared folder displays file system of the target machine. Let’s make copies of our project file “SampleApplication”, library file “SampleInstallLib.dll”, and backup of our database SampleDatabase.bak. Essential assembly will be automatically included in our project. Now create folder “Database”, the files of our database will be unpacked in it. To create the folder, right click “Application folder” and select Add-> Folder, name it. In the window properties, select
AlwaysCreate in true.
- Next create Project output. For that, choose Application Folder and right click select Add-> Project Output. In the window, Add Project Output Group select in Project:
SampleInstallLib, then select Primary output and click OK.
Created Primary output will appear in file list.
- Then press a button in Solution Explorer and open Custom Actions Editor. And for all four actions, choose Primary output from
SamplesInstallLib(Active). For that, right click for the necessary Action and select Add Custom Action.
As a result, we get the following:
The most recent move we pass parameter/argument list for action Commit. At installation stage, the variable IDictionary savedState (Commit function) gets transmission parameters at the moment of activation event Commit.
public override void Commit(System.Collections.IDictionary savedState)
The parameters are shown in CustomActionData property. Parameters transfer syntax is paramName=”value”.
For our task, the line is:
/TargetDir="[TARGETDIR]\" /databaseName="SampleDatabase"
/filePath="[TARGETDIR]SampleDatabase.bak" /serverName=".\SQLEXPRESS"
 /userName="" /password="" /dataFilePath="[TARGETDIR]Database\\"
/logFilePath="[TARGETDIR]Database\\"
- Build the project
SampleInstall, now we can execute installation, right click the project in Solution Explorer and select Install. Windows Installer will copy files in the specified folder. If it is copied successfully, the full access will be given to user’s group “NT AUTHORITY\NETWORK SERVICE” to installation directory and database will be unpacked in the Database directory.
References
PS
When you create your own installation packet, you can ignore step 2 and use Custom action instead that is in the archive attached with this article.
History
- 15th October, 2008: Initial post
This member has not yet provided a Biography. Assume it's interesting and varied, and probably something to do with programming.


 General
  News
News  Suggestion
  Question
  Bug
Bug  Answer
  Joke
Joke  Praise
  Rant
Rant  Admin
Admin 


