Introduction
In the first part, I described how to develop a simple page which shows all the "companies" stored in the company table. Now I would like to describe how to add some additional functions - create new company, edit company's details. If you are interested, take a look at the first part or directly download the source code.
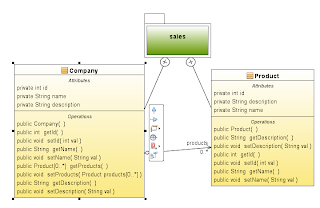
Class Diagram and Actual State
Here is our class diagram:

And here the page with some table containing 2 companies.

What We Will Add
Now I will add a button to each row of the table, which will direct the page to a site where the user could edit the company details and a second button which will allow creating a new company. Before creating web pages again, I will start with defining methods which we will need in Session Beans (the lowest layer) and additional methods and fields in Backing Beans (the middle layer).
New Methods in Session Beans
In the Session Bean, I will add a method called "saveCompany".
public void saveCompany(Company company) {
    company = em.merge(company);
    em.persist(company);
}
This method will take an instance of "Company" object and will perform a "merge" of this object with object in Persistence Context. If there is already object distinguished by the same ID in the Persistence Context, than the Entity Manager will update the state of the object in Persistence Context. If there is no such object, then a new one will be created (or let's say the new Company will be added to the Persistence Context. Then by calling the "persist" method of Entity Manager, the Company will be stored in the database.
Changes in Backing Bean
Now the Backing Bean will need some more changes. I will add a field of type "Company" which will represent a Company which is actually shown or edited. Then instead of using a basic collection of type List,<company> I will use a class called DataModel, which is a part of JSF Framework and allows me to get the row selected by the user in the GUI.
public DataModel companiesModel;
private Company company;
public DataModel getCompaniesModel(){
    companiesModel = new ListDataModel(getAllCompanies());
    return companiesModel;
}
Now when I have the model I am able to get Company object representing the actually selected row. This is show in method "editCompany".
public String editCompany(){
    company = (Company)companiesModel.getRowData();
    return "edit-company";
}
You see that the method returns String, concretely "edit-company". That string represents a name of a navigation rule which will be used by JSF Framework. Basically it means that the user will be redirected to another page which is specified in the faces-config.xml file. That I will show later. First let me put the last 2 new methods in Backing Bean, one for saving and one for creating a new company. Again, the methods return String values for navigation purposes, it will all be clear soon ![Smile | <img src=]() " src="http://www.codeproject.com/script/Forums/Images/smiley_smile.gif" /> .
" src="http://www.codeproject.com/script/Forums/Images/smiley_smile.gif" /> .
public String saveCompany(){
    ssl.saveCompany(company);
    return "show-companies";
}

public String newCompany(){
    company = new Company();
    return "edit-company";
}
New JSF Page to Show Company's Details
Let's create a new JSF JSP page (On the Web Module -> New -> JSF JSP) and call it "company.jsp". This page will be used to specify the company details. The code is quite simple:
<form>
    </form>

<form>
<h1 class="brush:html"><outputtext value="Company Details:" /></h1>

<pre class="brush:html">    <panelgrid columns="2">
         <outputtext value="Name" />
         <inputtext value="#{sales.company.name}" />
         <outputtext value="Description" />
         <inputtext value="#{sales.company.description}" />
    </panelgrid>
    <commandbutton id="btnSave" value="Save" action="#{sales.saveCompany}" />
</pre>
</form>
You see that it uses the h:form tag. This tag is basically later rendered as an HTML form tag. This TAG has to be present if your page contains buttons or other components that perform some action. You see that the action of a button is binded to the "saveCompany" method of our Backing Bean and the value of the input fields are binded to the "company" members again in the Backing Bean.
Changes to Page Containing Table of Companies
Now let's make some changes to the "companies.jsp" page - the page containing the table of all companies. I will add an "Edit" button to each row (by defining a new column) and in the bottom of the page I will add a "New" button. Both of these buttons will use method previously defined in the Backing Bean.
<form>

<h1><outputtext value="Companies List" /></h1>

     <datatable value="#{sales.companiesModel}" var="item">
           <column>
                <facet name="header"><outputtext value="Name" /></facet>
                <outputtext value="#{item.name}" />
           </column>
           <column>
                 <facet name="header"><outputtext value="Description" /></facet>
                 <outputtext value="#{item.description}" />
           </column>
           <column>
                 <commandbutton id="btnEdit" value="Edit" action="#{sales.editCompany}" />
           </column>
      </datatable>
      <commandbutton id="btnNew" value="New" action="#{sales.newCompany}" />
</form>
Notice, that because there are buttons performing actions I had to surround the whole table by h:form tag.
Changes to faces-config.xml
OK - now we have the pages, the last step missing is to explain the navigation rules. As I said before, these rules are managed by JSF Framework, and are "called" by returning string expression of our Backing Beans methods (editCompany, saveCompany, newCompany). Open the file "faces-config.xml" and in the upper tab, select "Page Flow". You will see a diagram of your pages (there should be 3 of them: companies.jsp, company.jsp, index.jsp). Edit the "Page Flow diagram so it will resemble the following one:

You can change the view to XML and see the XML declaration of these rules (the Page Flow diagram is there just to visualize the navigation rules.
<navigation-rule>
    <from-view-id>/companies.jsp</from-view-id>
    <navigation-case>
        <from-outcome>edit-company</from-outcome>
        <to-view-id>/company.jsp</to-view-id>
    </navigation-case>
</navigation-rule>
<navigation-rule>
    <from-view-id>/company.jsp</from-view-id>
    <navigation-case>
        <from-outcome>show-companies</from-outcome>
        <to-view-id>/companies.jsp</to-view-id>
    </navigation-case>
</navigation-rule>
OK. Now you should be ready to start try out the project. In the "index.jsp" page, I added redirect from index page to "companies.jsp" - so you do not have to type the address and it just gets opened after running the project in NetBeans.
<forward page="matchesList.jsf" />
 General
  News
News  Suggestion
  Question
  Bug
Bug  Answer
  Joke
Joke  Praise
  Rant
Rant  Admin
Admin 


 d
d 

![Rose | [Rose]](https://codeproject.global.ssl.fastly.net/script/Forums/Images/rose.gif)