Introduction
Knockout is a new JavaScript library that simplifies data-binding on the client. It can be used to keep a UI and a data-model in sync in a similar way to how Silverlight bindings work. It’s similar in principle to data-linking in jQuery but takes the concept even further. It was written by Steven Sanderson author of one of the best (in my opinion) books on ASP.NET MVC so it’s got a good pedigree behind it. It’s designed to complement the functionality of other libraries such as jQuery and when used together, some really powerful behaviours can be achieved with little effort.
Prerequisites
To run the code, you’ll need Visual Studio 2008 or above with MVC installed. The relevant JavaScript files are included in the sample project but for reference, I’m using Knockout v1.1.1 and jQuery templates downloadable from here along with jQuery 1.4.4
Previously
This article follows on from a previous one I wrote about using list boxes in ASP.NET MVC. For reference, the UI is shown below:
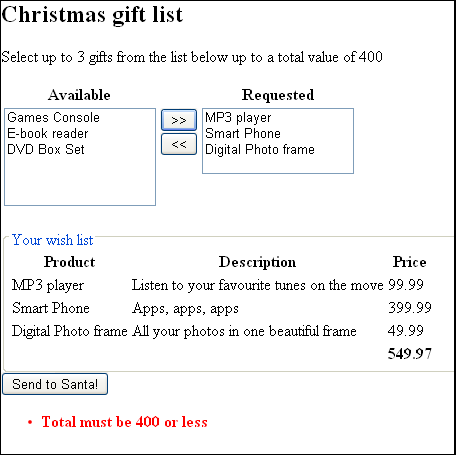
To summarise the behaviour, the user selects one or more items in the available list box and clicks the >> button to move them to the requested list box. Having done so, the details of the chosen items are shown under the list box.
Currently the UI is driven entirely by the web server, when a button is pressed the form is submitted and the server takes the necessary actions to update the view data model then re-displays the updated UI. This works well enough but it would be a much nicer user experience for this behaviour to be client driven; there’s no real need to involve the server in redrawing the interface every time. In this article, we’ll enhance the current UI so that all the display work is done on the client with no involvement from the server beyond the initial set-up and final submit. We’ll do it using progressive enhancement so that the page will still work for non-JavaScript enabled browsers.
Defining the Behaviour
To see what we’re aiming for, let’s define some behaviours we want the page to exhibit, some of which are repeated from the current server driven behaviour.
- Selecting items and pressing the relevant transfer button should move items to the other list box.
- If no items are selected in a list box, the relevant transfer button should be disabled.
- When item(s) are moved from one box to another, the list of product details should update to reflect the new selections.
- If the current selections do not meet the business rules, then the send button should be disabled.
On first inspection, these requirements might not seem too tricky, but consider all the elements that have to be kept in sync; done manually the code could get tangled very quickly. Also there is not enough information in the page to generate the product details list, so we'd need to resort to AJAX or manually manage JavaScript objects to fulfil #3. Knockout simplifies these kinds of tasks considerably.
Using the Code
Let’s start with behaviour #1. The first thing we need to do is to define a view model for the page, this object models the state and behaviour of the UI and is what Knockout uses to perform its bindings. In practice, it’s a bit like a code-behind in a web forms page but more dynamic. To represent the state of the list boxes, we need 2 pieces of information for each: the items in the list box and the items that the user has selected. We want Knockout to be able to track these values so we create them as observable arrays. An observable array is a Knockout object that wraps a standard array and raises notifications when the number of objects in it changes. Our view model then looks like this:
var viewModel = {
            availableProducts: ko.observableArray
		(<%=new JavaScriptSerializer().Serialize(Model.AvailableProducts) %> ),
            availableSelected: ko.observableArray([]),
            requestedProducts: ko.observableArray
		(<%=new JavaScriptSerializer().Serialize(Model.RequestedProducts) %>),
            requestedSelected: ko.observableArray([])
}
In this code, I'm using the JavaScriptSerializer class (available in the System.Web.Script.Serialization namespace) to inject JSON data into the array. Alternatively, we could have fetched the data using an AJAX request to an action method that returns a JsonResult.
Knockout works by applying data-bind attributes to HTML elements to describe the desired behaviour, while this shouldn’t cause any browser problems, it does raise a few potential issues:
- "data-bind" isn’t considered a valid attribute in non HTML 5 scenarios and will cause validation errors in the W3C validator.
- Because it isn’t a valid C# property name, we can’t use the anonymous object initializer syntax to add attributes to HTML created using the HTML helpers, instead we must use the uglier dictionary initializer syntax.
- Some people just plain don’t like mixing this kind of information in with their HTML markup.
Some of these problems can be ameliorated through the use of the jQuery attr command to apply the attributes. For the sake of simplicity, I’ll be applying the attributes directly for the rest of this article but the sample download includes a ‘pure html’ version which passes XHTML 1.1 validation (admittedly in a slightly dirty way) and does all the work in external JavaScript files.
To hook up the data for the list-boxes, we'll use 3 bindings:
- options: tells Knockout which property of our view model represents the options the list box contains.
- selectedOptions: tells Knockout which property of our view model represents the selected options of the list box.
- optionsText: tells Knockout which property of the objects in the array to display for the options text.
To apply these attributes to the select lists, alter the calls to Html.ListBoxFor().
<%=Html.ListBoxFor(m => m.AvailableSelected,
                        new MultiSelectList(Model.AvailableProducts,
			"Id", "Name", Model.AvailableSelected),
                  		new Dictionary<string, object>{{"data-bind",
			"options:availableProducts, selectedOptions:availableSelected,
			optionsText:'Name'"}})%>
Notice that options value isn't supplied; an important concept to understand is that the bindings track the underlying data model not just the values contained in the UI elements themselves. When we select an option in the list box, the selectedOptions array in the view model is populated with all the data for the corresponding product item, not just the id and name which is all we could traditionally get from the value / text format of the HTML select element. This is a really powerful feature as we’ll see.
To set Knockout in motion, add the command ko.applyBindings(viewModel); to the page ready handler. Reload the page and… well nothing should have changed visually, but if you were to examine the list boxes in FireBug or a similar tool, you'd be able to see the changes to the list-box data showing Knockout working.
Right let’s add some behaviour. We are going to apply a new binding to our movement buttons, the click binding. Alter the 2 submits to the following:
<input type="submit" name="add" value=">>" data-bind="click: addRequested" />
<input type="submit" name="remove" value="<<" data-bind="click: removeRequested" />
The click button specifies a function in the view model to run when the item is clicked. Add the following function after the requestedSelected property in the view model:
addRequested: function(){
                var requested = this.requestedProducts;
                $.each(this.availableSelected(), function(n, item) {
                    requested.push(item);
                });
                this.availableProducts.removeAll(this.availableSelected());
                this.availableSelected.splice(0,this.availableSelected().length);
            },
jQuery’s each() function is used to process each item in the selected array and move it into the requested array, these items are then removed from the available array and the selected array cleared. Knockout prevents the default action from occurring as standard so the form will not be submitted when pressing these buttons. The code for removeRequested is the same apart from the arrays used.
A Note about using observableArray
Notice in the code above, I sometimes use requestedSelected without parenthesis and at other times requestedSelected() with them. observableArray is a wrapper for an array not the array itself but the underlying array can be accessed through the use of the () operator. This can lead to confusion so it is important to understand which object you are accessing. The observableArray object defines some functions that have the same names as the equivalent functions for a normal array object, for example push() and splice(). Calling requested.push() and requested().push() would both add an item to the underlying array; however Knockout will only register the change using the former syntax. You need to be careful to ensure any changes to an observable are done through the observable object and not the object it is wrapping. Not all functions are duplicated, so for example, length must be accessed through requestedSelected().length. This inconsistency can be a bit confusing at first but as a rule, any write actions should be made without parenthesis, any read actions should be made with them.
Behaviour #1 is now complete: items can be moved between list boxes. To achieve this, we didn’t need to access the UI components directly but just manipulate the values of the underlying data model. This is neat but hardly revolutionary; we could have achieved the same thing more easily by applying some DOM manipulation. However, our view model is now almost complete and from here implementing the rest of the behaviours is relatively easy, we’ll soon see the approach pay off.
Next up behaviour #2: the transfer buttons should only be enabled if items in the list are selected. Add the following to the “add” button: enable:availableSelected().length > 0 and the following to the remove button: enable:requestedSelected().length > 0. Job done, next! Seriously, how easy was that? The enable binding describes the condition under which the element should be enabled. In this case, the relevant observable array should have items in it. Knockout takes care of the rest for us. Next up that tricky sounding behaviour #3, keeping the keeping the list of product details in sync with the user’s requested items. For this we’re going to need another binding.
The Template Binding
If you look at how the product list gets rendered in the C# code, it basically consists of rendering a table row template for each product in the model’s requested products collection. The template binding in Knockout lets us do the same thing with our client-side data. It uses the jQuery Template engine under the hood (though you can swap in another if you want) so the format should be familiar if you’ve used that before. First we define a named template:
<script id="requestedTemplate" type="text/html">
<tr>
      	<td>${Name}</td>
        <td>${Description}</td>
        <td>${Price}</td>
      </tr>
</script>
That script tag looks a bit weird (note the type) but I think it’s pretty obvious what is going on. Next add the template binding to the tbody tag:
<tbody data-bind='template: { name: "requestedTemplate", foreach: requestedProducts }'>
This just says apply the named template ‘requestedTemplate’ for each item in the requestedProducts array in the view model. And that’s all that is necessary to get the products list working, it will now automatically keep itself in sync with whatever items the user has selected. We also need to update the total of the selected products; to do this, we’ll create a dependant observable, an observable value that itself is dependant on other observables to determine its value:
viewModel.requestedTotal = ko.dependentObservable(function(){
                var total = 0;
                $.each(this.requestedProducts(), function(n, item){
                    total = total + item.Price;
                });
                return total;
            }, viewModel);
Then add a value binding to the span in the table footer:
<span id="total" data-bind="text:requestedTotal().toFixed(2)">
Now as the user moves items about the total will be automatically updated.
Last up is behaviour #4 only enable the send button if the user’s selections conform to our rules. We already know enough to do this one so I won’t include the code here. Creating a dependant observable to track the status or pasting the conditions directly into the enable attribute will get the job done.
The last thing we need to do is send the correct information to the server when the form is submitted. A hidden field of comma separated ids is used to track which products the user has requested. Using a submit binding, we can update this field before the form is submitted:
<form action='<%=Url.Action("Index") %>' method="post" data-bind="submit:onSubmit">
The view model code is shown below:
onSubmit: function(){
                var ids = [];
                $.each(this.requestedProducts(), function(n, item) {
                    ids.push(item.Id);
                });
                $("#SavedRequested").val(ids.join());
                return true;
            }
Returning true from the function allows the form to be submitted normally.
Conclusion
Knockout is another example of the trend towards a more declarative programming style: it allows us to state what we want to happen without needing to specify how it is achieved. Combining it with jQuery, we can achieve some really nice client-side behaviours in our pages with very little work. With the freedom, ASP.NET MVC gives us over our markup and how data can be received we have a server-side platform that enables us take advantage of these developments more easily and produce some really nice user experiences.
History
- 22 December 2010 - Initial upload
I am currently a developer at a management consultancy company.
In addition to all things .NET I have a keen interest in Japan and the Japanese language and hope to be able to combine these passions one day soon.


 General
  News
News  Suggestion
  Question
  Bug
Bug  Answer
  Joke
Joke  Praise
  Rant
Rant  Admin
Admin 


