Introduction
OpenNI is an easy and friendly platform, used for Natural
Interaction (NI) programming to create NI Apps.
This article contains a short description for a beginner NI
programmer on how to create a simple “Hello World” NI App.
Natural Interaction (NI) refers to a concept whereby
Human-device interaction is based on human senses, mostly focused on visual and
auditory senses. NITE™ by PrimeSense, is the middleware that perceives the
world in 3D based on depth images, and translates these perceptions into
meaningful data in the same way that people do. NITE acts as the perception
engine that comprehends user interaction within their surroundings and includes
both computer vision algorithms.
Getting Started
This chapter provides a simple step-by-step tutorial
describing how to initiate a simple NITE project.
1.1 Installing Necessary Software
First thing you’ll need is to download and install the
relevant software (SW) needed:
- OpenNI
- NITE
middleware
- Sensor
related SW (driver)
1.2 Creating an Empty Project that Uses NITE
1.2.1 On Windows
This section describes how to
set up your environment for developing your own applications using NITE in
Windows.
To Create a Simple Project Using NITE
- Create a new Visual
Studio project, or open an existing one on which you want to use the NITE.
- In the Visual Studio menu, open the Project menu and select Project Properties.
- In the C/C++ section, under the General node, locate the Additional Include Directories and add the value of
the
$(OPEN_NI_INCLUDE) environment variable (the default location is C:\Program
files\OpenNI\Include). Also add the value of the $(XN_NITE_INSTALL_PATH)
environment variable followed by \Include (the default location is C:\Program
files\Prime Sense\NITE\Include).
- In the Linker section, under the General node, locate the Additional Library Directories and add the value of
the
$(OPEN_NI_LIB) environment variable (the default location is C:\Program
files\OpenNI\Lib). Also add the value of the $(XN_NITE_INSTALL_PATH)
environment variable followed by \Lib (the default location is C:\Program files\Prime Sense\NITE\Lib). - In the Linker section, under the Input
node, locate the Additional Dependencies and add openNI.lib
and XnVNITE_1_4_1.lib libraries to the field.
- In the Debugging section, locate the Working
Directory and add
$(TargetDir) to the field. This addition will
allow you to debug the application.
1.2.2 On Linux
Both a Windows and a Linux
platform packages are available for downloading, however, this document only
describe how to use the Windows version.
The Actual Code
This section lists the code parts that are required for the
Hello World NI App.
2.1 Adding Global Items
You will need to include the
OpenNI and NITE header files:
#include <stdio.h>
#include <XnOpenNI.h>
#include <XnVNite.h>
XnOpenNI.h will include any
other OpenNI headers that are required. XnVNite.h will include any other NITE
headers that are required.
There are two ways to initialize an OpenNI application; (i) explicitly opening
the sensor and initiating the streams; or (ii) implicitly by using an XML File.
The latter allows more flexibility for the application by enabling a
sensor/streams alteration without recompiling the application.
#define SAMPLE_XML_FILE "../Data/Sample-Tracking.xml"
Now we will add the global variables of the application.
XnBool g_bQuit = false;
XnVSessionManager* g_pSessionManager = NULL;
static XnUInt32 g_nWaveCounter = 1;
Note that the
g_pSessionManager object may also be a local variable but for simplicity and
easier cleanup, I have decided to use it as a global variable.
2.2 Adding the Callback Functions
Callback Functions, in this
case, are used for event handling. Just as you wish that, the application will
trigger your handling function upon a mouse button click or a key strike when
using a mouse or a keyboard. You will also want that when an NI event happens
the application will trigger the NI handling function i.e., Callback Function.
void XN_CALLBACK_TYPE SessionStart(const XnPoint3D& ptFocusPoint, void* UserCxt)
{
printf("Session started. Please wave ...\n");
}
void XN_CALLBACK_TYPE SessionEnd(void* UserCxt)
{
printf("Session ended. Please perform focus gesture to start session\n");
}
void XN_CALLBACK_TYPE OnWaveCB(void* cxt)
{
printf("Hello World - Wave number: %d!\n", g_nWaveCounter);
if(2 <= g_nWaveCounter)
CleanAndExit();
++g_nWaveCounter;
}
2.3 Adding the Main Function
In the Main Function, we will
initiate the entire OpenNI and NITE component and create an endless loop that
will constantly read data from the sensor that NITE will analyze.
2.3.1 OpenNI Entry Point Initialization
First, we will need to
initialize OpenNI entry point, which is xn::Context:
xn::Context context;
xn::ScriptNode scriptNode;
XnStatus rc = context.InitFromXmlFile(SAMPLE_XML_FILE, scriptNode);
if (rc != XN_STATUS_OK)
{
printf("Couldn't initialize: %s\n", xnGetStatusString(rc));
return 1;
}
Here we initiate the Context
implicitly by using the XML file that is located in the SAMPLE_XML_FILE path.
Such a file can be found under the Data folder in the NITE installation folder.
2.3.2 NITE Entry Point Initialization
Second, we will need to
initialize NITE entry point, which is XnVSessionManager:
g_pSessionManager = new XnVSessionManager();
if(NULL == g_pSessionManager)
{
printf("Out of memory\n");
CleanAndExit();
}
rc = g_pSessionManager->Initialize(&context, "Click,Wave", "RaiseHand");
if (rc != XN_STATUS_OK)
{
printf("Error: SessionManager: %s\n", xnGetStatusString(rc));
CleanAndExit();
}
g_pSessionManager->RegisterSession(NULL, &SessionStart, &SessionEnd, NULL);
We initiate the Session
Manager with the OpenNI context that can be used for extracting the depth
stream and with predefined focus and quick refocus gestures.
Here, in order to start an NI
session, you will need to perform either a Wave gesture or a Click gesture.
Once in NI session your hand
will be tracked in order to detect other hand points based gestures (controls).
If tracking is lost for some
reason e.g., that hand got out of the Field Of View (FOV), the session will
continue once a RaiseHand event will happen e.g., the hand returned to the FOV.
The last part of this code piece
is registering the Session function callbacks. This will enable you to print to
screen when the session started (SessionStart()). i.e., the user performed a
focus gesture. When the session ended (SessionEnd ()), i.e., no hand points are
available and the Quick Refocus Grace Period ended (= the default grace period
time is 15 seconds).
2.3.3 NITE Components Initialization
Now we will need to create
and initialize a NITE tree that will detect a Wave gesture. This is a very
simple NITE tree that contains only a single branch: XnVWaveDetector:
XnVWaveDetector wd;
wd.RegisterWave(NULL, OnWaveCB);
g_pSessionManager->AddListener(&wd);
context.StartGeneratingAll();
First, we instantiate a Wave
Detector; wd.
Then, we register to Wave
callback function that will be called once a wave has been detected. Then we
connect the Wave Detector to the Session Manager by adding it to its hand
point’s listeners list.
Once the NITE tree is complete, we can call the StartGeneratingAll() function
that will start generating the streams.
2.3.4 Updating
Since we constantly want to
read data from the sensor and update the NITE components accordingly, we will
need to create an endless loop that will constantly read the sensor streams and
update the NITE tree with them.
while (!g_bQuit)
{
context.WaitAnyUpdateAll();
g_pSessionManager->Update(&context);
}
3 Running the Application
The NIHelloWorld.zip file contains a Windows project that
has the sample code described in this document.
Providing you have an OpenNI compatible Depth sensor and
you’ve followed the instructions listed in this document, you’ll be able to
compile and run this sample. You’ll need to connect the sensor to your computer
and run the application.
3.1 Operating your First NI App
Once the application is
running, stand in front of the sensor at a distance of about 1m to 2.5m.
Perform a Focus gesture to
start the session; either a Wave or a Click. In order to perform a Click
gesture you will need to stretch your hand forward towards the sensor and then
retract your hand a bit backwards in a smooth motion as displayed in the image
below.
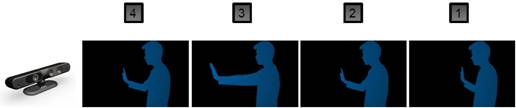
Figure 3-1: "Click" focus gesture
Once you’ve
gained focus, you’ll get a printed notification that indicates it, and
you’ll be able to perform a Wave gesture to print the “Hello World” message on
your screen. In order to exit the application, you’ll need to perform the Wave gesture
twice.
For more information, you may consult the OpenNI Google Group: http://groups.google.com/group/openni-dev
You’ll be able to find more interesting applications, many with their source code, on the OpenNI Arena where developers are showcasing their NI Apps
Lior Cohen is an Application Developer at PrimeSense. In the past two years, he trained and taught programmers from all over the world how to use OpenNI and PrimeSense technologies.


 General
  News
News  Suggestion
  Question
  Bug
Bug  Answer
  Joke
Joke  Praise
  Rant
Rant  Admin
Admin 


