Click here to Skip to main content
15,880,392 members
Articles / Programming Languages / XML

Extending Visual Studio Part 1 - Creating Code Snippets

Rate me:
Please Sign up or sign in to vote.
4.77/5 (30 votes)
14 Apr 2012CPOL4 min read 103.1K   1.7K   103   31
Learn how to extend Visual Studio 2010 by creating custom code snippets.

Extending Visual Studio

This article is part of the series 'Extending Visual Studio'.

Part 1 - Creating Code Snippets
Part 2 - Creating Addins
Part 3 - Item Templates  

Introduction

In this series of articles, I am going to show you some of the fantastic ways that you can extend Visual Studio. Visual Studio is amazingly extensible, there are a number of ways that you can build upon it.

In this article, we'll start with one of the simplest ways to extend Visual Studio - creating Code Snippets.

What are Code Snippets?

A code snippet is a chunk of pre-formatted code that is dropped into the editor, either inserting a new block of code or wrapping an existing block. The snippet can contain some reusable segment of code. As an example, create an empty class and type in 'ctor'. As you type, intellisense will narrow down the choices for you, here we can see a snippet:

extendingvisualstudio1/SnippetScreenshot.png

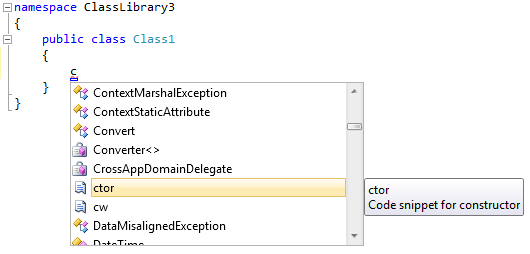
Now press tab twice. The 'ctor' snippet creates the class constructor. You can create all sorts of snippets, let's get started.

The Brief

First let's define what we want the snippet to do. Look at the code below - here you can see two Notifying Properties from my Apex Library.

C#
private NotifyingProperty firstNameProperty =
    new NotifyingProperty("FirstName", typeof(string), string.Empty);

public string FirstName
{
    get { return (string)GetValue(firstNameProperty); }
    set { SetValue(firstNameProperty, value); }
}

private NotifyingProperty secondNameProperty =
    new NotifyingProperty("SecondName", typeof(string), string.Empty);

public string SecondName
{
    get { return (string)GetValue(secondNameProperty); }
    set { SetValue(secondNameProperty, value); }
}

I use these properties all over my code - so this is the ideal candidate for a code snippet. The majority of the code is the same in every case, the only thing that will change is:

  • The name of the property
  • The type of the property

Creating the Snippet

In the example project, I have added the snippet files to a blank C# project - however, we don't need any specific type of project to create a snippet, it's just a bit of XML. Create a new XML file and rename it InsertApexNotifyingProperty.snippet. Use the boilerplate below to get started.

XML
<?xml version="1.0" encoding="utf-8" ?> 
<CodeSnippets xmlns="http://schemas.microsoft.com/VisualStudio/CodeSnippet">
    <CodeSnippet Format="1.0.0">

        <!-- The header contains information describing the snippet. -->
        <Header>
          
          <!-- The Title of the snippet, this will be shown in the snippets manager. -->
          <Title>Insert Notifying Property</Title>
          
          <!-- The description of the snippet. -->
          <Description>Inserts an Apex Notifying Property.</Description>
          
          <!-- The author of the snippet. -->
          <Author>Dave Kerr</Author>
          
          <!-- The set of characters that must be keyed in to insert the snippet. -->
          <Shortcut>apexnp</Shortcut>
          
          <!-- A URL for more help. -->
          <HelpUrl>http://apex.codeplex.com</HelpUrl>
          
          <!-- The set of snippet types we're dealing with - either Expansion or -->
          <SnippetTypes>
            <SnippetType>Expansion</SnippetType>
          </SnippetTypes>          
          
        </Header>
      
        <!-- Now we have the snippet itself. -->
        <Snippet>
                    
            <!-- Sepecify the code language and the actual snippet content. -->
            <Code Language="CSharp" Kind="any">
                <![CDATA[

                    // My first snippet!
                    
                ]]>
            </Code>
        </Snippet>
    </CodeSnippet>
</CodeSnippets>

You may find this boilerplate useful - a link to it is at the top of the page.

Note for Visual Basic: If you're creating a VB code snippet, the in the 'Code' tag, change 'Language' from 'CSharp' to 'VB'. 

So what have we done here? Just created some summary data for the snippet and a very basic piece of content.

Installing the Snippet

Choose 'Tools > Code Snippet Manager' and then select 'Import' - browse to your newly created snippet. Now in any code window, you can key in 'apexnp' and you get the comment '// My first snippet'. Not bad!

extendingvisualstudio1/CodeSnippetsManager.png

Adding Parameters

Let's generalise the code that we want to create. Insert the code below into the snippet file in the 'Code' tag.

C#
private NotifyingProperty PropertyNameProperty =
    new NotifyingProperty("PropertyName", typeof(PropertyType), default(PropertyType));

public PropertyType PropertyName
{
    get { return (PropertyType)GetValue(PropertyNameProperty); }
    set { SetValue(PropertyNameProperty, value); }
}

I've highlighted the key points in red and blue - there are actually only two segments of code we need to replace, the PropertyName and PropertyType strings.

Modify the snippet definition so it looks like this:

XML
<!-- Now we have the snippet itself. -->
<Snippet>

  <!-- Create any declarations that we use in the snippet. -->
  <Declarations>
    <Literal>
      <ID>PropertyName</ID>
      <ToolTip>Enter the property name</ToolTip>
      <Default>PropertyName</Default>
    </Literal>
    <Literal>
      <ID>PropertyType</ID>
      <ToolTip>Enter the property name</ToolTip>
      <Default>PropertyType</Default>
    </Literal>
  </Declarations>

  <!-- Sepecify the code language and the actual snippet content. -->
  <Code Language="CSharp" Kind="any">
    <![CDATA[
                private NotifyingProperty $PropertyName$Property = 
                  new NotifyingProperty("$PropertyName$", typeof($PropertyType$), default($PropertyType$));
                
                public $PropertyType$ $PropertyName$
                {
                  get { return ($PropertyType$)GetValue($PropertyName$Property); }
                  set { SetValue($PropertyName$Property, value); }
                }
            ]]>
  </Code>
</Snippet>

We've added two Literal tags. Literals are replaced in each segment of code. The first part of a literal is the ID - this is what we must surround in dollar signs in the Code tag. The second part is the tooltip that is displayed. The final part is the default value for the snippet. Let's see our updated snippet in action.

extendingvisualstudio1/FinalScreenshot.png

Perfect! It all works exactly as it should.

Installing the Snippet

We can create an installer for the snippet by first creating another XML file named .vscontent. It should look like this:

XML
<?xml version="1.0" encoding="utf-8" ?>
<VSContent xmlns="http://schemas.microsoft.com/developer/vscontent/2005" >
  <Content>
    <FileName>InsertApexNotifyingProperty.snippet</FileName>
    <DisplayName>Insert Apex Notifying Property</DisplayName>
    <Description>Inserts an Apex Notifying Property</Description>
    <FileContentType>Code Snippet</FileContentType>
    <ContentVersion>2.0</ContentVersion>
    <Attributes>
      <Attribute name="lang" value="csharp"/>
    </Attributes>
  </Content>
</VSContent>

Note for Visual Basic: If you need to install a Visual Basic snippet - use 'vb' as the 'value' part of the 'attribute' tag. 

The final thing to do is add the .vscontent and .snippet file into a new *.zip file and rename it from zip to vsi. This creates a VSI installer - double click on it and you get the below:

extendingvisualstudio1/ContentInstaller.png

Important Note: If you get an exception when running the installer, do you have the Windows Phone Developer Toolkit installed? If so, post on http://social.msdn.microsoft.com/Forums/en-US/vsx/thread/6504fde1-b84d-4e4f-80f9-54f6a5596fc0/ and kick up a stink so that Microsoft fixes this bug!

If you need to display publisher information, you must sign the VSI file, some more details are available here: http://msdn.microsoft.com/en-us/library/ms246580.aspx.

Final Thoughts

I hope you enjoyed this article, keep your eyes on my blog for news of the next in the series, www.dwmkerr.com.

License

This article, along with any associated source code and files, is licensed under The Code Project Open License (CPOL)


Written By
Software Developer
United Kingdom United Kingdom
Follow my blog at www.dwmkerr.com and find out about my charity at www.childrenshomesnepal.org.

Comments and Discussions

 
QuestionFound new snippet to vsi converter Pin
Member 432946910-Dec-11 10:56
Member 432946910-Dec-11 10:56 
AnswerRe: Found new snippet to vsi converter Pin
Dave Kerr3-Feb-12 23:54
mentorDave Kerr3-Feb-12 23:54 
GeneralUseful... Pin
janhavib7-Dec-11 19:10
janhavib7-Dec-11 19:10 
GeneralRe: Useful... Pin
Dave Kerr3-Feb-12 23:54
mentorDave Kerr3-Feb-12 23:54 
GeneralMy vote of 5 Pin
ShlomiO6-Dec-11 21:25
ShlomiO6-Dec-11 21:25 
GeneralRe: My vote of 5 Pin
Dave Kerr3-Feb-12 23:54
mentorDave Kerr3-Feb-12 23:54 
GeneralMy vote of 5 Pin
Leo566-Dec-11 20:42
Leo566-Dec-11 20:42 
GeneralRe: My vote of 5 Pin
Dave Kerr3-Feb-12 23:55
mentorDave Kerr3-Feb-12 23:55 
Glad you like it Smile | :)

General General    News News    Suggestion Suggestion    Question Question    Bug Bug    Answer Answer    Joke Joke    Praise Praise    Rant Rant    Admin Admin   

Use Ctrl+Left/Right to switch messages, Ctrl+Up/Down to switch threads, Ctrl+Shift+Left/Right to switch pages.