Introduction
Recently I have started to work with WPF and I found that there is not much information available about a normal desktop application. Let me say that in C Sharp if you want to start with a desktop application you will select MDI (Multiple Document Interface), according to my knowledge there is no such option in WPF. You can add MDI form but that will be a windows Forms application rather a WPF application. I mean it is "MDIParent.cs" file rather "*.xaml" file.
I have created this project with Visual studio 2010 and .Net 3.5 / 4.0.
Background
I was coding for a image processing application, that will exactly behave like a Windows Paint application. But before being able to start I stumble upon the idea of how to create the Menu in WPF ! I searched a lot in the internet and have gone through many tutorials and PDF's as well, but what I found is that, every information is available but in unorganized fashion.
So I thought lets publish an article for the beginners. This article is a very step by step approach so even if you don't download the source code you just follow the procedure and you will learn what I have come know after Five long days.
Using the code
If you've done Windows Forms development, you should love the fact that adding menu items is as easy as writing html. (Of course, if angle brackets get you down, there's always the designer).
The <MenuItem> class defines a Menu Item, which is to say they represent the visible portion of the menu.
Lets start now. In normal WPF window you will find two xaml file "App.xaml" and "MainWindow.xaml". If you double click on the MainWindow.xaml file a simple white main Window will appear. If you open the mainWindow.xaml, the code will be looking like this:
<Window x:Class="supertest.MainWindow"
xmlns="http://schemas.microsoft.com/winfx/2006/xaml/presentation"
xmlns:x="http://schemas.microsoft.com/winfx/2006/xaml"
Title="MainWindow" Height="350" Width="525">
<Grid>
</Grid>
</Window>
Now our aim is to populate the window with menu. So go to toolbox and select "Menu" and drag and drop it to the main window. (You can adjust the size of it if you want). Now immediately after it you will see that mainWindow.xaml has changed
<Window x:Class="supertest.MainWindow"
xmlns="http://schemas.microsoft.com/winfx/2006/xaml/presentation"
xmlns:x="http://schemas.microsoft.com/winfx/2006/xaml"
Title="MainWindow" Height="350" Width="525">
<Grid>
<Menu Height="27" HorizontalAlignment="Left" Name="menu1" VerticalAlignment="Top" Width="503" />
</Grid>
</Window>
Now Menu is created but menu items are absent. Here I will guide you two processes by which you can create menu items like File, Edit, View, Help etc.
First Approach:
Open the Xaml file and remove the "/" from the menu block. Just below that add the four lines the way I have added and also close the Menu tag like </menu>
<Menu IsMainMenu="True" Height="27" HorizontalAlignment="Left" Name="menu1" VerticalAlignment="Top" Width="503" >
<MenuItem Header="_File " />
<MenuItem Header="_Edit " />
<MenuItem Header="_View " />
<MenuItem Header="_Help " />
</Menu> ...
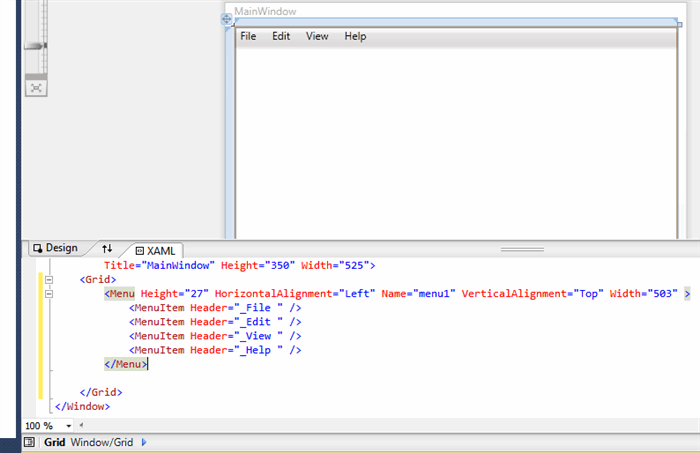
See the image for better understanding
Here is an interesting fact about the "IsMainMenu" property which is exposed by the Menu class, and makes the menu perform as expected when the user presses the Alt or the F10 keys. This property is set to "true" by default for every menu added to your form.
when the user presses Alt or F10. The menu is the one that appears first in the XAML. Then the user tab through all of the menu items. If you want to create sub-menu under a menu say File then add the following xaml code
<Window x:Class="supertest.MainWindow"
xmlns="http://schemas.microsoft.com/winfx/2006/xaml/presentation"
xmlns:x="http://schemas.microsoft.com/winfx/2006/xaml"
Title="MainWindow" Height="350" Width="525">
<Grid> <MenuItem Header="_File" Visibility="Visible" Name="mnuFile" >
<MenuItem Header="_New..." Click="New_Click" >
</MenuItem>
</MenuItem>
<MenuItem Header="_Edit" />
<MenuItem Header="_View" />
<MenuItem Header="_Help" />
</Grid>
</Window>
Now press F5 and you will see "New..." sub menu is added in the File menu. Similar way you can add other menus.
Another Approach:
This approach is very simple, because here you don't have to code in xaml but to follow simple process. In the "mainWindow" click and select Menu bar. Go to Properties and under "Common" attributes select "Items". Click in the Editor button and another window will pop up. Here you will see all the Present Menu items. If you want to add another, just click on "Add" and in the Properties Box under section Header give a name. For example You just click on Add and give Name "Project". close the Window and press F5. You will see Project is another menu item. So till now we have completed adding menu and sub-menu, to make a perfect Desktop Applications. Now we want to add toolbar buttons beside the sub-menus. Like the below image

Here in our application "New..." "Open..." and "Save" menus should display graphics (ala icons) in the left part. This part is quite tricky. Those who are familiar with Windows forms, knows that there is a folder called Resources in Windows Forms and to access those files under it, you just need to give the path in your code behind. But in WPF there is no such folder called Resources in the beginning. Here the procedure is...
(I am supposing that you have already downloaded the png / ico files for New, Open and Save options in the desktop)
In the solution Explorer, double click on "Properties". In the new tab window go to "Resources". Click in the drop down list of "Add Resource". Click in the "Add Existing File". Go to desktop and add the three files, you have downloaded. Close the tab and, you will see that in Solution Explorer Resources Folder is added.
This part is not still over yet. Even if you have put those files under Resources folder, you need to tell the framework that these files will be used as a Resource. Go to Solution Explorer, go to Resources and select any image, go to Properties, go to Advanced and under Build action property Change "None" to "Resource". Similarly do for other files.
Now You can use these files as a toolbar icons, follow the below xaml code,specially the Bold-Italic part:
</MenuItem>
<MenuItem Header="_New..." Name="menuNew">
                    <MenuItem.Icon>
                        <Image Source ="Resources/1340618235_flag-new-blue.png"/>
                    </MenuItem.Icon>
                </MenuItem>
                <MenuItem Header="_Open..."  Name="menuOpen">
                    <MenuItem.Icon>
                        <Image Source ="Resources/1340611542_Open.ico"/>
                    </MenuItem.Icon>
                </MenuItem>
                <MenuItem Header="_Save" Command ="Save" Name="menuSave" >
                    <MenuItem.Icon>
                        <Image Source="Resources/1340613938_save.ico" />
                    </MenuItem.Icon>
                </MenuItem>
When I was coding for this in mainWindow.xaml, it was something similar to below
</MenuItem>
<MenuItem Header="_New..." Name="menuNew" Command="New">
                    <MenuItem.Icon>
                        <Image Source ="Resources/1340618235_flag-new-blue.png"/>
                    </MenuItem.Icon>
                </MenuItem>
                <MenuItem Header="_Open..."  Name="menuOpen" Command="Open">
                    <MenuItem.Icon>
                        <Image Source ="Resources/1340611542_Open.ico"/>
                    </MenuItem.Icon>
                </MenuItem>
                <MenuItem Header="_Save" Command ="Save" Name="menuSave" >
                    <MenuItem.Icon>
                        <Image Source="Resources/1340613938_save.ico" />
                    </MenuItem.Icon>
                </MenuItem>
The only difference this Command="New" was doing is, it put all the sub-menus in inactive / disable state. So even if you try to put a click event like Click="New_Click" it doesn't work. I will tell you later why it is? May be in my Next article.
So till now we have created menu and submenu with icons. Now the final part. My main intention was to guide you about the menu creation like normal desktop application. So that part is done.
Now I will write a simple code to load an image in the main window and try to zoom in - zoom out using mouse wheel.
First put an image box in the grid from Toolbox. By default the name of this will be image1.
Now select Open submenu in xaml file and go to Properties. Select Events. Double click on Click event or beside the Click box writedown the "Open_Click". Here you can see that Open menu has a name menuOpen, don't use any other name, you will get compile time error.
In the Open_Click event in your mainWindow.xaml.cs file put the following code.
    private void Open_Click(object sender, RoutedEventArgs e)
    {
        FileDialog fDlg = new OpenFileDialog();
        fDlg.DefaultExt = ".jpg";
        fDlg.FilterIndex = 1;

        if (fDlg.ShowDialog() == System.Windows.Forms.DialogResult.OK)
        {
            BitmapImage bmp = new BitmapImage();
            bmp.BeginInit();
            bmp.UriSource = new Uri(fDlg.FileName);
            bmp.EndInit();
            image1.Source = bmp;
        }
      }
}
If you didn't get any error at compile time then you are lucky, or may be your Visual Studio Version is added the required Referrence. Many of us will actually get an error in the following line.
FileDialog fDlg = new OpenFileDialog();
You may get an error "The type of namespace FileDialoge doesn't exist in the namespace..."
This is because by default System.Windows.Forms namespace is not included in the WPF References. So in order to add that namespace, right click on References, click on "Add References...". it will again open another window select .Net tab, navigate through "System.Windows.Forms" and select it or double click on it. Now in your mainWindow.xaml.cs file
add the last line of the image, "using System.Windows.Forms" and there will no compile time error.
So we have completed creating menu and sub-menu in WPF. Now its time to run the application. Press F5. Select File, Select New and load an image file in the Image box.
Points of Interest
While I was writing my code I was using a lot of resources from the internet, but there are so much of them and those are not available in organized way, so, I can't put all the name here. Few articles from wpftutorial.net definitely helped me.
I learned a lot of things when I was coding for the menu items in WPF. It was Fun, it was challenging and some times it was frustrating too. That's the reason that being a fresher I started to share my knowledge of whatever I have learned.
Summery
Hope the explanation will help the beginners, specially looking for the menu items creation in desktop applications. Definitely there are and there must be some better approach, better code, written for this kind of Programming / design, what I tried to delve into is purely from a beginners point of view.
James Cameron's films have always been distinguished by ground-breaking technical excellence. However his movies convey nothing about his technical ability.


 General
  News
News  Suggestion
  Question
  Bug
Bug  Answer
  Joke
Joke  Praise
  Rant
Rant  Admin
Admin 


 (
(