Contents
- Prerequisites
- Creation of a WCF service
- Configuring a WCF application on IIS 5
- Configuring a WCF application on IIS 7
- Configure the security parameters for Silverlight
1. Prerequisites
In this article I would like to dive into the configuration and deployment of WCF services used by a Silverlight client on IIS 5 and IIS 7.
The prerequisites for this article are as follows:
1.1 Server side
You should have installed the following:
- Windows XP or Window 7
- IIS installed
- .NET Framework 3.5 or 4.0 (recommended)
1.2 Client side
Silverlight 2, 3, or 4 (preferably the right version of Silverlight; if the right version is not used, the Silverlight application would be non-functional).
1.3. Local Area Network
A Local Area Network is essential to test our application.
2. Creation of a WCF Service
To create a WCF service, you have to define the Service Contract that has to be exposed to the client. An example of a service contract interface for a calculator service is shown below:
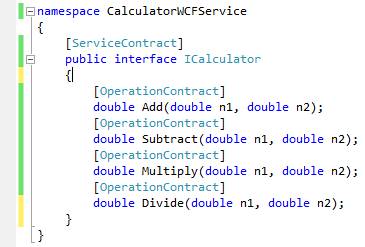
Fig. 1: Defining the Service Contract for the WCF service
Here the interface needs to be marked as ServiceContract and the methods should be marked with the OperationContract attribute, respectively.
If the methods within the interface have parameters to be passed, the parameter types should be either serializable or Data Contracts.
Implement the service in Calculator.svc.cs.

Fig. 2 Implementation of the Calculator service on the server side
Create a web.config containing the address, binding, and endpoint of the service. If the Silverlight client has to be able to access the service, then basicHttpBinding
or pollingDuplexBinding, or NetTcpBinding has to be supported.
Note: PollingDuplex and NetTcp bindings are not supported in IIS 5.
Fig. 3 A sample web.config file
Create a .svc file to include the implementation of the server.
Fig. 4 CalculatorService.svc
Now the WCF service is ready to be hosted and used by the client.
3. Configuring a WCF application on IIS 5
3.1 Check for IIS in the server machine
To check the existence of IIS, click on Start -> Run and type inetmgr in the command window. If IIS is installed, the IIS Management Console opens up.
Fig. 1 IIS Management Console
3.2. Hosting a WCF service on IIS 5
Change the ASP.NET configuration to the version of the .NET Framework in which the WCF service is built.
Fig. 2 ASP.NET configuration for .NET 4.0
Create a virtual directory with the name CalculatorService.
Fig. 3 Organization of the Virtual Directory CalculatorService
Create a folder App_code and drop CalculatorService.cs and CalculatorService.svc.cs in it. Drop the .NET assemblies in the bin folder.
Drop the web.config and CalculatorService.svc files in the virtual directory CalculatorService.
3.3. Testing the WCF service
Type the URL of the WCF service with the path of the SVC file in the virtual directory http://localhost:64692/CalculatorService/CalculatorService.svc
and the page shown below appears:
Fig. 4 Web Service hosted successfully
4. Configuring a WCF application on IIS 7
4.1. Installing IIS 7 in the machine
To install IIS, click on Start -> Run and type appwiz.cpl in the command window and press Enter. Now click on Turn Windows features on/off.
Enable Internet Information Services and ensure that all the subfolders under IIS are checked and click OK. This will install IIS on your machine.
Fig. 1 Enabling IIS features
Also enable Microsoft .NET Framework 3.5.1 and ensure that WCF HTTP Activation and WCF Non-Http Activation are enabled and click OK.
Fig. 2 Enabling .NET Framework 3.5.1
We have to register aspnet_regiis.exe to inform IIS about WCF extensions. On the command prompt,
go to the following path: WINDOWS\Microsoft.NET\Framework\v4.0.30319>asp.net_regiis.exe -i –enable and press Enter.
Fig. 3 Registering aspnet_regiis.exe
To register the WCF extensions, on the command prompt, go to the following path: Windows Microsoft.NET\Framework\\V3.0\Windows Communication Foundation\ServiceModelReg.exe –i
and press Enter.
Fig. 4 Registering WCF extensions
To check the existence of IIS, click on Start -> Run and type inetmgr in the command window and press Enter.
The IIS Management window will open up. Double click on Application Pools. Set the Framework version to 4.0 or 3.5 and set the pipeline either
to Integrated or Classic mode and click OK as shown in the figure below.
Fig. 5 Set Framework and pipeline mode
In IIS, browse to MIME Types and check for verbs and extensions like .xaml, .xbap, .xap as these extensions are used by Silverlight applications.
Note: In IIS 7.0 onwards, these MIME types are already available so we need not have to add them but in case we are using a lower version, then we need to add them separately.
Fig. 6 IIS Management window with the MIME types
4.2. Hosting the WCF service on IIS 7
Change the ASP.NET configuration to the version of the .NET Framework in which the WCF service is built.
Fig. 7 ASP.NET configuration for .NET 4.0
Create a virtual directory with the name CalculatorService.
Fig. 8 Organization of the Virtual Directory patient demo
Create a folder App_code and drop CalculatorService.cs and CalculatorService.svc.cs in it. Drop the .NET assemblies in the bin folder.
Drop the web.config and patientService.svc files in the virtual directory.
4.3. Testing the WCF service
Type the URL of the WCF service with the path of the svc file in the virtual directory http://localhost:64692/CalculatorService.svc, and the page shown below appears.
Fig. 9 Web Service hosted successfully
To view the WSDL, click on the link in Fig. 9.
Fig. 10 WSDL of the WCF service
5. Configure the security parameters for Silverlight
If you need to use the Silverlight client, you need to add two more files to the virtual directory: clientaccesspolicy.xml and crossDomain.xml.
These policies will be the same for IIS 5 and IIS 7.
Fig. 11 Client access policy
In the allow-from tag, we can configure http-request-headers such as SOAP, content-type for supporting MIME.
We could also restrict access to a set of trusted sites by including them in the <domain uri> tag in the allow-from
tag. This will help us overcome Denial of Service attacks from fake clients. If you want to allow access from only one other domain,
such as http://mysite.com, replace the <domain uri="*"/> line within the <allow-from> element
of the clientaccesspolicy.xml file above with the line <domain uri="http://mysite.com"/>.
If a * is used with the <domain-Uri> tag, then all the sites are allowed to access the service. As mentioned above, you will also require
a ClientAccessPolicy to access the Silverlight application. Place ClientAccessPolicy and CrossDomainPolicy in the Virtual Directory,
and now the application is ready.
This member has not yet provided a Biography. Assume it's interesting and varied, and probably something to do with programming.


 General
  News
News  Suggestion
  Question
  Bug
Bug  Answer
  Joke
Joke  Praise
  Rant
Rant  Admin
Admin 


